
Table of Contents
- I Getting started
- II Variables
-
III Operators
- 23. Introduction
- 24. Operator Overloading
- 25. Numeric Operators
- 26. Simple Assignment Operator
- 27. The Complement Operator
- 28. Equality Operators
- 29. Arithmetic operators
- 30. Relational Operators
- 31. Increment and Decrement Operators
- 32. Conditional Operators
- 33. Bitwise Operators
- 34. Compound Assignment Operators
- 35. String Operators
- 36. Regular Expression Operators
- 37. Collection operators
- 38. Object Operators
- IV Control Flow Statements
- V Exceptions
- VI Methods
- VII Closures
- VIII Object-oriented programming
-
IX More object-oriented programming
- 86. Introduction
- 87. Organising your code
- 88. Naming your packages
- 89. Packages and directory structure
- 90. The Shapes demo - packages
- 91. Interfaces
- 92. Referring to objects by their interface
- 93. General advice for interfaces
- 94. The Shapes demo - Interfaces
- 95. Traits
- 96. Trait properties and fields
- 97. Trait methods
- 98. Trait static members
- 99. The class-trait relationship
- 100. Traits and interfaces
- 101. Implementing multiple traits
- 102. The Shapes demo - Traits
- 103. Inheritance
- 104. Subclassing
- 105. Final Classes and Methods
- 106. Abstract classes
- 107. The Shapes demo - Inheritance
- X Going further
Introduction
I like Groovy.
I like the way it lets me use the Java skills I’ve built up over the years but it makes it easier to code solutions to problems. I like the way it doesn’t, well, get in the way. With Groovy I can:
- Easily code small scripts to perform command-line tasks
- Tie together existing systems and libraries - leveraging the breadth and depth of existing Java-based projects
- Write entire applications that can be deployed onto any system running the Java Virtual Machine (JVM) - without having to tell people the code isn’t in Java.
Groovy programs run on the Java Virtual Machine (JVM) and the JVM is installed across a huge spectrum of systems: desktops, servers, mobiles and the Internet of Things. Importantly, the Java world has been going through a great renewal phase. Where once the JVM and the Java programming language were almost synonyms, a range of JVM-based languages have appeared: Groovy, Scala, Clojure, Jython. These aren’t languages that run within a Java program (though many can do just that), these are languages that compile down to JVM bytecode and run in a way that means you don’t even need to tell your SysAdmin that you didn’t write it in Java. What’s more, we’re not at the “cutting edge” of this approach - it’s been going for long enough that you can expect a level of stability that supports the use of these languages in real application development.
In the following sections I aim to guide you through the basics of Groovy. I haven’t really focussed on writing a “How to program” guide nor do I expend a lot of words comparing Groovy with Java. You may also notice that I haven’t included the output of most of the code examples - this is to save some clutter in the text and encourage you pop open a groovyConsole and try the code for yourself. Go on, you know you’ll love it.
I really hope that this tutorial gives you a basis in understanding the Groovy language and I hope that you start to see why I like Groovy so much.
Enjoy!
Duncan (@groovytutorial)
Something Wrong?
If you find something wrong I’d really appreciate you letting me know via the GitHub issue system. Please remember that I’m not a big corporation or an automaton - I can’t respond immediately to queries and I am an assemblage of emotions that respond well to positive encouragement a lot better than negativity.
Bookmarks
Between Groovy and Java there’s a lot of useful websites - this is a few key ones you’ll want to have in your browser.
Core resources to have at-hand:
- The Groovy homepage is a great starting point.
- The latest Groovy API documents are available at:
- The Groovy API - aka the GAPI
- The Groovy extensions to the JDK - aka the GDK
- The Java API always comes in handy
- So do The Java Tutorials
- Whilst not a perfect fit for Groovy, I tend to use the Google Java Style as my stern mentor.
I’ve been establishing www.groovy-tutorial.org to supplement this book with practical Groovy tutorials. Keep an eye out for new content!
Great blogs and sites that provide Groovy coding examples:
- Mr Haki - A really useful site containing heaps of Groovy code examples.
- InfoQ - Another useful site for Groovy articles.
The book Groovy in Action (2nd Edition) will help you go further with your Groovy programming.
If you find yourself stuck and needing some help, the following channels are worth tuning into:
-
StackOverflow’s Groovy tag is really useful
- search for an answer before posting a question
- Check out their article “How do I ask a good question?” - it’s an excellent outline for asking in a way people may answer
- The Groovy Mailing lists are also worth joining and searching
I suggest to anyone within the orbit of Java that “Effective Java (2nd edition)” by Joshua Bloch should not only be read (repeatedly) but always at-hand.
Conventions Used in This Book
I’ve tried to present this book in a manner that will suit both the reader that likes a linear path of front-to-back and those who like to dip in on specific items.
Code
Code is displayed using a monospaced font.
Code presented within regular language looks something like:
Use of
printlnas your primary testing framework is discouraged.
Blocks of code are presented as follows:
def name = "Billy"
println "Hi there $name"
Some code doesn’t feature a title and is presented so as to be more aligned with the flow of the text:
def name = "Billy"
println "Hi there $name"
I’ve opted not to display line numbers with code as it makes copy and paste difficult.
The book formatting/layout process can cause code to be broken over to another line. In these cases a backslash (\) is added at the end of the first line:
def x = 10 \
+ 1
Unfortunately this syntax isn’t always Groovy-compliant and can cause the code to fail. If a code listing doesn’t seem to work your best bet is to remove the backslash and newline.
Asides
I use a variety of asides to note information. These appear with an icon and some text and, on most occasions, feature a title.
Your Rights and This Book
I’m making the “Groovy Tutorial” freely available because I feel that open source projects such as Groovy deserve to have a variety of documentation that helps people use open source software. This body of work is one that took a significant amount of unpaid time but I have benefitted from many people’s work in developing open source software and the associated, freely available text, that they make available.
This work is licensed under a Creative Commons Attribution License - this means that you have the right to share and adapt the text as you see fit but you must give me “appropriate credit, provide a link to the license, and indicate if changes were made. You may do so in any reasonable manner, but not in any way that suggests the licensor endorses you or your use”. If you decide to use the whole text or parts thereof in a manner that derives you an income I think it’d be civil of you to consider contributing to my retirement fund.
All code samples are licensed under the Apache License, Version 2.0. If you would like to browse a subset of the code examples used in this book you’ll find them in the GitHub repository.
The “source” for this book is written in Markdown, based on the LeanPub Manual. You can access the source from my GitHub repository.
I don’t provide any warranties, guarantees or certainties1. You should use this text to help you in your Groovy coding but you are responsible for your journey :)
- … or pekignese↩
Legal Notices
Acknowledgement of trademarks:
- Java™ is a registered trademark of Oracle and/or its affiliates.
- Apple® and OS X® are trademarks of Apple Inc., registered in the U.S. and other countries
- Microsoft® and Windows® are either registered trademarks or trademarks of Microsoft Corporation in the United States and/or other countries.
- Spring IO® and Grails™ are trademarks/service marks of Pivotal Software, Inc. and its subsidiaries and affiliates
- Gradle™ is a trademark of Gradle, Inc. in the United States and/or other jurisdictions.
- Android™ is a trademark of Google Inc.
- Git™ is a trademark of the Software Freedom Conservancy.
None of the companies listed above endorse this book.
The Groovy logo that features on the cover page was sourced from the groovy-website GitHub project
If you believe that any part of this text infringes on your intellectual property, copyright, trademark(s) or any other legal structure then please contact me - I’m sure we can sort it out.
I Getting started
1. Introduction
Getting to know a new programming language can be both fun and, sometimes, frustrating. In this section we’ll get Groovy installed, write the mandatory “Hello, World” program and look at some of the basic aspects of Groovy.
2. Installing Groovy
There are a few methods for installing Groovy on your system and this section will describe the basics for getting started. Before you get started make sure that any installations are for the versions listed in the table below:
| System | Version |
|---|---|
| Java JDK | 8 (7 is fine too) |
| Groovy | 2.4.0 (or higher) |
Don’t Install Groovy
I know this chapter is about installing Groovy but perhaps it’s worth leaving this until later. The Groovy web console is an online Groovy console that should let you run most of the sample code provided in this book. Provided you have web access you can skip through to the next chapter and get straight into writing some code!
However, please note that the web console has some limitations and won’t run code that attempts to access URLs and files.
Install a Java Virtual Machine
All methods for installing Groovy require that you have a Java Virtual Machine (JVM) installed. For the purposes of this book we’ll use the Java 8 SE JDK (Java 8 Standard Edition Development Kit). You’ll notice that Java 8 may also be represented as Java 1.8 - the former is the Java Platform version number (8) and the latter is the version string (1.8).
To install the Java JDK, head to the Oracle site and locate the download appropriate to your platform: Oracle JDK Downloads. For the most part these installs are straight-forward and have enough associated documentation so we won’t go through this step-by-step.
Before moving onto the Groovy installation I’d like to make you aware that the Oracle JDK is not the only version of the JDK available. As you become more comfortable with working in a Java-based environment you might like to take a look at the Open JDK.
Install Groovy
Once you have the JDK installed it’s time to get Groovy. We’ll be using Groovy 2.4 throughout this book. Other (newer) versions may work fine - it’s just that the examples used throughout the book have been tested against Groovy 2.4.
The following subsections will guide you through an installation based on which platform you’re using.
Windows
The Groovy Download page includes links to a Windows installer - download this and run the installer using the provided defaults (it’s as easy as that).
Just make sure you’re downloading a 2.4.x version!
Checking for Groovy in the Start Menu
Once you have the JDK and Groovy installed you should see the GroovyConsole application in your Windows 7 Start menu. Start up the GroovyConsole application and you should be good to go.
Mac OSX and Linux
SDKMAN! is the best tool for getting Groovy running on your system. The homepage is http://sdkman.io/ but you don’t need to visit it to run an installation.
If you are comfortable with using the terminal then you just need to run the following command as a regular user1:
curl -s get.sdkman.io | bash
Once SDKMAN! has been installed, run the following command to determine which versions of Groovy are available:
sdk list groovy
You’ll see a large table of version numbers but are most interested in those marked with 2.4.x - you’ll want the version with the highest value of x (e.g. 2.4.4). To install Groovy you now just call sdk as below:
sdk install groovy 2.4.4
Checking Groovy (all platforms)
Once you have the JDK and Groovy installed, run the following command to double-check your Groovy version:
groovy -v
You should see something like the following output:
Groovy Version: 2.4.0 JVM: 1.8.0_31 Vendor: Oracle Corporation OS: Mac OS X
This tells me that I am running:
- Groovy 2.4.0
- The Oracle Java 8 JVM
- The Apple Mac OS X operating system
Alternatives
The Groovy Download page provides binary and source releases for Groovy. These are perfectly fine to use but you’ll need to setup your system path to get up and running.
For those on Mac OS X you can also explore one of the following package manager options:
Linux users may find Groovy packages in their distribution’s package repository but check the version being installed.
- The
curlcommand line tool is used for transferring data. It’s very likely that your Linux distribution’s package manager (yum,apt-getetc) includes a copy of cURL but if it doesn’t, visit http://curl.haxx.se/ to download it.↩
3. Your first lines of Groovy
The Groovy Console provides a handy environment for preparing and testing basic Groovy scripts. In order to open the console you need to start a command line (or terminal) session and enter the following command:
&
The Groovy Console should look something like the following screen grab:
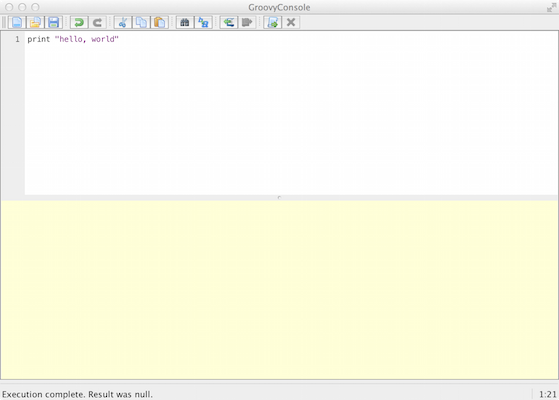
The main parts of the console are:
- The top half is the editor area for adding your Groovy script
- The bottom half is the output area that displays the results of your script
- The menu provides the standard tools for opening and saving files (
File) and cut/copy/paste (Edit) - The
Scriptmenu gives you a number of functions you’ll use as you work through this book:-
Runwill run the script -
Run Selectionallows you to select (highlight) part of your script and run only that section
-
- The
Viewmenu lets you reset the output area (Clear Output)- I’d suggest that you select
Auto Clear Output on Runas this helps reduce confusion
- I’d suggest that you select
Once you have the Groovy Console open, enter the following line in the editor area:
print 'hello, world'
Once that’s ready, go to the menu and select Script -> Run and you should see your output in the bottom half of the window something like the image below:

If you see the output hello, world then congratulations - you’ve taken your first step into a larger world.
Examining the script
Our first Groovy script is very simple: it uses the print method (function) to output the string hello world to the console.
For those that have come from languages such as C++ and Java the script print "hello, world" probably appears to be missing items such as imported libraries for output and “container” or “boilerplate” code that sets up the context of the code. In fact, if we were to write this code in Java it would look something like:
class Hello {
    public static void main(String[] args) {
        System.out.print("hello, world");
    }
}
When I look at the code above I see why Groovy is so appealing to me:
- Groovy lets me focus on solving the problem and not working through so much decoration code.
- Groovy doesn’t need semi-colons at the end of each statement
- Groovy essentially builds the
Helloclass around the script
- The Groovy code is much more readable and this should help reduce bugs (or at least make finding them easier)
- Most Java code is valid Groovy code - you can copy that Java code into the Groovy Console and run it - it will work
- Groovy lets you use the comprehensive standard Java libraries and the extensive third-party libraries written by the Java developer community.
- But also extends these standard libraries with some great timesavers.
Groovy gives us the brevity and flexibility of a scripting language (such as Python, Ruby and Perl) whilst letting us tap into the galaxy of existing Java libraries.
4. Running a script
Now that we can output something to the screen, let’s try and make our example a little more personal. Clear the Groovy Console editor and enter the following:
println "hello, ${args[0]}"
Before we try to run this, let’s look at what’s in the code:
-
printhas becomeprintln- this does the same thing as our previous use ofprintbut adds a new line at the end of the output.- This makes the output easier to read when we’re running on the command line
- Instead of the text
worldwe’re now using${args[0]}:-
argsis a variable (an array1) that holds any command-line arguments we pass to the script- You may have noticed
String[] argsin the Java version ofhello, world- essentially Groovy is writing that segment of code for you. -
args[0]is the first element in theargsarray - this is the first parameter (command-line argument) passed to the script
- You may have noticed
- The
${...}notation tells Groovy that the contents need to the resolved into a value - in this case Groovy needs to determine the value ofargs[0]before displaying the output
-
Don’t worry if this appears to be a big jump from our hello, world - there’s a range of concepts being introduced and we’ll work through them in this tutorial section. For now, put the code into your Groovy Console and know that, when run, your script will say hello to a specified person.
You now need to save your script so go to the File menu and select Save. When prompted, name the file Hello.groovy and save it into a directory you can access.
Unfortunately we can’t run this script in the Groovy Console as it doesn’t provide an option for passing in a command-line parameter. Follow this process to run the script:
- Open a command prompt (terminal) and change to the directory (
cd) into which you savedHello.groovy. - Type the command
groovy Hello.groovy Newmanand press thereturnkey
You should see the following output:
hello, Newman
Of course you can change “Newman” to be any name so feel free to try out your name, the dog’s name etc. However, make sure you add a name - your script needs that parameter or you’ll see a disconcerting error.
- More about arrays in a little bit↩
5. Compiling Groovy
You can compile a Groovy script into a class file - the same type of file that Java developers compile their code into. The resulting class file is in bytecode format that can be read by the Java Virtual Machine (JVM). Once compiled to bytecode, Groovy code can work on the same JVM that runs existing Java systems - this is extremely handy if you work in a Java-centric organisation but want to use Groovy.
In order to compile Hello.groovy we will use the groovyc command in the command-prompt as follows:
groovyc Hello.groovy
When you look at the directory contents you should now see a file named Hello.class. Don’t try to read the contents of the file - it’s now in bytecode.
We’ll explore this further in the Organising your code chapter.
6. Comments
Comments are not read by the Groovy compiler - they’re purely used to help humans follow your code. They’re really important once your code becomes more complex and your programs larger. Key places you’ll see/use comments are:
- When a complex algorithm is being used
- When specific business logic is being implemented
- For documenting interfaces that other coders will use
- To remind you why you chose one approach over another - really handy when you revisit the code in 6-weeks and say “why did I do it that way?”.
Single-line comments
A single-line comment is introduced with two forward slash characters (//):
//This is a single-line comment
println "hello, world"
Single-line comments can be appended to a Groovy statement:
def radius = 10
def pi = 3.14 //This is not very precise
def area = pi * (radius * radius)
Multi-line comments
A multi-line comment is introduced by the characters /* and terminated with the characters */. Generally, the /* and */ appear on their own line:
/*
This is a multi-line comment
and here is the second line
*/
Multi-line comments are most commonly formatted with an asterisk (*) on each line, aligned with the introductory asterisk as follows:
/*
 * This is a multiline comment
 * and here is the second line
 */
Multi-line comments can be introduced and terminated on a single line:
/* This is a multiline comment on a single line */
Nesting within a multi-line comment is not possible, rendering the following code invalid:
/*
 * Multi-line comments cannot
 * /* be nested */
 */
Usage to avoid
In a similar vein to single-line comments, multi-line comments can be appended to a statement. However, the single-line comment is generally more readable than the following example:
def radius = 10
def pi = 3.14 /* This is not very precise */
def area = pi * (radius * radius)
Even less expected is a multi-line comment appended to a statement in the following manner:
def radius = 10
def pi = 3.14 /* This is not very precise
                and should really use java.lang.Math.PI */
def area = pi * (radius * radius)
In such a case the multi-line comment should appear above the statement being discussed:
def radius = 10
/*
 * This is not very precise
 * and should really use java.lang.Math.PI
*/
def pi = 3.14
def area = pi * (radius * radius)
Use of a comment within a statement should never be contemplated as it results in code that is hard to read:
def radius = 10
def pi = 3.14
def area = pi * /* I should find out how to square */ (radius * radius)
Groovydoc
Java provides a very handy tool for documenting the outward-facing aspects of your code - i.e. those items that others may reuse - it’s called javadoc1. Groovy has its own version called groovydoc. Essentially this is the same tool as javadoc but is run over groovy code.
- See the Javadoc guide↩
7. Statements
A Groovy statement is generally completed by an end-of-line (EOL) character such as a carriage return:
def num = 21
println num
A semicolon (;) can be used to explicitly mark the end of a statement however this is deemed to be redundant in most cases and spoils readability:
def num = 21;
println num;
The backslash (\) is used indicates that a statement continues on the next line. The example below uses continuation to break up a long statement:
def solution =  1 * 2 * 3 \
                * 4 * 5 * 6
Without the backslash the code above would cause an error but a minor rewrite will work:
def solution =  1 * 2 * 3 *
            4 * 5 * 6
I would suggest the first version is easier to read and explicitly indicates that you intend to carry into the next line. However, statements can span multiple lines without a backslash provided Groovy can determine that the lines make up a single statement. This feature should be utilised if it aids in improved readability - this is often referred to as line-wrapping. For example, an array declaration that provides a number of entries may be written as:
def myArray = ['Tasmania', 'Victoria', 'New South Wales', 'Queensland', 'Western\
 Australia', 'South Australia']
The judicious use of line-wrapping may improve readability:
def myArray = ['Tasmania',
               'Victoria',
               'New South Wales',
               'Queensland',
               'Western Australia',
               'South Australia']
It is difficult to provide specific metrics regarding readability in these cases and the programmer is left to determine the best use of white space and placement.
Usage to avoid
A semicolon can be used to separate two statements appearing on the same line:
def num = 1 + 1; println num
The presentation of multiple statements in a single line should be avoided - it’s not easy to read and is likely to trip you up at some point.
Groovy is very forgiving of statements spread over more than one line but usage such as the one below should be avoided as it reduces readability. For example, the following code will actually work but it looks odd and isn’t worth the hassle:
def num = 1 +
1
println num
8. The assert statement
The assert statement is perhaps out of order being described here but it will be relied on in many code examples.
The assert statement evaluates a boolean expression (one that is true or false). If the result is false then the assertion has failed, the program is halted and an error is reported. The following example provides an obviously incorrect statement:
assert 1 == 2
An expression can be appended to the assert statement after a colon (:):
assert true == false : 'true cannot be false'
The second expression can be anything Groovy can evaluate and the result is used in the error message. The following example will (unhelpfully) place the number “8.0” in the error message:
assert true == false : Math.sqrt(64)
Handling failed assertions
For the purposes of our tutorial scripts, using asserts is a handy way to demonstrate a result for a problem. However, it’s not good practice to have a program suddenly just quit when an assertion fails. When you start writing large programs, your code should aim to “fail gracefully” unless it’s really in a position where bailing out is the only option.
Groovy (unlike Java) does not provide a mechanism for turning off assertions so be careful about where you use the assert statement in larger systems. Remember that a failed assert raises an Error (which signals a critical problem) rather than an Exception (from which a program is more likely to recover). Arguably, in running (production) systems, assertions are best suited to dark places in code that should never be reached - they flag when the extremely unlikely condition has happened.
The error raised by a failed assertion can be caught within a try-catch and handled but this isn’t how errors are usually treated (we normally just let them happen). The following example illustrates a class handling a failed assertion by logging the problem - don’t be concerned if you don’t follow the code as it utilises a number of concepts not yet visited:
import groovy.util.logging.*

@Log
class AssertionTest {
    static void runTest() {
        try {
            assert true == false : 'true cannot be false'
        } catch(AssertionError err) {
            log.severe "An assertion failed ${err}"
        }
    }
}

AssertionTest.runTest()
The section on Exceptions will explain this syntax in more depth.
Although it’s Java-focussed, check out the Programming with Assertions guide for more information.
9. Reserved Words
| abstract | as | assert | boolean | break |
| byte | case | catch | char | class |
| const | continue | def | default | do |
| double | else | enum | extends | false |
| final | finally | float | for | goto |
| if | implements | import | in | instanceof |
| int | interface | long | native | new |
| null | package | private | protected | public |
| return | short | static | strictfp | super |
| switch | synchronized | this | threadsafe | throw |
| throws | trait | transient | true | try |
| void | volatile | while |
Groovy relies of a number of key words that it reserves for its own use. This means that you shouldn’t use these words for the names of variables and other items you declare. For example, the code below won’t run as package is a reserved word:
def package = 'my package'
10. Packages
Except for very small programs, most Groovy and Java-based programs are made up of packages of code:
- The
packagekeyword is used to designate that a class is part of a package and we’ll cover this more fully in the Organising your code chapter. - The
importkeyword is used to import classes from other packages into a program.
Consider the sample code below:
package test

import java.time.Year

println Year.now()
I’ve indicated that this code:
- Is part of a
packagenamedtest - Needs to use the
Yearclass defined in thejava.timepackage
This notion of packaging allows for thousands of developers to create classes and packages without clashing. If another developer creates a Year class but puts it into a package with a name other than java.time then all will be well. Oh, and you’d never start your own package name with java. - that really won’t work out well for you1.
Before you write any new code you should always check out these resources in the order I’ve given below:
Using the order I’ve provided above lets you look at the libraries providing the Groovy approach first (the GAPI and GDK) then looking at the Java standard library (JDK).
For the rest of this chapter I’ll focus on import as that will help us in the early set of tutorials.
Using import
You can import other classes in a variety of manners - let’s take a look.
Basic Imports
The basic form of imports are the most commonly seen and you should get accustomed to them pretty quickly.
import java.time.Year- This will import the
Yearclass from thejava.timepackage import java.time.*- This is a star (wildcard) import
- This will import all classes in the
java.timepackage
Static imports
Static imports can help your code look a little cleaner as they give you an easy way to refer to useful constants and functions (methods) declared in other code packages2.
import static java.lang.Math.PI- This is a static import
- This lets you import static items from another class
- In this example I’ve imported the
PIconstant from thejava.lang.Mathclass and can now use it as if it was just part of my code:println PI import static java.lang.Math.PI as pi- This is a static import with aliasing
- This is the same as the previous
importbut I can use theaskeyword to rename the item being imported - I’ve decided to usePIbut refer to it using the lowercase form (pi) import static java.util.UUID.randomUUID as generateId- This is also a static import with aliasing but I’ve imported the
randomUUIDstatic method and given in the aliasgenerateId - I can now call
println generateId()in my program import static java.lang.Math.*- This is a static star import and will import all static elements described in
Mathand let me refer to them directly in my program.
I’ve thrown the term static around a lot here - don’t worry too much about this for now as we’ll really only need basic imports for now. The notion of static will be covered when we get to object-oriented Groovy.
Built in Libraries
The following libraries are imported into Groovy by default - you don’t need to do anything to start using them:
java.io.*java.lang.*java.math.BigDecimaljava.math.BigIntegerjava.net.*java.util.*groovy.lang.*groovy.util.*
Groovy is able to make use of classes within these packages without explicitly importing them. You can still declare them with import and you’ll notice various development environments (IDEs) will do this regardless of Groovy’s default - either way it’ll be groovy.
Useful third-party libraries
There is an extensive body of existing Java libraries available to the Groovy developer and it’s best to do some investigating before you write your own code - re-using well-supported libraries is a real time saver - here’s a couple to take a look at:
In the olden days (in Java-time) you’d often have to download the third-party library you wanted, download any other libraries it depended on, store them in the correct place (called a Classpath) and then you could start using it. Time went by and systems such as Apache Maven came along to make it easier to grab a copy of your dependencies. This then lead to The (Maven) Central Repository and made it even easier to grab the libraries you needed.
- There’s actually a package naming convention that is very easy to follow.↩
- We’ll describe how these are written in the Class Methods and Variables chapter.↩
11. Grape
Whilst you can use Maven or (even better) Gradle to grab dependencies, Groovy includes a dependency manager called Grape that you can start using straight away.
Say I wanted to grab a copy of my favourite web page and had worked out that Apache’s HTTP Components would really help me. I can search the Maven Central Repository and find what I need. In fact, that web page even tells me how to use the library with Grape:
@Grapes(
@Grab(group='org.apache.httpcomponents', module='httpcomponents-client', version\
='4.4')
)
Grape uses annotations - essentially the “at” (@) sign followed by a name - to do its thing. In the example above:
-
@Grapesstarts of the grape listing- You need this if you’re grabbing several libraries in the same segment (node) of your code - we can actually ignore this in smaller examples.
- Each grape is declared using
@Graband providing the following:- The
groupthat holds the module - The name of the
module - The required version of the
module
- The
In the code below I use the Apache HTTP Components library to report on the HTTP status line from my request to “http://www.example.org”. I’ve trimmed off the @Grapes as I just need to Grab one module:
@Grab(group='org.apache.httpcomponents', module='httpclient', version='4.3.6')
import org.apache.http.impl.client.HttpClients
import org.apache.http.client.methods.HttpGet

def httpclient = HttpClients.createDefault()
def httpGet = new HttpGet('http://www.example.org')
def response = httpclient.execute(httpGet)

println response.getStatusLine()
You can use a short-form version of @Grab using the format <group>:<module>:<version> - this would let us use the following:
@Grab('org.apache.httpcomponents:httpclient:4.3.6')
Once you start building more complex programs you will probably turn to Gradle but Grape works just fine for these tutorials.
II Variables
12. Introduction
Variables are (perhaps unsurprisingly), items that can change. Essentially a variable is a “box” that can hold a value. Groovy is a “dynamic language” in that it allows you to easily store and manipulate variables regardless of their value. This places it in similar company to Python and Ruby but, as a child of Java, Groovy can also operate as a “typed language”. In typed languages we can specify the data type (e.g. a number or piece of text) of the variable.
Groovy lets us work in both language modes - dynamic and typed - and this flexibility makes it that much easier to use.
13. Declaring Variables
Groovy provides a few ways to create a variable but the best one to start with is to use the def keyword. In the example below I define (def) a new variable named score that can be used to hold a value later in my program:
def score
In the next example I assign score a value of 10 and ask Groovy to display the value of score using println:
def score
score = 10
println score
Instead of declaring score and then assigning it the value 10 I can do this on a single line using def score = 10. I do just this in the example below and then change the value of score (it is a variable after all) - try this in your Groovy Console and the printlns will show you the value of score after it’s been set.
def score = 10
println score
score = 11
println score
You’ll note that the second time I use score I don’t need the def prefix as I’ve already declared score and don’t need to redeclare it.
If we’re declaring a number of variables we could provide a def on each line:
def myNumber
def myName
Alternatively, the previous example could be represented on a single line in which each variable is separated by a comma (,):
def myNumber, myName
You can assign values to variables defined on a single line:
def number1 = 10, number2 = 20
A set of variables can be assigned values from a list (multiple assignment):
def number1, number2
(number1, number2) = [10, 20]

assert number1 == 10
assert number2 == 20
In the next example a third variable is introduced but the assignment list only provides two elements. This will result in number1 and number2 being set but number3 remaining without a value (null):
def number1, number2, number3
(number1, number2, number3) = [10, 20]

assert number1 == 10
assert number2 == 20
assert number3 == null
Finally, we can perform multiple assignment at the point of declaring the variables:
def (number1, number2, number3) = [10, 20, 30]

assert number1 == 10
assert number2 == 20
assert number3 == 30
Variable names
Variable names must meet the following criteria:
- Must start with a letter (upper-case [A-Z] or lower-case [a-z])
- The underscore (
_) is also allowed but this is very strongly discouraged - Must only contain letters, digits (0-9) or an underscore (
_)- The dollar-sign (
$) is also allowed but very strongly discouraged
- The dollar-sign (
- Must not match a keyword (reserved word)
The use of literate variable names that comply to the criteria is encouraged. For example, a variable named x provides little information as to its role whereas accountNumber is likely to be clear within the context of a broader system.
Data Types
Data types define the sort of data a variable can hold. Most programming language feature the following data types:
- Booleans
- A logical value of
trueorfalse
- A logical value of
- Characters and strings
- A character is a single letter, number or symbol (e.g.
#) - A piece of text is referred to as a “string”
- A character is a single letter, number or symbol (e.g.
- Numbers
- Integers (whole numbers) both positive and negative
- Decimals (fractional numbers) both positive and negative
- Dates and times
- You know, like dates and times
- Lists and sets
- A variable that holds a number of values (list)
- A variable that holds unique values (set)
- Maps
- A variable that holds a number of values, each referred to by a key
- Ranges
- A numeric sequence between a start and an end value - e.g. 1 to 10
Being an object-oriented programming language, Groovy lets you also define your own types of objects (called classes).
Groovy allows you to create and use variables without declaring a data type - often called dynamic typing. Java, on the other hand, uses static typing and you need to tell Java the data type you want to use when declaring a variable. Once again, Groovy is flexible and lets you use dynamic or static typing (or both) in your programs.
14. Objects
But what is an object? Well, an object is an encapsulation of properties and methods:
-
Properties and Fields are variables that hold data about the object
- For example, a person object may have properties such as
nameandemail - There is a difference between Properties and Fields but we’ll look into that later.
- For example, a person object may have properties such as
-
Methods are a means for accessing and manipulating the object’s properties
- For example a person object may have methods such as
getName()andsetName(name) - Methods can take parameters and/or return values. For example:
getName()would return the person’s name; andsetName(name)takes 1 parameter (name) and sets the person’s name to that value - Methods are sometimes called functions
- For example a person object may have methods such as
We use the class structure to define this assembly of properties and methods.
Declaring and using a class
Let’s look at a Groovy script that declares a new class:
class Person {
    def name
    def email

    def getName() {
        return this.name
    }

    def setName(name) {
        this.name = name
    }

    def getEmail() {
        return this.email
    }

    def setEmail(email) {
        this.email = email
    }
}

// Create a new variable to hold an instance of the Person class
def david = new Person(name: 'David', email: 'david@example.com')

// Change David's email address:
david.setEmail('dave@example.com')

// Print out David's information
println david.getName()
println david.getEmail()
A class is defined using the class keyword and it’s best practice to use an uppercase letter for the first character: class Person {
We declare the two properties in much the same way as we do for any variable:
def name
def email
A number of methods are declared to let us set and retrieve (get) the values of the object’s properties:
def getName() {
    return this.name
}

def setName(name) {
    this.name = name
}

def getEmail() {
    return this.email
}

def setEmail(email) {
    this.email = email
}
After we’ve declared the Person class we can now create instances of the class and assign values to the properties:
def david = new Person(name: 'David', email: 'david@example.com')
We use def david as we would for other variables and then use new Person to indicated that david will hold an instance of the Person class. Lastly we call a special method called a constructor that Groovy provides us for our objects: (name: 'David', email: 'david@example.com'). This sets up david with starting values for the properties.
At some point David changes his email address so we call the setEmail method:
david.setEmail('dave@example.com')
You can see that the method call uses dot-point notation of <variable name>.<method name> - the dot (.) separates the variable name (david) from the method (setEmail).
Lastly, we use the two get methods to display david’s information:
println david.getName()
println david.getEmail()
The example Person class has demonstrated a number of Groovy’s object-oriented programming syntax:
- Creating a new class with properties and methods
- Creating a new instance of the class and calling its constructor
- Changing (setting) and retrieving (getting) the instance’s properties
You can create lots of Person instances and each will exist in their own context. This means that david and sarah don’t get mixed up:
def david = new Person(name: 'David', email: 'david@example.com')
def sarah = new Person(name: 'Sarah', email: 'sarah@example.com')
Useful Methods
In the Groovy/Java family tree, java.lang.Object is the grand-daddy of all classes. Using a system called “inheritance”, each new class inherits attributes such as methods and properties from their forebears. Even the Person class I described above inherits from java.lang.Object and the Groovy developers have enhanced that class further! This means that all classes have built-in features that we can access. Let’s look at a few of them.
class
The class property is used to access the Class that defines the object. This can be really useful when we want to check what sort of object we’re dealing with.
class Person {
    def name
    def email
}

def david = new Person(name: 'David', email: 'david@example.com')

println david.class.name
dump()
This will return a String that describes the object instance’s internals. Try out the following code to see what gets dumped:
class Person {
    def name
    def email
}

def david = new Person(name: 'David', email: 'david@example.com')

println david.dump()
with()
This method works with closures (we’ll cover them later) to give us an easy format for accessing a object’s properties in methods. In the example below I wrap some code using with and don’t have to use david.name and david.email to access those properties:
class Person {
    def name
    def email
}

def david = new Person(name: 'David', email: 'david@example.com')

david.with {
    println name
    println email
}
Existing classes
The great strength/benefit/bonus of an object-oriented programming platform such as Java is the vast array of existing libraries of objects that you can reuse in your code. In Groovy and Java the listing of these available objects are referred to as the Application Programming Interface (API).
If we were going to create a variable to hold a string (a piece of text) we would do something like:
def quote = 'Well may we say "God save the Queen", because nothing will save the\
 Governor-General!'
We could also use the following code to do exactly the same thing as the code above:
def quote = new String('Well may we say "God save the Queen", because nothing wi\
ll save the Governor-General!')
This looks similar to the way we created an instance of the Person class - we create a new instance of String and pass the text into the constructor.
Now that we have our quote string we actually also get a number of methods that help us handle our variable:
def quote = 'Well may we say "God save the Queen", because nothing will save the\
 Governor-General!'

//Display the quote in upper case letters
println quote.toUpperCase()

//Display the quote backwards
println quote.reverse()

//Display the number of characters in the quote
println quote.size()
The example above demonstrates how we can call methods on an object instance and you’ll see this used in the rest of the tutorials. Be sure to try out the code above to see what it does!
Classes and literal values
Literal values are best thought of the value you would write down:
- Boolean:
- true
- false
- Numbers:
- 42
- 3.14
- Strings (text):
- ‘hi there’
We can call methods directly on literal values as Groovy will create an appropriate object instance for us:
assert 1.plus(1) == 2
This definitely looks a bit odd but think of it this way:
- Groovy sees the literal value
1followed by a method call - Groovy creates a number object instance for
1 - Groovy then calls the
plusmethod against the new number instance
This can start to be very useful when you look at lists and ranges - something we’ll get to soon.
Lastly, as the literal is put into an object we can access methods and properties for the object. In the example below I can see what data type Groovy is actually using when I use 3.14:
println 3.14.class.name
15. Booleans
Boolean variables are perhaps the simplest and can hold a value of either true or false.
def truth = true
def lies = false
Useful Methods
Booleans have a small number of methods that you generally won’t find yourself using as they (mostly) have equivalent operators that are more “natural” to read and write.
The and(right) method performs a logical ‘and’
def truth = true
def lies = false
assert truth.and(lies) == false
The conditional And operator (&&) is equivalent to the and method and the assertion above could also be written as assert truth && lies == false
The or(right) method performs a logical ‘or’
def truth = true
def lies = false
assert truth.or(lies) == true
The conditional Or operator (||) is equivalent to the or method and the assertion above could also be written as assert truth || lies == true
16. Numbers
There are two main types of numbers you’re likely to need:
- Integers (whole numbers)
- Decimals
Groovy also gives us scientific notation and other number systems and we’ll take a look at how you use them.
Integers
Integers are whole numbers and can be negative or positive:
def age = 27
def coldDay = -8
Groovy will also handle very large numbers:
// 1 astronomical unit (au)
def distanceEarthToSun = 149597870700
def distanceNeptuneToSun = distanceEarthToSun * 30
Decimals
Decimal numbers provide a fraction and can be negative or positive:
def pi = 3.14159

// Measured in celsius
def absoluteZero = -273.15
Scientific notation
Base-10 (decimal) scientific notation ( ) can also be used by placing an
 e or E before the exponent:
def atomicMass = 1.67e-27
The next example sets the au variable to  and then checks to make sure I haven’t messed up the exponent:
def au = 1.49597870700e11
assert au == 149597870700
In the previous two examples you can see a signed (positive or negative) integer as the exponent:
-
e-27is negatively signed -
e11can also be written ase+11and is positively signed
Number Systems
Most of the time we deal with decimal (base-10) numbers but there are other number systems out there. If we want to use the number 15 in base-10 we just type 15 but we can also use:
- Binary (base-2) by prefixing
0b- That’s a zero followed by lower-case “b”
- Octal (base-8) by prefixing
0- That’s just zero
- Hexadecimal (base-16) by prefixing
0x- That’s a zero followed by lower-case “x”
The code below illustrates the many faces of the number 15 (base-10):
println 0b1111    //Binary
println 15         //Decimal
println 017       //Octal
println 0xf       //Hexadecimal
To help you deal with long numbers Groovy lets you use underscores (_) to visually break up the number without changing its value:
assert 1_000_000 == 1000000
assert 0b0001_0110_1101 == 365
Let’s close with a joke:
def value = 0b10

println "There are only $value types of people in the world - those who know bin\
ary and those who don't"
Useful Methods and Properties
Groovy (Java) numbers trace their lineage (inherit) back to java.lang.Number. The Number class provides methods to covert between different types of numbers (integer, decimal etc) - we’ll cover this in the chapter on Data Types.
Most numerical classes (e.g. Integer) provide the handy max and min methods that let you compare two numbers of the same numerical type:
assert Integer.max(10, 2) == 10
assert Integer.min(10, 2) == 2
17. Strings
There are two main ways in which you can declare a string in Groovy: single or double quotes
| Method | Usage |
|---|---|
Single quotes ('...') |
These are fixed strings and tell Groovy that the string is as we’ve written it (e.g. def pet = 'dog'). |
Double quotes ("...") |
These are called GStrings and let us interpolate (insert) variables into our string. (e.g. def petDescription = "My pet is a $pet") |
Three single quotes ('''...''') |
A multi-line fixed string |
Three double quotes ("""...""") |
A multi-line GString |
Here’s a quick example of a fixed string and a GString in action:
def pet = 'dog'
def petDescription = "My pet is a $pet"
println petDescription
Escape sequences
Strings can contain escape sequences, allowing you to use non-printable characters in your text.
| Sequence | Character |
|---|---|
| \n | line feed |
| \f | form feed |
| \r | carriage return |
| \t | horizontal tab |
| \’ | single quote |
| \” | double quote |
| \\ | backslash |
The line feed (\n) is often used to move to a new line:
print 'Hi \n there\n'
You’ll notice the use of print in the example above - the final \n performs the same as println and moves to a new line.
The form feed (\f) and carriage return (\r) aren’t often used. Form feed indicates a new page and carriage return goes back to the start of the line.
The horizontal tab (\t) is essentially the same as the tab key on your keyboard. It’s useful for formatting things like tables of information:
println 'name\tage\tcolour'
println 'Sam\t12\tblue'
println 'Alice\t8\tgreen'
If you wish to use a quote within your string that matches the quote type you’re using to surround your string then you need to escape the internal quote using the \ character. In the code below you can see the quotes being escaped (\' and \"):
println 'That\'s mine'
println "I said \"NO!\""
As the backslash (\) is used to escape characters, it needs an escape of its own. In order to use a backslash in a string you need to double it up (\\) as in the example below:
println 'c:\\documents\\report.doc'
GStrings
In order to have Groovy interpolate the value of a variable we use the $ symbol in front of the variable name - as you can see with $pet below:
def pet = 'dog'
println "I own a $pet"
This can be handy if you have a number of variables that you’d like to use in a string:
def name = 'Sally'
def hobby = 'surfing'
println "Did you know that $name likes $hobby?"
GStrings also let you interpolate more complicated expressions into a string by using ${...}. In the following example we perform a calculation within the GString:
println "10 to the power of 6 is ${10**6}"
We can also access information about a variable in the same manner:
def word = 'Supercalifragilisticexpialidocious'
println "$word has ${word.length()} letters"
Multiline Strings
The examples given so far use short strings but longer strings would be cumbersome to type using \n all over the place. Instead, Groovy provides multiline strings - the code below declares a multiline fixed string:
def poem = '''But the man from Snowy River let the pony have his head,
And he swung his stockwhip round and gave a cheer,
And he raced him down the mountain like a torrent down its bed,
While the others stood and watched in very fear.'''

print poem
If you run the code above you’ll see that new lines are used at the correct points in the display but the first line is not quite right. You can modify this slightly and place a backslash (\) at the start of the string - using statement continuation for readability:
def poem = '''\
But the man from Snowy River let the pony have his head,
And he swung his stockwhip round and gave a cheer,
And he raced him down the mountain like a torrent down its bed,
While the others stood and watched in very fear.'''

print poem
GStrings can also be defined using the multiline format:
def animal = 'velociraptor'

println """But the man from Snowy River let the ${animal} have his head,
And he swung his stockwhip round and gave a cheer,
And he raced him down the mountain like a torrent down its bed,
While the others stood and watched in very fear."""
Building Strings
Working with basic strings is fine but if you need to build up a large piece of text throughout a program they can become very inefficient. We’ll look into this in the tutorial on Operators.
Useful Methods
Strings (text) are important aspects to human-based systems so most programming languages provide a number of methods for modifying, search, slicing and dicing strings. Groovy provides a number of helpful methods you can use with strings and we’ll look at just a few of them here:
-
length(): returns the number of characters in a string -
reverse(): returns the mirrored version of the string -
toUpperCase()andtoLowerCase(): returns the string with all of the characters converted to upper or lower case.
def str = 'Hello, World'
println str.length()
println str.reverse()
println str.toUpperCase()
println str.toLowerCase()
The trim() method returns the string with any leading and trailing whitespace removed:
def str = '  Hello, World  '
println str.trim()
The substring method returns a subsection of a string and can be used in two possible ways:
- Provide a start index (e.g.
substring(7)) to get the subsection that includes that index (i.e. the 7th character in the string) through to the end of the string - Provide a start and an end index (e.g.
substring(7, 9)) to get the subsection that includes that start index through to the end index of the string
def str = 'Hello, World'
println str.substring(7)
println str.substring(7,9)
A number of methods are provided to help you with basic searching:
- The
indexOfandlastIndexOfmethods return the index (location) of the specified character in the string -
contains,startsWith, andendsWithreturntrueorfalseif the supplied parameter is located within the string
def str = 'Hello, World'

//These methods return the index of the requested character
println str.indexOf(',')
println str.lastIndexOf('o')

//These methods check if the string contains another string
println str.contains('World')
println str.startsWith('He')
println str.endsWith('rld')
The replace method lets us provide a string that we want to change to a new value:
def str = 'Hello, World'

println str.replace('World', 'Fred')
Lastly, and a favourite of mine, is toURL(). This converts a String to a URL object which, in Groovy has a great text
property that lets us load the text of our favourite web page:
println 'http://www.example.com/'.toURL().text
18. Collections
Collections group a number of values in a single container. The Java Collections Framework provides a really extensible and unified approach to handling collections. Groovy makes these even easier to use and focusses on two key collection types:
- Lists: provide a container for several values
- Maps: use keys as a method for indexing a set of values
Lists
List variables contain several items and are declared using square brackets ([...]).
The example below declares a variable (temperatures) as an empty list:
def temperatures = []
The next examples declares the temperatures list with some initial values:
def temperatures = [10, 5, 8, 3, 6]
In the temperatures example the list contains just numbers but Groovy lists can contain a mix of data types:
def mixed = [1, true, 'rabbit', 3.14]
println mixed[2]
println mixed[-3]
println mixed.get(3)
The square brackets [] are used to create a list but are also used to refer to indexes in the list (e.g. mixed[2]) - this is often referred to as subscript notation. In the example above you’ll notice I’ve printed out mixed[2] - the list item with index (subscript) 2. Somewhat confusingly this causes rabbit to be displayed. This is because lists are zero-based and the first item is at index 0, not index 1. Where we use mixed[2] we’re asking for the third item in the list.
It may surprise some programmers that println mixed[-3] is valid - it’s a very handy approach to accessing list items from the end of the list. Item -1 is the last in the list so mixed[-3] will be the value true.
The get() method can also be used to access a list element by its index - e.g. mixed.get(3) gives us 3.14.
I can provide multiple indexes in the subscript notation and grab the specified elements from the list. In the example below I grab elements 0 and 2 (temperatures[0, 2]) and then elements 1, 3 and 4 (temperatures[1, 3, 4]):
def temperatures = [10, 5, 8, 3, 6]
assert temperatures[0, 2] == [10, 8]
assert temperatures[1, 3, 4] == [5, 3, 6]
Ranges can also be used in the subscript notation and, as demonstrated in the example below, return a list containing the items whose indexes are included in the range:
def temperatures = [10, 5, 8, 3, 6]
assert temperatures[1..3] == [5, 8, 3]
We can also use a mix of individual indexes and ranges as we see fit:
def temperatures = [10, 5, 8, 3, 6]
assert temperatures[0..1, 3] == [10, 5, 3]
assert temperatures[0..1, 1..3] == [10, 5, 5, 8, 3]
assert temperatures[0..1, 1..3, 4] == [10, 5, 5, 8, 3, 6]
What? Let’s take a look:
-
temperatures[0..1, 3]returns a list containing the elements oftemperatureswith the indexes 0, 1 and 3 -
temperatures[0..1, 1..3]returns a list using two ranges to select the indexes. As index item1is requested twice, the returned list features the item (5) twice. -
temperatures[0..1, 1..3, 4]does the same as the previous statement but adds in the item at index4
Adding elements
To add an element to a list we use the add() method or the << operator:
def mixed = [1, true, 'rabbit', 3.14]
mixed << 'biscuit'
mixed.add(101)
println mixed
Sets
Sets are much like lists but each element in a set is unique:
def names = ['sally', 'bob', 'sally', 'jane'] as Set
println names
If you try the code above you’ll get [sally, bob, jane] - the set just ignores the repeated element.
Useful List Methods
The size() method returns the number of elements in the list:
def periodic = ['hydrogen', 'helium', 'lithium']
println periodic.size()
The first() and last() methods return the first and last elements in a list. The head() method is synonymous with first().
def periodic = ['hydrogen', 'helium', 'lithium']
println periodic.first()
println periodic.head()
println periodic.last()
The tail() method returns the list minus the first (head) element and the init() method returns the list minus the last element:
def periodic = ['hydrogen', 'helium', 'lithium']
assert periodic.tail() == ['helium', 'lithium']
assert periodic.init() == ['hydrogen', 'helium']
The contains() method returns true if the requested element is contained in the list:
def periodic = ['hydrogen', 'helium', 'lithium']
assert periodic.contains('helium') == true
The reverse() method returns the mirror of the list:
def periodic = ['hydrogen', 'helium', 'lithium']
println periodic.reverse()
The sort() will sort the elements in a “natural” order. Basically, this relies on the list elements being comparable in some manner. The sort method is best used when the list contents are all of the same type (e.g. strings or numbers):
def periodic = ['hydrogen', 'helium', 'lithium']
periodic.sort()
The asImmutable() method is a handy way to set the list contents in stone - “Immutable” essentially means “unchanging”.
def friends = ['fred', 'sally', 'akbar'].asImmutable()

//This next line will cause an exception:
friends << 'jake'
Maps
Maps allow us to build up a type of look-up table using keys and values. Other languages call these dictionaries or associated arrays.
An empty map is declared using [:] and the example below shows this in use when declaring the periodic variable.
def periodic = [:]
Each key in a map is unique and points to a value in the map. In the example below we see the start of a basic periodic table by declaring a variable (periodic) with a set of key-value pairs (key: value) each separated by a comma (,) and held within square brackets ([...]):
def periodic = ['h': 'hydrogen',
		'he': 'helium',
		'li': 'lithium']

println periodic['li']
println periodic.li
println periodic.get('li')
You should also note that we can access map items using:
- The key in square brackets (
[])- Much as we did with lists:
println periodic['li']. - This is often referred to as subscript notation.
- Much as we did with lists:
- We can also use the period (
.) followed by the key:- As in
println periodic.li. - This is often referred to as dot-point notation
- As in
- Lastly, the
get()method is passed a key and returns the associated value
The keys in a map can be names provided they adhere to the same rules we follow for variable names. That means that the keys in periodic don’t have to be written as strings:
def periodic = [h: 'hydrogen',
        he: 'helium',
        li: 'lithium']
Adding elements
To add an element to a map we can use the square bracket, dot-point notation, << operator, or put() method to add on a new key/value pair:
def periodic = ['h': 'hydrogen',
        'he': 'helium',
        'li': 'lithium']

periodic['be'] = 'Beryllium'
periodic.b = 'Boron'
periodic << ['c': 'Carbon']
periodic.put('n', 'Nitrogen')

println periodic
Keys
Map keys don’t have to be strings - they can be a mix of strings, numbers or other objects. Let’s look at an example then go through the various bits of code:
class Chicken {
    def name

    String toString() {
        return "I am $name".toString()
    }
}

def cluckers = new Chicken(name: 'Cluckers')

def mixedMap = [
        12        : 'Eggs in a carton',
        'chicken' : 'Egg producer',
        (cluckers): 'Head chicken'
]

println mixedMap[12]
println mixedMap.get(12)

println mixedMap.chicken
println mixedMap['chicken']
println mixedMap.get('chicken')

println mixedMap[(cluckers)]
println mixedMap.get(cluckers)

println mixedMap
In the example above:
- I create a new class (
Chicken)- … and store a new instance of
Chickenin the variablecluckers
- … and store a new instance of
- I then create a map variable called
mixedMapwith different types of keys:-
12is a number -
'chicken'is a string -
(cluckers)indicates that the key is a variable value
-
- I use the square-bracket notation and
getmethod to access the value aligned to the key12-
mixedMap.12won’t work
-
- I use the square-bracket, dot-point and
getmethod to access the value aligned to the key'chicken' - I use the square-bracket notation and
getmethod to access the value aligned to the key(cluckers)mixedMap.cluckers
-
println mixedMapis called to display the map contents
For those interested in such things, the (cluckers) key isn’t affected if I change the value of cluckers later on. If you append the code below to the chicken example you’ll see that mixedMap.get(cluckers) will now return null as the match fails. You’ll also notice that println mixedMap is the same output you get before changing cluckers:
cluckers = new Chicken(name: 'Bill')
println mixedMap.get(cluckers)
println mixedMap
Useful Map Methods
As with lists, the size() methods returns the number of elements in a map.
The get method can be used to get the value for the requested key. A second optional parameter can be provided and is returned if the map does not contain the requested key:
def periodic = ['h': 'hydrogen',
        'he': 'helium',
        'li': 'lithium']

println periodic.get('he')
println periodic.get('he', 'Unknown element')
println periodic.get('x', 'Unknown element')
The keySet() method returns a list containing all of the keys in a map and values() returns a list of the values in a map:
def periodic = ['h': 'hydrogen',
        'he': 'helium',
        'li': 'lithium']

println periodic.keySet()
println periodic.values()
The containsKey() and containsValue() methods are useful for checking on map contents:
def periodic = ['h': 'hydrogen',
        'he': 'helium',
        'li': 'lithium']

println periodic.containsKey('li')
println periodic.containsValue('carbon')
The asImmutable() method works for maps in the same manner as it does for lists:
def periodic = ['h': 'hydrogen',
        'he': 'helium',
        'li': 'lithium'].asImmutable()

//This will cause an exception:
periodic.x = 'new element'
19. Arrays
For my money, the collections we’ve just looked at (lists, sets, maps) are more versatile than arrays and collections are my preferred approach. However, there’s a lot of code out there using arrays so let’s take a quick look.
Arrays contain a fixed number of elements of a specified data type. Let’s look at an example of array declaration and usage:
Number[] point = new Number[2]

point[0] = 27
point[1] = -153

assert point.length == 2
So let’s dissect that chunk of code:
- The
pointvariable is declared usingNumber[] point = new Number[2]-
Number[]indicates that we want an array of Numbers -
[]indicates that the variable is an array, not just a single Number value -
new Number[2]setspointto be an empty array that can contain two (2) elements of theNumberclass (or a subtype thereof). - Don’t use
defas we’re specifying the data type
-
- Arrays are zero-based, meaning that the first element is at index 0
-
point[0]is the first element -
point[1]is the second
-
-
point.lengthreturns the number of elements in the array- Note that the range of indexes for an array is
0..(point.length - 1) -
point.size()would also work and provides the same result aspoint.length
- Note that the range of indexes for an array is
If I’d tried something like point[2] = 99 I would get a java.lang.ArrayIndexOutOfBoundsException as the array can only hold 2 elements.
It’s important to note that the size of an array is fixed at declaration. If you decide that you need to expand the array then you’ll slap your forehead and ask “Why didn’t I use collections?”. If you dig your heels in and stay with arrays you might check out the java.lang.System.arraycopy method and learn the gentle art of copying and resizing arrays. Then, you’ll start using collections.
We can be more direct in creating the array and provide the values up-front. In the example below I create an array that can hold two elements and I load the values into the array:
Number[] point = [27, -153]
So, why did I pick Number? Well, I want an array of numerical values but perhaps wasn’t sure which type of numbers. Provided the values I put into the array are subtypes of Number, all will be well. That means the following will work fine and nothing will be truncated:
Number[] point = [27.9, -153]
If I really wanted to be specific about the type of number I could have declared point as an array of Integer values:
Integer[] point = [27, -153]
Arrays can also be declared to be of a primitive type such as int1:
int[] point = [27, -153]
Going further with subtypes etc, arrays can be of any type and the Object class provides a flexible type when your array needs to hold a mixture of values (e.g. numbers, strings, various types):
Object[] bag = new Object[4]
bag[0] = true
bag[1] = 'Rabbit'
bag[2] = 3.14
bag[3] = null
Without wanting to be repetitive, the example above would probably be easier to work with if we used a collection such as a list.
Manipulating arrays
We’ve seen the size() method and length property - both indicating how many elements the array can hold.
Sorting an array is easy with the sort() method:
Number[] nums = [99, 10.2, -7, 99.1]
nums.sort()
println nums
Of course sort() works well if the element types have a meaningful sorting order but try out the following code and you’ll see that the sort() perhaps isn’t overly useful on mixed values:
Object[] bag = new Object[4]

bag[0] = true
bag[1] = 'Rabbit'
bag[2] = 3.14
bag[3] = null

println bag.sort()
Use the Arrays.asList() static method to get a copy of an array into a list (collection):
asListNumber[] nums = [99, 10.2, -7, 99.1]
def list = Arrays.asList(nums)
Alternatively, you can use the as operator to cast the array to a List.
asNumber[] nums = [99, 10.2, -7, 99.1]
def list = nums as List
Check out the java.util.Arrays class for more array methods.
- Primitive types are discussed in the Data Types chapter.↩
20. Ranges
Ranges define a starting point and an end point. Let’s look at a well-known type of range:
def countdown = 10..0

println countdown.getFrom()
println countdown.getTo()
The countdown range starts at 10 and goes down to 0. The notation should be easy to decipher: <start>..<end>.
Printing out a range variable will display that a range is rather like a list of values - in the case of countdown they’re numbers:
def countdown = 10..0
println countdown
Whilst my examples so far all go down, you can just as easily have a range that goes up:
def floors = 1..10
println floors
You can also use decimals but note that it is only the integer (whole-number) component that is stepped through:
def countdown = 10.1..1.1
println countdown
Half-Open Ranges
Ranges aren’t just limited to inclusive ranges such as 1..10. You can also declare a half-open range using ..< - that’s two periods and a less-than. This denotes that the range ends prior to the number to the right. In the example below I setup a grading criteria that avoids an overlap between the grades:
def gradeA = 90..100
def gradeB = 80..<90
def gradeC = 65..<80
def gradeD = 50..<65
def gradeF = 0..<50
I could tweak the above code if I want to get fancy:
def gradeA = 90..100
def gradeB = 80..<gradeA.getFrom()
def gradeC = 65..<gradeB.getFrom()
def gradeD = 50..<gradeC.getFrom()
def gradeF = 0..<gradeD.getFrom()
Ranges of Objects
Ranges are primarily used with numbers but they can be of any object type that can be iterated through. This basically means that Groovy needs to know what object comes next in the range - these objects provide a next and previous method to determine this sequence. Over time you’ll discover various options for use in ranges but numbers really are the main type.
Apart from numbers, individual characters (letters) can be used in ranges. In the example below I create a range of lower-case letters:
def alphabet = 'a'..'z'
println alphabet
Ranges and Enums
Ranges can be handy when dealing with enums as they give us the ability to set a subset of enum values. In the example below I create a handy helpdesk tool:
- Setup an
enumlisting the possible ticket priorities - Create a new
classto describe helpdesk tickets - Setup a
helpdeskQueuecontaining a list of tickets - Set the
focusvariable as a range ofPriorityvalues - Go through the list of tickets and pick up any that are set to the
priorityI care about.
enumenum Priority {
LOW,MEDIUM,HIGH,URGENT
}
class Ticket {
def priority
def title
}
def helpdeskQueue = [
new Ticket(priority: Priority.HIGH, title: 'My laptop is on fire'),
new Ticket(priority: Priority.LOW, title: 'Where is the any key'),
new Ticket(priority: Priority.URGENT, title: 'I am the CEO and I need a coff\
ee'),
new Ticket(priority: Priority.MEDIUM, title: 'I forgot my password')
]
def focus = Priority.HIGH..Priority.URGENT
for (ticket in helpdeskQueue) {
if (ticket.priority in focus) {
println "You need to see to: ${ticket.title}"
}
}
Try the example above out with various settings for the focus variable:
-
def focus = Priority.MEDIUM..Priority.URGENT- Gives us more tickets to see to :(
-
def focus = Priority.HIGH..Priority.LOW- Is actually similar to
4..1and leaves out the tickets markedURGENT
- Is actually similar to
Ranges and List Indexes
You can access a subset of a list using a range subscript. In the example below I use the subscript [1..3] to grab a new list containing elements 1 through 3 of the temperatures list.
def temperatures = [10, 5, 8, 3, 6]
def subTemp = temperatures[1..3]
assert subTemp == [5, 8, 3]
Ranges and Loops
Ranges are most often see when we’re using loops - we’ll get to them in a later tutorial but here’s an example of a launch sequence:
def countdown = 10..0

for (i in countdown) {
    println "T minus $i and counting"
}
In the above example I store the range in the countdown variable in case I need it again later. If I don’t really need to re-use the range I can put the range’s literal value directly into the loop:
for (i in 10..1) {
    println "T minus $i and counting"
}
Useful Methods
We can use the size() method to find out how many elements are in the range:
def dalmations = 1..101
println dalmations.size()
As seen earlier, the getFrom() and getTo() methods return the start and final values respectively:
def intRange = 1..10
println intRange.getFrom()
println intRange.getTo()
The isReverse() method returns true if a range iterates downwards (backwards):
def countdown = 10..0
assert countdown.isReverse() == true
You can can use the reverse() method to flip the range:
def floors = 1..10
println floors.reverse()
In order to check if a value is contained within a range we use the containsWithinBounds method and pass it the value we’re checking on:
def countdown = 10..0
assert countdown.containsWithinBounds(5) == true
The step method returns a list based on going through the range via the specified increment (step). In the example below I step through the range one at a time (step(1)) and then two at a time (step(2)):
def countdown = 5..1
assert countdown.step(1) == [5, 4, 3, 2, 1]
assert countdown.step(2) == [5, 3, 1]
As step returns a list I can use it to populate a list variable that has too many numbers for me to be bothered typing out:
def dalmations = (1..101).step(1)
println dalmations
As we’re about to see the step method is very effective when used with closures.
Ranges and Closures
Closures are a method (function) that can be handled in a manner similar to variables. A closure is described within curly brackets {..} and can be passed as method parameters. Closure have a default variable named it and this holds a value passed to the closure by its caller.
We’ll look into closures much more thoroughly in a later tutorial but, for now, take in the following examples and refer back to them when you get to know closures a little better.
The step method will call a closure for each item in a range. In the example below I step through countdown one number at a time and, for each number, I display a message:
def countdown = 10..1
countdown.step(1) {
    println "T minus $it and counting"
}
I can use the range literal but need to place it within (..):
(10..1).step(1) {
    println "T minus $it and counting"
}
You can change the size of each step - in the case below I step down by 2 each time. Run the code and notice that launch never happens!
(10..1).step(2) {
    println "T minus $it and counting"
}
21. Regular Expressions
Regular expressions (RegEx’s) get entire books devoted to them and you’ll find some developers are RegEx ninjas and others (like myself) are RegEx numpties. This chapter will introduce the basics but the Java Tutorial’s Regular Expression trail is a useful reference as is Wikipedia for those seeking RegEx glory. There are also a number of online tools such as RegExr that come in very handy when trying to debug that elusive RegEx pattern.
To define the regular expression pattern we use the ~/ / syntax:
def regex = ~/\n/
Once stored as a variable, this regular expression can be used in a variety of ways. The example below sets up three string variables and tests them against the regex pattern by using the matches method - which returns true if the string matches the pattern:
def regex = ~/https?:\/\/.*/

def httpUrl = 'http://www.example.com/'
def httpsUrl = 'https://secure.example.com/'
def ftpUrl = 'ftp://ftp.example.com/'

assert httpUrl.matches(regex)
assert httpsUrl.matches(regex)
assert ! ftpUrl.matches(regex)
In the code above, ~/https?:\/\/.*/ is the regular expression pattern that’s essentially looking for any string starting with http or https. The s? will match 0 or 1 occurrence of s in the pattern. You’ll notice the odd-looking \/\/ - I need to escape the forward slashes in http:// so that Groovy doesn’t confuse them with the slashes used to define the regular expression pattern (~/../).
We’ll also look at the special operators for regular expressions in the section on Operators.
Underpinning Groovy’s regular expression functionality is the Java class java.util.regex.Pattern. Groovy handles the compiling of the pattern and this helps you focus on the struggle of getting the regular expression correct :)
Regular Expression Syntax
Regular expressions use a number of syntactic elements to define a pattern of text. We’ll take a brief look at them here.
Characters
These elements are used to match specific literal characters.
| Element | Matches |
|---|---|
g |
The character g
|
\\ |
The backslash character |
\t |
Tab character |
\n |
Newline character |
\f |
Formfeed character |
\r |
Carriage-return character |
In the example below I take a section of a poem and use the split method to get a list whose elements contain a single line from the poem.
// The Ballad of the Drover by Henry Lawson
def poem = '''\
 Across the stony ridges,
  Across the rolling plain,
 Young Harry Dale, the drover,
  Comes riding home again.
 And well his stock-horse bears him,
  And light of heart is he,
 And stoutly his old pack-horse
  Is trotting by his knee.'''

def regex = ~/\n/

def lines = regex.split(poem)

def i = 1
for (line in lines) {
    println "Line $i: $line"
    i++
}
Character Classes
Character classes are used to define character sets and sequences.
| Element | Matches |
|---|---|
[xyz] |
x, y or z
|
[^xyz] |
Not x, y or z
|
[a-zA-Z] |
Range of characters (all letters) |
[0-9] |
Range of characters (all numbers) |
[a-zA-Z_0-9] |
Range of characters |
Predefined Character Classes
The predefined character classes save you from having to define the class specifically and are handy for seeking out words and whitespace.
| Element | Matches |
|---|---|
. |
Any character |
\d |
Digits [0-9]
|
\D |
Non-digits |
\s |
Whitespace |
\S |
Not whitespace |
\w |
Word character [a-zA-Z_0-9]
|
\W |
Not a word character |
Boundaries
Boundaries, to state the obvious, mark the edge of something - specifically a line or a word.
| Element | Matches |
|---|---|
^ |
Start of a line |
$ |
End of a line |
\b |
Word boundary |
\B |
Non-word boundary |
Quantifiers
These determine how many matches are acceptable. For example s? matches the character s zero or one time - meaning that I expect that character to be an s or, if it’s not, move to the next part of the pattern. s+ means that I really want at least one s at that point.
| Element | Matches |
|---|---|
? |
Single match |
* |
Zero or more matches |
+ |
One or more matches |
{n}? |
Exactly n matches |
{n, }? |
At least n matches |
{n,m}? |
At least n but not more that m matches |
Useful Methods
A number of String methods can accept a regular expression and these are my preferred approach to checking text against regular expressions. Most of them take the pattern as the first parameter.
We saw the matches() method at the beginning of the chapter:
def regex = ~/https?:\/\/.*/
def httpUrl = 'http://www.example.com/'

assert httpUrl.matches(regex)
The find() method returns the first match against the pattern within the string. In the example below the find() will return the match against the port number in the URL:
def regex = ~/:[0-9]+/
def httpUrl = 'http://www.example.com:8080/'

println httpUrl.find(regex)
The findAll() method returns a list of matches for the pattern. In the example below I am returned all words in speech that start with like:
findAlldef speech = '''This like guy like I know but like don\'t really like
was like so mean but likely to be nice when you know him better.'''
println speech.findAll(~/\blike\w*\b/)
Like, wow!
The example below provides a very basic word counter by seeking out the \b\w+\b pattern and displaying the size of the list returned by findAll:
def poem = '''\
 Across the stony ridges,
  Across the rolling plain,
 Young Harry Dale, the drover,
  Comes riding home again.'''

def regex = ~/\b\w+\b/

println poem.findAll(regex).size()
The replaceFirst() and replaceAll() methods seek out matches and replace them in a manner that their names implies:
def speech = '''This like guy like I know but like don\'t really like
 was like so mean but likely to be a nice guy when you know him better.'''

println speech.replaceAll(~/\blike\b/, 'um')
println speech.replaceFirst(~/\bguy\b/, 'marmoset')
The splitEachLine() method is very handy when handling structured files such as comma-separated files. You can see in the example below that the first parameter is the pattern that will match commas (~/,/) and the second parameter is a closure that will do something for each line. Within the closure, the it variable is a list with each element being the delimited segment of the text with the line:
def csv = '''\
Bill,555-1234,cats
Jane,555-7485,dogs
Indira,555-0021,birds'''

csv.splitEachLine(~/,/) {
    println "Name: ${it[0]}"
}
Pattern Methods
The java.util.regex.Pattern class provides a number of useful methods. I prefer to use the String methods but maybe I’m just lazy.
The static matches method is called against Pattern to evaluate a pattern against a piece of text. You’ll note that the first parameter is the pattern but represented as a string so you drop the ~/../ notation:
Pattern//Note the import
import java.util.regex.Pattern
assert Pattern.matches('https?://.*/', 'http://www.example.com/') == true
The matcher() method is called against a regular expression pattern and is passed the text that is to be checked. A Matcher variable is returned and these give you a whole heap of regular expression functionality. In my example I just check for the match by calling matches():
Matcherdef regex = ~/https?:\/\/.*/
def httpUrl = 'http://www.example.com/'
def matcher = regex.matcher(httpUrl)
assert matcher.matches() == true
The split() method uses a pattern as a delimiter and returns the elements of the parameter broken up by the delimiter. In my example below I split the domain up based on the period (.) delimiter:
def regex = ~/\./
def domain = 'www.example.com'

println regex.split(domain)
That last example is simple but you can use some pretty funky patterns to split up a string.
22. Data types
Groovy does not preclude the programmer from explicitly declaring a data type, particularly when it would be pertinent to constrain the values being managed. Furthermore, knowledge of data types is very useful for a number of reasons:
- Use of JVM-compatible libraries may require knowledge of the data types required by method calls.
- Important if you want to mine the rich collection of existing Java libraries
- Conversion between different data types (such as decimal numbers to whole numbers) can cause truncation and other (perhaps unexpected) results.
- Essential knowledge if your program relies on calculations
Most of Java’s “core” classes (types) are defined in the java.lang package. Groovy enhances some of these in the GDK to give you extra flexibility.
Groovy’s use of types
The table below illustrates Groovy’s selection of a data type based on a literal value:
| Value | Assigned Type |
|---|---|
true |
java.lang.Boolean |
'a' |
java.lang.String |
"This is a String" |
java.lang.String |
"Hello ${Larry}" |
org.codehaus.groovy.runtime.GStringImpl |
127 |
java.lang.Integer |
32767 |
java.lang.Integer |
2147483647 |
java.lang.Integer |
9223372036854775807 |
java.lang.Long |
92233720368547758070 |
java.math.BigInteger |
3.14 |
java.math.BigDecimal |
3.4028235E+38 |
java.math.BigDecimal |
1.7976931348623157E+308 |
java.math.BigDecimal |
It is important to note that the type is selected at each assignment - a variable that is assigned a string such as "Hello" is typed as java.lang.String but changes to java.lang.Integer when later assigned the value 101.
Using a specific type
A variable can be declared as being of a specific data type. When using a type, drop the def keyword:
Integer myNum = 1
String myName = "Fred nurk"
Suffixes can also be used if you want to be really specific about the data type Groovy is to use for a number. When using suffixes you use the def keyword to define the variable: def dozen = 12i
| Suffix | Type | Example |
|---|---|---|
I or i
|
Integer | 12i |
L or l
|
Long | 23423l |
F or f
|
Float | 3.1415f |
D or d
|
Double | 3.1415d |
G or g
|
BigInteger | 1_000_000g |
G or g
|
BigDecimal | 3.1415g |
You may have noticed that BigInteger and BigDecimal have the same suffix - this isn’t a typo - Groovy works out which one you need simply by determining if the number is a whole number (BigInteger) or a decimal (BigDecimal).
If you’re going to use explicit types then you need to know limitations of that type. For example, the following code will fail:
assert 3.1415926535f == 3.1415926535d
This failure occurs because Float will shorten (narrow) the value to 3.1415927 - not a mistake you’d want to make when measuring optics for your space telescope! You can see which type Groovy will use automatically by running this snippet of code:
println 3.1415926535.class.name
The null Value
Variables that are not assigned a value at declaration are provided a null value by default. This is a special reference that indicates the variable is devoid of a value.
Variables can be explicitly assigned null:
def id = null
Available data types
As Groovy imports the java.lang package as well as the java.math.BigDecimal and java.math.BigInteger classes by default, a range of data types are available for immediate use:
-
Boolean: to store a logical value oftrueorfalse - Numbers (based on
java.lang.Number):ByteShortIntegerLongFloatDoubleBigDecimalBigInteger
-
Character: A single character such as a letter or non-printing character -
String: A regular Java-esque piece of text -
GString: A Groovy string that allows for interpolation -
Object: This is the base class for all other classes -
Closure: The class that holds closure values
The types listed above are often referred to as reference types, indicating that they relate to a class definition. Groovy also provides a set of primitive types that are more closely aligned to the C programming language than an object-oriented language such as Java and Groovy.
Primitive types
The table below maps the types defined in java.lang against their equivalent primitive types:
| Type | Primitive type | Value range | Size (bits) |
|---|---|---|---|
| Boolean | boolean |
true or false
|
- |
| Byte | byte |
-128 to 127, inclusive | 8 |
| Short | short |
-32768 to 32767, inclusive | 16 |
| Character | char |
‘\u0000’ to ‘\uffff’ inclusive | 16 |
| Integer | int |
-2147483648 to 2147483647, inclusive | 32 |
| Long | long |
-9223372036854775808 to 9223372036854775807, inclusive | 64 |
| Float | float |
32-bit IEEE 754 floating-point numbers | 32 |
| Double | double |
64-bit IEEE 754 floating-point numbers | 64 |
You can check those value ranges by using the MIN_VALUE and MAX_VALUE constants available on the various classes representing numbers:
println Integer.MIN_VALUE
println Integer.MAX_VALUE
println Float.MIN_VALUE
println Float.MAX_VALUE
As an object-oriented language Groovy also provides a mechanism for declaring new data types (objects) that extend and encapsulate information to meet a range of requirements. These implicitly extend the java.lag.Object class.
Type Conversions
Groovy will convert values assigned to variables into the variable’s declared data type. For example, the code below declares a variable of type “String” and then assigns it 3.14 (a number). The assertion that the variable remains of type “String” will succeed, indicating that 3.14 was converted to a String value by Groovy before being assigned to the myName variable.
String myName = "Fred nurk"
myName = 3.14
assert myName.class == java.lang.String
Care must be taken to not rely totally on this automatic conversion. In the example below the assertion will fail as the myPi variable is declared as an Integer and the assignment drops the fractional component of 3.14:
def pi = 3.14
Integer myPi = pi
assert myPi == pi
Casting
The as operator can be used to cast (change) a value to another class.
def pi = 3.1415926535 as Integer
assert 3 == pi
This will be discussed further in the Object Operators tutorial.
Converting Numbers
java.lang.Number provides a number of methods for converting numbers between the various numerical data types:
byteValue()-
doubleValue()- also
toDouble()
- also
-
floatValue()- also
toFloat()
- also
-
intValue()- also
toInteger()
- also
-
longValue()- also
toLong()
- also
shortValue()toBigInteger()toBigDecimal()
Here’s a small example of grabbing the whole (integer) component from a number:
def pi = 3.1415926535
assert 3 == pi.intValue()
assert 3 == pi.toInteger()
III Operators
23. Introduction
Groovy supports a range of operators - those you know from primary school (e.g. + and =), through to more specialised operators.
Operators are used with values and variables and the context in which they’re used will vary the resulting output. This introduction lists the range of operators available to you and the following chapters describe each in more detail.
Arithmetic and Conditional Operators
| Operator(s) | Type |
|---|---|
= |
Simple Assignment Operator |
! |
Logical Complement Operator |
== !=
|
Equality Operators |
+ - * / % **
|
Arithmetic Operators |
> < <= >=
|
Relational Operators |
++ --
|
Increment and Decrement Operators |
&& || ?:
|
Conditional Operators |
<< >> >>> ~ & | ^
|
Bitwise Operators |
+= -= *= /= &= |= ^= %= <<= >>= >>>=
|
The Compound Assignment Operators |
String Operators
| Operator(s) | Type |
|---|---|
+, <<
|
Concatenate Operator |
<<= +=
|
Append Operator |
- |
Remove Operator |
-= |
Remove In-place Operator |
* |
Repeat Operator |
*= |
Repeat In-place Operator |
++ --
|
Increment and Decrement Operators |
Regular Expression Operators
| Operator(s) | Type |
|---|---|
=~ |
Find |
==~ |
Match |
Collection Operators
| Operator(s) | Type |
|---|---|
in |
Membership Operator |
* |
Spread Operator |
*. |
Spread-Dot Operator |
.. |
Range Operator |
[] |
Subscript Operator |
Object Operators
| Operator(s) | Type |
|---|---|
?. |
Safe Navigation Operator |
.@ |
Field Operator |
.& |
Method Reference |
as |
Casting Operator |
is |
Identity Operator |
instanceof, in
|
Type Comparison |
24. Operator Overloading
Groovy supports something called “operator overloading” and it’s possible for classes to determine how they want operators to behave. Throughout this tutorial I’ll provide some examples of overloading but before we go too far, let’s take a look at what “operator overloading” actually means.
The C++ language provides a mechanism for programmers to customise how operators such as + (plus) and - (minus) work. This functionality isn’t provided in Java but is available to Groovy programmers. Essentially, a class can include certain methods that replace (overload) the default implementation - as such methods are tied to specific operators.
Consider the + operator, as seen in many great additions. You can use the operator in a statement such as 10 + 2 but you can also use the plus method instead: 10.plus(2). I’d argue (strongly) that using the plus method in your code will be far less readable. However, you should be able to see that using the + operator actually results in the plus method being called.
This means that you can use operator overloading for evil - say, by creating a numerical class that ignores all mathematical sense. Aside from developer practical jokes you’ll probably only use operator overloading every now and then. Where it does become extremely useful is in the core Groovy classes and the Groovy extensions to the JDK.
In the coming chapters you’ll see a range of operator usage that isn’t available to the Java developer but made available through Groovy’s extensions to the JDK and through the GAPI.
To highlight all of this, operator overloading can be used in classes via the methods associated in the following table:
| Method | Operator |
|---|---|
| plus | + |
| minus | - |
| div | / |
| mod | % |
| multiply | * |
| power | ** |
| equals | == |
| compareTo |
<=>, >, <
|
| rightShift | >> |
| leftShift | << |
| next | ++ |
| previous | -- |
Throughout the tutorials on operators I’ll provide information as to how certain functionality is obtained through operator overloading. Feel free to glaze past these sections - they’re mainly there to explain why/how stuff is happening.
25. Numeric Operators
The following chapters will describe each of the numerical operators in further detail. In this tutorial I just lay the list of operators out for you to quickly see and then describe operator precedence - the order in which the operators are evaluated.
| Operator(s) | Type |
|---|---|
= |
Simple Assignment Operator |
! |
Logical Complement Operator |
== !=
|
Equality Operators |
+ - * / %, **
|
Arithmetic Operators |
> < <= >=
|
Relational Operators |
++ --
|
Increment and Decrement Operators |
&& || ?:
|
Conditional Operators |
<< >> >>> ~ & | ^
|
Bitwise Operators |
+= -= *= /= &= |= ^= %= <<= >>= >>>=
|
The Compound Assignment Operators |
Operator Precedence
Operator precedence describes the order in which operators are evaluated. For example, most people know that the multiplication operator is evaluated before the addition, resulting in the following code displaying 20 (and not 60):
println 10 + 2 * 5
Parentheses can be used to denote the need for an operator to be evaluated first, allowing the following code to give us 60:
def result = (10 + 2) * 5
println result
Operators with the same (equal) precedence (e.g. + and -) are evaluated depending on their associativity. There are three types of associativity:
- Left-associative: where the operators are grouped left to right
- Associative: where operators are grouped arbitrarily
- Not seen in Groovy
- Right-associative: where the operators are grouped right to left
For example, the additive operators (+ and -) are left associative, meaning that they are evaluated left to right. The expression 6 + 2 - 4 is evaluated as the result of 6 + 2 minus 4.
The simple assignment operator (=) is right associative, resulting in the following code displaying a result of 2:
def a = 10
def b = 5
def c = 2

a = b = c

println a
Order of Precedence
The order of precedence (highest to lowest) for the arithmetic operators is as follows:
| Operator | Example | |
|---|---|---|
| Postfix increment and decrement |
n++, n--
|
|
| Unary operators | ||
| Positive and negative | -10 |
|
| Prefix increment and decrement |
++2, --1
|
|
| Logical complement | !true |
|
| Bitwise complement | ~0x64 |
|
| Power | 10**2 |
|
| Multiplicative |
10 * 2, 6 / 3
|
|
| Additive |
5 + 5, 10 - 2
|
|
| Shift | >> |
|
| Relational | 10 > 4 |
|
| Equality | 1 == 1 |
|
| Bitwise AND | & |
|
| Bitwise XOR | ^ |
|
| Bitwise OR | | |
|
| Logical AND | true && false |
|
| Logical OR | true || false |
|
| Ternary | 10 > 2? true: false |
|
| Assignment (simple and compound) |
10 += 2, var = 9
|
26. Simple Assignment Operator
| Operator |
|---|
= |
The equals (=) sign is used to assign a value to a variable:
def age = 101
def name = "Fred"
In the following code the variable count is assigned the numeric value 10:
def count = 10
If we then wanted to compare count with another value (11) we need to use the == operator:
if (count == 11) println "Count is 11"
Use of = in the comparison will cause a compilation error:
if (count = 11) println "Count is 11"
Rest assured that if you accidentally use the simple assignment operator (=) instead of the equality operator (==) you’ll not be the first in making that mistake.
27. The Complement Operator
The exclamation (!) sign is used switch a value to its opposite boolean value. In boolean algebra1 this is referred to as a Not (or negation) operator.
| Operator |
|---|
! |
The following example makes sure that “not true” is the same as “false”:
assert !true == false
The complement operator results in the following:
| Value | Complement |
|---|---|
true |
false |
false |
true |
28. Equality Operators
The equality operators return a boolean (true or false) result from a comparison.
| Operator | Name |
|---|---|
| == | Equal to |
| != | Not equal to |
All of the following comparisons evaluate as being true:
assert -99 == -99
assert 'koala' == 'koala'
assert 'cat' != 'dog'
assert 6 != 7

def domesticAnimal = 'dog'
def wildAnimal = 'lion'
assert domesticAnimal != wildAnimal

def str1 = 'Hello'
def str2 = 'Hello'
assert str1 == str2
What Is Equality?
Equality can be a little tricky - both for Groovy and humanity. Think about the statement “Hey cool, we have the same car!”. This could mean that we have the same make and model but different instances of a car or it could mean that we share a car.
is and ==def obj1 = new Object()
def obj2 = new Object()
def obj3 = obj1
assert obj1.is(obj3)
assert ! obj1.is(obj2)
assert obj1 != obj2
assert obj1 == obj3
assert ! obj1.equals(obj2)
assert obj1.equals(obj3)
Precedence
In the following example, the equality operator (!=) is evaluated before the assignment operator (=), resulting in the value of truth being the boolean value true:
def truth = 'cats' != 'dogs'
assert truth == true
Overloading Equality
It is possible to define a custom implementation of == by overriding the equals(Object obj) method. This can be handy if your object has a simple method for determining equality, such as comparing staff members by their ID:
==class StaffMember {
def id
@Override
boolean equals(obj) {
if (this.id == obj.id) {
return true
} else {
return false
}
}
}
def fred = new StaffMember(id: 12)
def jan = new StaffMember(id: 47)
def janet = new StaffMember(id: 47)
assert fred != jan
assert jan == janet
The Groovy package groovy.transform provides a handy annotation that generates an equals implementation which compares the object’s properties. This reduces the previous StaffMember class to even fewer lines of code:
EqualsAndHashCode@groovy.transform.EqualsAndHashCode
class StaffMember {
def id
}
def fred = new StaffMember(id: 12)
def jan = new StaffMember(id: 47)
def janet = new StaffMember(id: 47)
assert fred != jan
assert jan == janet
29. Arithmetic operators
The five arithmetic operators (+, -, *, /, %) are familiar to most people from their early school days.
Additive Operators
| Operator | Name |
|---|---|
| + | Plus |
| - | Minus |
The additive operators provide for basic addition and subtraction.
assert 1 + 1 == 2
assert 10 - 9 == 1
Additive operators are left-associative - they are assessed from left to right:
assert 1 + 4 - 3 == 2
Multiplicative Operators
| Operator | Name |
|---|---|
| * | Multiply |
| / | Divide |
| % | Remainder |
The remainder operator (%) is also commonly referred to as the modulus operator and returns the remainder of a division:
assert 13 % 2 == 1
Multiplicative operators are left-associative:
assert 10 * 6 / 2 == 30
The Power operator
| Operator | Name |
|---|---|
| ** | Power |
The power operator (**) is used to raise a number to the power of the second number:
assert 5**3 == 125
Precedence
Multiplicative operators have precedence over additive operators.
assert 10 - 1 * 10 == 0
If the result above is surprising and the expected result was 90 then parentheses “()” should have been used:
assert (10 - 1) * 10 == 90
The elements within parentheses have precedence over the rest of the evaluation. This results in (10 - 1) being evaluated first and the result being multiplied by 10.
If we consider Pythagoras’ theorem: ( ) the operator precedence will yield the correct answer without requiring parentheses:
assert 3 * 3 + 4 * 4 == 5 * 5
However, we could use parentheses purely for the sake of clarity:
assert (3 * 3) + (4 * 4) == (5 * 5)
Nested parentheses can be used to further delineate an expression. The innermost parentheses are evaluated first, then moving outwards:
assert ((10 - 1) * 10) / 2 == 45
In the equation above, (10 - 1) is evaluated first, the result (9) is then multiplied by 10 and that result (90) being divided by 2.
For significantly more complex calculations such as the quadratic equation (below) parentheses are required if the calculation is to be performed in a single expression:

def a = 5
def b = 6
def c = 1
def x
x = ((-1 * b) + Math.sqrt((b**2) - (4 * a * c))) / (2 * a)
assert x == -0.2
30. Relational Operators
Similar to the Equality Operators, the expressions involving Relational Operators return a boolean result (true or false).
| Operator | Name |
|---|---|
| > | Greater than |
| >= | Greater than or equal to |
| < | Less than |
| <= | Less than or equal to |
<=> |
Spaceship |
All of the following operations resolve to true:
trueassert 5 > 2
assert 4 >= 3
assert 4 >= 4
assert 8 < 9
assert 6 <= 7
assert 7 <= 7
Ordinarily, the operands used in a relational comparison can be compared in a meaningful manner. If they are different data types then the operands need to be able to find a common type for comparison (such as both being numbers) - the following code will cause and exception because Groovy can’t be expected compare a string with a number in this way:
if ('easy' < 123) println "It's easier than 123"
Spaceship
The spaceship operator comes from the Perl programming language. The Spaceship operator is most often seen where sorting is done.
| Operator |
|---|
<=> |
In the example below the sort function uses the closure to define the sort algorithm and this is where the spaceship lands:
def nums = [42, -99, 6.3, 1, 612, 1, -128, 28, 0]

//Descending
println nums.sort{n1, n2 -> n2<=>n1 }

//Ascending
println nums.sort{n1, n2 -> n1<=>n2 }
The following table indicates the result for spaceship expressions (LHS = left-hand side, RHS = right-hand side):
| Expression | Result |
|---|---|
| LHS less than RHS | -1 |
| LHS equals RHS | 0 |
| LHS greater than RHS | 1 |
The following assertions all resolve as true:
assert 2 <=> 2 == 0
assert 1 <=> 2 == -1
assert 2 <=> 1 == 1
Overloading the relational operators
The compareTo method is used by Groovy to assess the result of relational operations:
assert 1.compareTo(2) == -1
Java’s Comparable interface is implemented by classes that allow instances to be compared. Custom classes can determine their own appropriate algorithm for the Comparable’s compareTo method and this will be available when you use the relational operators.
class Num implements Comparable {
    def val

    @Override
    int compareTo(obj) {
         if (val < obj.val) {
             return -1
         } else if (val > obj.val) {
             return 1
         } else {
             return 0
         }
    }
}

def a = new Num(val: 2)
def b = new Num(val: 5)
def c = new Num(val: 2)

assert a < b
assert b > a
assert a != b
assert a == c
You’ll notice that I’ve tested a != b and a == c - these equality operators actually call the compareTo method. There’s been a bit of discussion about how Groovy handles == and the underlying equals and compareTo methods so if you’re looking to overload these operators it’d be worth your time checking up on what the Groovy developers are planning.
31. Increment and Decrement Operators
The increment operator increments a value to its next value. When you increment or decrement a variable using ++ or -- the variable is modified to the new value.
| Operator | Name |
|---|---|
| ++ | Increment |
| – | Decrement |
The increment and decrement operators come in two flavours, prefix and postfix:
- Prefixes are assessed before the statement is evaluated
assert ++5 == 6
- Postfixes are assessed after the statement is evaluated
assert 5++ == 5
assert 10++ == 10
assert ++10 == 11
assert --10 == 9
assert 10-- == 10
The increment and decrement behaves differently depending on the type of value being used.
Booleans don’t increment/decrement
Numbers increment/decrement by 1:
def num = 10
num++
assert num == 11
Characters move to the previous (--) or next (++) character:
def ch = 'c'
ch--
assert ch == 'b'
Strings are a little odd and it is the last character in the string that is affected:
def str = 'hello'
str++
assert str == 'hellp'
Enums1 will cycle through the enum values:
enum Priority {
    LOW, MEDIUM, HIGH
}
def task = Priority.LOW
task++
assert task == Priority.MEDIUM
BUT be aware that you’ll cycle back to the beginning of the value list. The following example is a good example of where you can easily get caught out:
def task = Priority.LOW
task--
assert task == Priority.HIGH
Overloading the Increment and Decrement Operators
By overloading next and previous methods, a custom class can support the increment and decrement operators.
The example below demonstrates a class that increments/decrements by 2:
class StepTwo extends Object {
    def value

    StepTwo(val) {
        this.value = val
    }


    def next() {
        value += 2
        return this
    }

    def previous() {
        value -= 2
        return this
    }

    String toString() {
        return "I have a value of ${this.value}"
    }
}

def two = new StepTwo(3)
println two
two++
println two
two--
println two
- We’ll get to Enums much later.↩
32. Conditional Operators
You’ll most often see Conditional-and (&&) and Conditional-or (||) used in conditional statements such as if. We also use them in expressions such as assert to determine if a statement is true or false.
The Conditional Operator (?:) is a short-form variant of the if-else statement that really helps with code readability. It’s also referred to as the “elvis” operator and the “ternary” operator.
| Operator | Name |
|---|---|
&& |
Conditional-and |
|| |
Conditional-or |
?: |
Conditional operator |
What Is Truth?
All of the following statements resolve as true and the assertions all pass:
assert 1
assert true
assert 'Hello'
Obviously false is false but so is 0, '' (empty string) and null.
The complement operator (!) can be used to negate an expression, allowing the following assertions to pass:
assert !false
assert !0
assert !''
assert !null
Evaluation
Conditional operators are evaluated left-to-right. The assertion in the following code passes as the result of true && false is false but is then or’d with true, resulting in true:
assert true && false || true
Conditional-And
Conditional-and uses the boolean AND to determine if a statement is true or false. In order to be true, both the left-hand and right-hand operands must evaluate to true, as described in the truth table below:
| LHS | RHS | Result |
|---|---|---|
| 0 | 0 | 0 |
| 1 | 0 | 0 |
| 0 | 1 | 0 |
| 1 | 1 | 1 |
In a conditional-and statement, both expressions are always evaluated. In the example below, ++counter is evaluated (giving counter now equal to 1) before the conditional is assessed:
def counter = 0
def result = true && ++counter

assert result == true
assert counter == 1
Conditional-Or
Conditional-or uses the boolean OR to determine if a statement is true or false. In order to be true, either the left-hand or right-hand operands must evaluate to true, as described in the truth table below:
| LHS | RHS | Result |
|---|---|---|
| 0 | 0 | 0 |
| 1 | 0 | 1 |
| 0 | 1 | 1 |
| 1 | 1 | 1 |
In a conditional-or statement, each expression is evaluated in left-to-right order until either an expression resolves to true or no expressions are left (resulting in false overall). Once an expression is evaluated to true no further evaluation of the conditional is performed. This is important to keep in mind if you have an expression performing an operation that you later rely on as it may never be evaluated. In the example below I demonstrate a similar block of code used in the conditional-and section but I’ll use a conditional-or. The final assertion (assert counter == 1) will fail as ++counter is never evaluated:
def counter = 0
def result = true || ++counter

assert result == true
assert counter == 1
Conditional Operator
The conditional operator (?:) is most commonly used when assigning a value to a variable. A conditional expression is used for the first operand and placed to the left of the question-mark. If this resolves to true then the second operand is evaluated, otherwise the third operand is evaluated. This sounds a little confusing so let’s look at an example:
def salary = 100000

def taxBracket = salary < 75000 ? 'Bracket 1': 'Bracket 2'

assert taxBracket == 'Bracket 2'
In the code above the relational expression (salary < 75000) is evaluated and, in this case, resolves to false and the third operand (Bracket 2) is evaluated and assigned to taxBracket. As the operand is just a string there’s no real evaluation but we can use any expression that will return a result.
The code below will calculate income tax based on the person’s income:
def salary = 100000

def tax = salary < 75000 ? salary * 0.1: salary * 0.2

assert tax == 20000
A major benefit of the conditional operator is readability. Consider the previous code being re-written using an if statement and I trust you’ll see that ?: makes for more compact and readable code:
def salary = 100000
def tax = 0

if (salary < 75000) {
    tax = salary * 0.1
} else {
    tax = salary * 0.2
}

assert tax == 20000
Default values
The conditional operator is also really useful for default values - these are used when you want to make sure a variable always has a value. In the code below the Person class has been prepared to ensure that any instance that has not been explicitly given a value for the name property is assigned Anonymous as the name:
?: to set a default valueclass Person {
def name
def Person(name = '') {
setName(name)
}
def setName(name) {
this.name = name ?: 'Anonymous'
}
}
def jim = new Person()
println jim.name
Instead of writing this.name = name ? name: 'Anonymous' you’ll notice that I didn’t provide a second operand. This is another bonus for the ternary operator - if the conditional resolves to true and no second operand is provided, the result of the conditional is returned. This is a boring way to say that in this.name = name ?: 'Anonymous' if name is not false then it is assigned to this.name.
Avoiding NPEs
NPEs (Null-Pointer Expressions) are the bane of Java and Groovy programmers. You’ll see a lot of code checking for null and this reduces readability. This is usually in the form if (myObj != null) {...} or using the conditional operator (myObj != null) ? ... : ....
As null evaluates to false in Groovy, the conditional operator provides a compact means by which to check if an object is null before trying to access the object:
def myObj = null
def dump =  myObj ? myObj.dump() : ''
In the example above I test myObj and, if it isn’t null then dump is given the value returned by myObj.dump(). Otherwise an empty string ('') is returned.
As an alternative, the safe-navigation operator (?.) can be used to test for null prior to attempting access on the object:
def myObj = null
def dump = myObj?.dump()
The safe navigation operator is discussed further under Object Operators.
In Java
In the code below I’ve provided a small example of checking for null in Java. You’ll note that we need to be explicit on our conditional ((t == null)):
public class NullTest {
    public static void main(String[] args) {
        NullTest t = null;

        String output = (t == null) ? "Null" : "Not null";

        System.out.println(output);
    }
}
To prove that I’m not just bloating my code to prove a point, here’s a slightly more compact version of the example:
public class NullTest {
    public static void main(String[] args) {
        NullTest t = null;
        System.out.println(t==null ? "Null" : "Not null");
    }
}
You’ll note that I didn’t bother with the output variable and dropped the parentheses (they’re not required). The code is reasonably compact but rewritten in Groovy it gets even tidier:
class NullTest {
    static main(args) {
        def t = null
        println(t ? 'Not null' : 'Null')
    }
}
You still need to check for null in Groovy but the shortened conditional operator and the safe navigation operator really do help cut down on the boiler-plate stuff.
33. Bitwise Operators
I have to admit that I haven’t seen many instances of bitwise manipulation since my university assignments. That’s not to say they’re not used or not important - I’ve just not done a lot of programming that’s called on bitwise operators.
| Operator | Name |
|---|---|
| & | Bitwise AND |
| | | Bitwise OR |
| ^ | Bitwise XOR1 |
| ~ | Bitwise negation (Not) |
| >> | Right shift |
| >>> | Right shift unsigned |
| << | Left shift |
Truth Tables
Truth tables describe the results of various logical operations. The truth tables below illustrate the NOT, AND, OR and XOR logic.
Not (~) |
Result |
|---|---|
| Not 0 | 0 |
| Not 1 | 1 |
And (&) |
Result |
|---|---|
| 0 AND 0 | 0 |
| 0 AND 1 | 0 |
| 1 AND 0 | 0 |
| 1 AND 1 | 1 |
Or (|) |
Result |
|---|---|
| 0 OR 0 | 0 |
| 0 OR 1 | 1 |
| 1 OR 0 | 1 |
| 1 OR 1 | 1 |
Xor (^) |
Result |
|---|---|
| 0 XOR 0 | 0 |
| 0 XOR 1 | 1 |
| 1 XOR 0 | 1 |
| 1 XOR 1 | 0 |
Flag example
The unix file permission scheme uses binary flags for read, write and execute permissions on files. You see them when you run ls -l as something like -rwxr-xr-x. Essentially, this is a set of flags where binary 1 turns on that permission and binary 0 turns it off. The three elements I’ll look at here are read (r), write (w) and execute (x):
- READ has the binary value 001 (decimal 1)
- WRITE has the binary value 010 (decimal 2)
- EXECUTE has the binary value 100 (decimal 4)
Let’s look at the example code first and then I’ll discuss it:
//Create global variables for the permissions
READ = 0b100
WRITE = 0b010
EXECUTE = 0b001

println 'Checking for READ:'
checkFile(READ)

println 'Checking for WRITE:'
checkFile(WRITE)

println 'Checking for READ or EXECUTE:'
checkFile(READ | EXECUTE)

def checkFile (check) {
    def fileList = [:]
    for (i in 0..7) {
        fileList["File $i"] = i
    }

    for (file in fileList) {
        if (file.value & check) {
            println "$file.key (${displayFilePermission(file.value)}) meets crit\
eria"
        }
    }
}

def displayFilePermission(val) {
    def retval = ""
    retval <<= (READ & val)? 'r': '-'
    retval <<= (WRITE & val)? 'w': '-'
    retval <<= (EXECUTE & val)? 'x': '-'
    return retval
}
First up I set the flags for each of the three elements using the 0b prefix to indicate binary numbers:
READ = 0b100
WRITE = 0b010
EXECUTE = 0b001
I then call my checkFile method to see which permissions match what I’m seeking. The third call to checkFile is the more interesting as I OR two flags: READ | EXECUTE. If I OR the READ flag (100) with the EXECUTE flag (001) I get 101 (decimal 5):
| Value | Binary | Operator | ||
|---|---|---|---|---|
| READ | 1 | 0 | 0 | OR |
| EXECUTE | 0 | 0 | 1 | |
| Result | 1 | 0 | 1 | = |
The checkFile method does the checking for me. The first part of the method just creates a set of possible files - enough to cover the various variations of the rwx elements:
def fileList = [:]
for (i in 0..7) {
    fileList["File $i"] = i
}
It’s the second half of checkFile that does the important stuff:
for (file in fileList) {
    if (file.value & check) {
        println "$file.key (${displayFilePermission(file.value)}) meets criteria"
    }
}
The if (file.value & check) performs an AND on the check requested (e.g. READ) and the file’s permissions. If the AND returns a result greater than 0 then the file’s permission match the check. For example, a file with execute permission (--x) meets the READ | EXECUTE criteria:
| Item | Value | Binary | Operator | ||
|---|---|---|---|---|---|
check |
READ | EXECUTE | 1 | 0 | 1 | AND |
file |
--x |
0 | 0 | 1 | |
| Result | 0 | 0 | 1 | = |
A file with read and write permission (rw-) also matches:
| Item | Value | Binary | Operator | ||
|---|---|---|---|---|---|
check |
READ | EXECUTE | 1 | 0 | 1 | AND |
file |
rw- |
1 | 1 | 0 | |
| Result | 1 | 0 | 0 | = |
However, a file with only the write permission (-w-) will not successfully match:
| Item | Value | Binary | Operator | ||
|---|---|---|---|---|---|
check |
READ | EXECUTE | 1 | 0 | 1 | AND |
file |
-w- |
0 | 1 | 0 | |
| Result | 0 | 0 | 0 | = |
Lastly, the displayFilePermission method just helps me display the permissions in the rwx format.
Some other quick points follow:
I can negate (~) a value to indicate that I want the inverse of a value, rather than ORing the other options individually:
println 'Checking for WRITE or EXECUTE:'
checkFile(~READ)
I can XOR (^) to aggregate the permissions but ignore intersections (where both variables contain the same flag):
def file1 = READ | EXECUTE
def file2 = WRITE | EXECUTE
println 'File 1: ' << displayFilePermission(file1)
println 'File 2: ' << displayFilePermission(file2)
println 'Result: ' << displayFilePermission(file1 ^ file2)
Shift Example
Shifting just moves the bits in a binary to the left (<<) or to the right (>>), depending on the left-hand operand. If we take the following list as a starting point we can see how progressive shifts left change a value:
- 0001 (binary) = 1 (decimal)
- 0010 (binary) = 2 (decimal)
- 0100 (binary) = 4 (decimal)
- 1000 (binary) = 8 (decimal)
With this is mind the following code demonstrates the left- and right-shift operators:
assert 2 << 1 == 4	//Left-shift once
assert 2 << 2 == 8	//Left-shift twice
assert 2 >> 1 == 1	//Right-shift once
The code below displays a table in which each row represents a value that’s be left-shifted by one position more than the prior row:
def value = 0b0000_0000_0000_0000_1111_1111

println '| Shift   | Hex      | Decimal  | Octal    | Binary                   |'
println '|---------|----------|----------|----------|--------------------------|'
(0..16).each {
    def shifted = value << it
    def hexDisplay = '0x' << Integer.toHexString(shifted).padLeft(6, '0')
    def binDisplay = Integer.toBinaryString(shifted).padLeft(24, '0')
    def decDisplay = "$shifted".padLeft(8, ' ')
    def octDisplay = Integer.toOctalString(shifted).padLeft(8, ' ')
    def shiftDisplay = "$it".padLeft(7, ' ')
    println "| $shiftDisplay | $hexDisplay | $decDisplay | $octDisplay | $binDis\
play |"
}
println '|---------|----------|----------|----------|--------------------------|'
- Known as an Exclusive OR↩
34. Compound Assignment Operators
The compound assignment operators1 really just conflate an operation that involves a variable which is, it turn, used to store the result. Let’s look at an example to make this clearer. In the example below I really just want to add 10 to the cost variable:
def cost = 20
cost = cost + 10
assert cost == 30
By using a compound assignment operator I can clean up the code (in a very minor way) by performing the operation ‘in place’:
def cost = 20
cost += 10
assert cost == 30
| Operator | Name |
|---|---|
| *= | Multiply |
| /= | Divide |
| %= | Remainder |
| += | Plus |
| -= | Minus |
| **= | Power |
| <<= | Bitwise left-shift |
| >>= | Bitwise right-shift |
| >>>= | Bitwise unsigned right-shift |
| &= | Bitwise And |
| ^= | Bitwise Xor |
| |= | Bitwise Or |
- Also known as augmented assignment operators. See http://en.wikipedia.org/wiki/Augmented_assignment↩
35. String Operators
You’ll spend a lot of your career manipulating strings so anything that makes them less of a hassle is nice. Groovy helps you with the following operators overloaded for your string work.
| Operator(s) | Type |
|---|---|
+, <<
|
Concatenate Operator |
<<= +=
|
Append Operator |
- |
Remove Operator |
-= |
Remove In-place Operator |
* |
Repeat Operator |
*= |
Repeat In-place Operator |
++ --
|
Increment and Decrement Operators |
Concatenate Operator
The concatenate operator joins two strings together:
println 'It was the best of times.' << 'It was the worst of times.'
The above example is rather daft as we could have just put both strings together in the same set of quotes. You’re more likely to see strings added to over the course of a program:
def quote = 'It was the best of times.'
quote = quote << 'It was the worst of times.'
println quote
Instead of using the concatenate you could have just used string interpolation:
def quote = 'It was the best of times.'
quote = "$quote It was the worst of times."
println quote
The + operator is used in the same manner as <<:
def quote = 'It was the best of times.'
quote = quote + 'It was the worst of times.'
println quote
As you’ll see in later in this chapter it’s best to use << over +
Concatenation and Types
When you concatenate a string with a number Groovy will cast the number into a string. That means you can end up with 1 + 1 = 11 as the code below demonstrates:
assert '1' + 1 == '11'
assert 1 + '1' == '11'
If you’re really wanting to add a string to a number you need to make sure you explicitly turn the string into a number:
assert '1'.toInteger() + 1 == 2
This may all sound a bit odd now but if you’re trying to work out why your program’s maths seems all wrong it’s worth looking into where strings and numbers are being mashed together.
Append Operator
The append operator (<<=) conflates the assignment (=) and concatenate operators:
def quote = 'It was the best of times.'
quote <<= 'It was the worst of times.'
println quote
This saves you from having to use quote = quote << 'It was the worst of times.'
Remove Operator
The remove operator (-) removes the first instance of a string or regular expression from another string. The easiest form just removes the first instance of a specific string - in the case of the example below, ‘of ‘ is removed:
quote = 'It was the worst of times.' - 'of '
println quote
The example above will display It was the worst times.
A regular expression pattern can also be used if you want to use a pattern. In the example below, the first occurrence of “bat” or “rat” is removed, resulting in cat rat monkey:
println 'cat bat rat monkey' - ~/[br]at/
Remove In-Place Operator
Works just like the remove operator (-) but does the match to the variable as well as modifying it. As for the first remove example, a string can be provided for removal:
quote = 'It was the worst of times.'
quote -= 'of '
println quote
…and it can also use patterns:
def str = 'cat bat rat monkey'
str -= ~/[br]at/
println str
Repeat Operator
This is a great operator for those that love repetition! Let’s print out hello ten-times, each time one a new line:
print 'hello\n' * 10
Repeat In-PlaceOperator
This one applies the multiplier against the variable and stores the result back in the variable:
def complaint = 'ow'
complaint *= 10
println complaint
I’ll leave it to you to see what happens :)
Increment and Decrement Operators
The increment operator will move the last character of the string to its next value:
def str = 'hello'
str++
assert str == 'hellp'
The increment/decrement actually works across the Unicode character codes1 so don’t expect code to just use ‘a’ to ‘z’:
def str = 'fo%'
str--
assert str == 'fo$'
For a small experiment, try the following code - it will display a subset of the Unicode characters:
//\u00A1 is the Unicode character for an inverted exclamation mark
def chr = '\u00A1'
for (i in 161..191) {
    println chr
    chr++
}
I’m sure that this is useful somewhere…..
Warning: Strings Are Expensive!
Many programs build strings up over the course of their operation. This can start becoming very expensive in terms of program resources such as memory because, without the correct approach, the JVM has to copy strings to new memory locations each time you use concatenation.
Java developers turn to the StringBuilder and StringBuffer classes to make their string building more efficient. Groovy developers using dynamic types can use a few tricks to stay dynamic and ensure efficiency.
Let’s take a look at two approaches to building a string. In the first example I’ll use the += operator and perform 1000 concatenations:
+= concatenationimport java.text.DecimalFormat
def quote = 'It was the best of times. It was the worst of times.\n'
def str = ""
def startTime = System.nanoTime()
1000.times {
str += quote
}
def endTime = System.nanoTime()
DecimalFormat formatter = new DecimalFormat("#,###")
def duration = formatter.format(endTime - startTime)
println "That took $duration nano seconds"
In the next example I’ll change just 1 thing: I’ll use the <<= operator rather than +=:
<<= concatenationimport java.text.DecimalFormat
def quote = 'It was the best of times. It was the worst of times.\n'
def str = ""
def startTime = System.nanoTime()
1000.times {
str <<= quote
}
def endTime = System.nanoTime()
DecimalFormat formatter = new DecimalFormat("#,###")
def duration = formatter.format(endTime - startTime)
println "That took $duration nano seconds"
When I run these scripts in groovyConsole I can see that the results are very different. When I ran each test 100 times and averaged the result I got:
- Example 1 (using
+=): 24,215,520 ns - Example 2 (using
<<=): 191,490 ns
To me this is evidence enough for me to use ‘<<=’ over +=!
Templates
If you find yourself building strings around boilerplate text - such as a form letter - consider using Groovy’s templating system.
- See the Unicode Character Code Charts↩
36. Regular Expression Operators
The earlier tutorial on Regular Expressions covered regular expression (pattern) variables and described the find and match methods. These operators are similar to these methods but return true or false if the pattern is found in (find) or matches (match) the first operand (a string).
| Operator(s) | Type |
|---|---|
=~ |
Find |
==~ |
Match |
For these operations, the left-hand operand must be a string and the right-hand operand a regular expression pattern.
Find (=~)
Returns true if the string on the left-side contains the pattern on the right of the operator.
def regex = ~/:[0-9]+/
def httpUrl1 = 'http://www.example.com:8080/'
def httpUrl2 = 'http://www.example.com/'

assert httpUrl1 =~ regex
assert ! (httpUrl2 =~ regex)
Match (==~)
Returns true if the string on the left-side matches (completely) the pattern provided on the right of the operator
def regex = ~/https?:\/\/.*/

def httpUrl = 'http://www.example.com/'
def ftpUrl = 'ftp://ftp.example.com/'

assert httpUrl ==~ regex
assert ! (ftpUrl ==~ regex)
37. Collection operators
A number of operators are provided for working with Lists and Maps. Some overload operators such as + and << whilst others (such as in) are more collection-oriented. Certain operators work with both Lists and Maps whilst others apply to only one.
| Operator(s) | Type |
|---|---|
in |
Membership Operator |
<< |
Append operator |
+ |
Addition operator |
- |
Subtraction operator |
+= -=
|
Compound assignment operators |
* |
Spread Operator |
*. |
Spread-Dot Operator |
.. |
Range Operator |
[] |
Subscript Operator |
This chapter won’t discuss the following operators as they’ve been described earlier:
- The Range operator creates a list of sequential values and is usually seen with numbers. This is how we created Range variables.
- The Subscript operator is used to access items in a List or a Map and this was discussed in the tutorial on collection variables.
To finish this chapter off I’ll do a little bit of mucking around with set theory.
Membership Operator (Lists and Maps)
The in operator is used to determine if an item is “in” a list or is a key in a map.
in operatorassert 6 in [1, 2, 6, 9]
assert !(3 in [1, 2, 6, 9])
def grades = ['Maths': 'A',
'English': 'C',
'Science': 'B'].asImmutable()
assert 'Science' in grades
assert !('French' in grades)
Append (Lists and Maps)
The << operator adds a new element to an existing list:
def friends = ['Frank', 'Larry']
friends << 'Jane'
println friends
It’s important to note that appending a list to a list will add a new element that contains the list in the right-hand operand:
def friends = ['Frank', 'Larry']
friends << ['Jane', 'Greg']
assert friends == ['Frank', 'Larry', ['Jane', 'Greg']]
In order to add the individual items of one list to another I need to use the addAll() method:
def friends = ['Frank', 'Larry']
friends.addAll(['Jane', 'Greg'])
assert friends == ['Frank', 'Larry', 'Jane', 'Greg']
I can also use << to append a new key:value pair to a map:
def grades = [:]
grades << ['Maths': 'A']
grades << ['English': 'C']
grades << ['Science': 'B']
println grades
If I was to add another line grades << ['Science': 'F'] to the code above, the value for Science would be changed to F as the map’s keys are unique.
Addition (Lists and Maps)
The addition operator (+) returns a new list with the right-hand operand added:
def friends = ['Frank', 'Larry']
assert friends + 'Jane' == ['Frank', 'Larry', 'Jane']
When we add two lists together we get a union of the two lists returned:
def friends = ['Frank', 'Larry']
assert friends + ['Jane', 'Greg'] == ['Frank', 'Larry', 'Jane', 'Greg']
Adding to a Set returns a set with the union sans any duplicates:
def set = [2, 4, 6, 8] as Set
assert set + [8, 10] == [2, 4, 6, 8, 10] as Set
The addition operator will either add a key:value pair to a map or alter the value held against an existing key. In the example below I create a new map item with a result for my French class and then change an existing map item with a reduced English score:
def grades = ['Maths': 'A',
'English': 'C',
'Science': 'B']
assert grades + ['French': 'F'] == ['Maths': 'A', 'English': 'C', 'Science': 'B'\
, 'French': 'F']
assert grades + ['English': 'D'] == ['Maths': 'A', 'English': 'D', 'Science': 'B\
']
Subtraction (Lists and Maps)
The subtraction (-) operator will return a new list with an element removed if the list contains the element:
assert [2, 4, 6, 8] - 6 == [2, 4, 8]
A list can also be subtracted from a list, returning a new list containing items in the left-hand operand ([2, 4, 6, 8]) that are not in the right-hand operand ([2, 6, 12]):
assert [2, 4, 6, 8] - [2, 6, 12] == [4, 8]
In the example below my attempt to remove Gary doesn’t do anything as he’s not in the list (this doesn’t cause an exception) but I do succeed in un-friending Frank:
def friends = ['Frank', 'Larry', 'Jane']
assert friends - 'Gary' == ['Frank', 'Larry', 'Jane']
assert friends - 'Frank' == ['Larry', 'Jane']
When subtraction is applied to a Map the right-hand operand needs to be a key:value pair. In the example below I attempt 3 things:
- I attempt to remove
['English': 'D']but it’s not ingradesso nothing happens - I attempt to remove
['French': 'F']but it’s not ingradesso nothing happens - I attempt to remove
['English': 'C']and it is ingradesso the removal occurs.
def grades = ['Maths': 'A',
'English': 'C',
'Science': 'B']
assert grades - ['English': 'D'] == ['Maths': 'A', 'English': 'C', 'Science': 'B\
']
assert grades - ['French': 'F'] == ['Maths': 'A', 'English': 'C', 'Science': 'B']
assert grades - ['English': 'C'] == ['Maths': 'A', 'Science': 'B']
Compound Assignment Operators (Lists and Maps)
Just as we saw with numbers, the addition and subtraction operators returns a value but don’t actually change the variable involved in the operation. To change the value of grades I would have needed to assign the resultant back into the variable as follows:
grades = grades + ['French': 'F']
assert grades == ['Maths': 'A', 'English': 'C', 'Science': 'B', 'French': 'F']
If we want to use the grades variable as the left-hand operand and change its value we can use the compound assignment operators. This means I could also have written the previous example using the += compound assignment:
grades += ['French': 'F']
assert grades == ['Maths': 'A', 'English': 'C', 'Science': 'B', 'French': 'F']
Using the append operator in its compound form (<<=) is redundant.
Immutability and Assignment
Consider the following code and see if you’re surprised:
def grades = ['Maths': 'A',
'English': 'C',
'Science': 'B'].asImmutable()
grades += ['French': 'F']
assert grades == ['Maths': 'A', 'English': 'C', 'Science': 'B', 'French': 'F']
Groovy let me change something that’s immutable! I should go to the mailing list and report this! The outrage!
Hang on! What asImmutable() does is set the elements of the list to be unchangeable but it doesn’t make the grades variable immutable. As the + operator actually returns a new list value, Groovy is correct in assigning that new value to grades.
If I’d used grades << ['French': 'F'] instead of grades += [‘French’: ‘F’] I would get a java.lang.UnsupportedOperationException as I’m actually trying to add a new element to grades.
If I really want to make grades completely immutable (constant) then I’d need to use the final modifier and declare grades within a class. The code below demonstrates how I’d set up the class and ensure that attempts to change grades cause an exception:
class Report {
final grades = ['Maths': 'A',
'English': 'C',
'Science': 'B'].asImmutable()
}
def myReport = new Report()
myReport.grades += ['French': 'F']
Running the code above will earn you a groovy.lang.ReadOnlyPropertyException.
Spread Operator (Lists)
The Spread operator extracts each element in the List into another list or a method’s parameters. This is helpful when you need to include a list’s individual items in another list or when your list can be used as parameters in a method call.
Extracting Into Lists
In the first example, one lists’s items are extracted into another list:
def list = [1, 2, 6, 9]
def list2 = [*list, 12, 34]
assert list2 == [1, 2, 6, 9, 12, 34]
This usage looks rather like the addAll() method but you may need to be mindful as to the position in which the list is extracted. The example below uses addAll() but results in list2 being ordered differently than in the previous example:
def list = [1, 2, 6, 9]
def list2 = [12, 34]
list2.addAll(list)
assert list2 == [12, 34, 1, 2, 6, 9]
In this last example I demonstrate an easy approach to creating a union of the two lists:
def list = [1, 2, 6, 9]
def list2 = [12, 34]
assert [*list, *list2] == [1, 2, 6, 9, 12, 34]
Extracting as Parameters
In the next example I extract the items in the score list out, each aligning with the parameters in the method signature:
def mean(num1, num2, num3) {
(num1 + num2 + num3) / 3
}
def scores = [4, 8, 3]
assert mean(*scores) == 5
That last example is a little bit of a goldilocks moment - I have exactly the same number of items in the list as the method has parameters. I also have a pretty limited version of the mean method - it only works on 3 numbers. However, a method with a varargs parameter is a little less fairy tale:
def mean(...nums) {
def total = 0
for (item in nums) {
total += item
}
return total / nums.size()
}
def scores = [4, 8, 3]
assert mean(*scores) == 5
One last example of using the spread operator:
def buyGroceries(...items) {
for (item in items) {
println item
}
}
def shoppingList = ['apples', 'cat food', 'cream']
buyGroceries(*shoppingList)
Multiply Operator
Note that you can use * as a form of multiplication involving lists but this doesn’t return a list containing each element multiplied by the right-hand operand. Rather, the returned list just contains the original list elements repeated by the number of times set by the right-hand operand. In the example below I get 2, 4, 6 repeated 4 times:
def list = [2, 4, 6]
println list * 4
Spread-Dot Operator (Lists)
The *. operator calls an action (method) on each item in the list and returns a new list containing the results. In the example below I call the reverse() method on each list element:
println(['carrot', 'cabbage', 'cauliflower']*.reverse())
The spread operator mimics the collect() method - with the previous example being equivalent to the following:
['carrot', 'cabbage', 'cauliflower'].collect{it?.reverse()}
The spread operator makes the method call using the “Safe navigation Operator” (?.) to make sure that the list element isn’t null - refer to the Object Operators tutorial for more information. In the next example I include a null in the list and the returned list features the null:
println(['carrot', 'cabbage', null, 'cauliflower']*.reverse())
For maps I can’t use *. so need to use the collect() method.
A Little Set Theory
Writing this chapter got me thinking about set theory and how various aspects can be achieved in Groovy lists.
Membership
The in method gives us a membership check:
assert 4 in [2, 4, 6, 8]
Union
The addition operator provides us with the ability to performs unions:
assert [2, 4, 6, 8] + [1, 3, 5, 7] == [2, 4, 6, 8, 1, 3, 5, 7]
Complements
The subtraction operator (-) gives us set complement (difference):
assert [2, 4, 6, 8] - [6, 8, 10] == [2, 4]
Intersection
The disjoint() method will return true if two lists don’t contain any intersecting elements:
assert [2, 4, 6, 8].disjoint([1, 3, 5, 7]) == true
If disjoint() returns false then some elements intersect.
def list1 = [2, 4, 6, 8]
def list2 = [6, 8, 10]
assert ([*list1, *list2] as Set) - (list1 - list2) - (list2 - list1) == [6, 8] a\
s Set
Guava Sets Library
All this got me thinking further and looking into Google’s Guava libraries - here’s some code that uses Guava to scratch my set itch:
@Grab(group='com.google.guava', module='guava', version='18.0')
import static com.google.common.collect.Sets.*
def list1 = [2, 4, 6, 8] as Set
def list2 = [6, 8, 10] as Set
println "Intersection: " << intersection(list1, list2)
println "Union: " << union(list1, list2)
println "Difference (list1 - list2): " << difference(list1, list2)
println "Difference (list2 - list1): " << difference(list2, list1)
println "Cartesian product of list1 and list2"
for (set in cartesianProduct(list1, list2)) {
println " - $set"
}
println "Powersets of list1: "
for (set in powerSet(list1)) {
println " - $set"
}
38. Object Operators
It could be argued that all operators are object operators as nearly every variable or value in Groovy is an object. However, these operators are all about working with and checking on the object’s structure.
| Operator(s) | Type |
|---|---|
?. |
Safe Navigation Operator |
as |
Casting Operator |
is |
Identity Operator |
instanceof in
|
Type Comparisons |
.@ |
Field Operator |
.& |
Method Reference |
Safe Navigation Operator
The Safe Navigation operator (?.) checks to make sure that a variable isn’t null before calling the requested method. Consider the following code:
class Person{
def name
}
def fred = new Person(name: 'Fred')
//various statements
fred = null
//various statements
println fred.name
As fred somehow became null at some point in the code, that call to fred.name causes a nasty java.lang.NullPointerException (aka the NPE). This happens a lot as variables (in this case fred) can end up being null for a number of reasons, including:
- The variable never gets set in the first place - perhaps the initialisation failed but we didn’t catch it properly
- A method returns
nullinstead of an object instance - We get passed a parameter that has
nullvalue.
In order to stop the NPE you’ll normally see developers using an if statement to check that the variable isn’t null before trying to call a method:
class Person{
def name
}
def fred = new Person(name: 'Fred')
//various statements
fred = null
//various statements
if (fred) {
println fred.name
}
Groovy’s Safe Navigation operator saves some time and code. In the code below, Groovy checks that the fred variable isn’t null before trying to access the name property - giving us a compact piece of code: fred?.name.
class Person{
def name
}
def fred = new Person(name: 'Fred')
//various statements
fred = null
//various statements
println fred?.name
You’ll see that “null” is displayed - this is because fred is null. Groovy doesn’t even try to access the name property.
Casting Operator
The Casting operator (as) changes the data type of a value or variable to the specified class. This is sometimes called “casting”, “type conversion” or “coercing”. You’ll have seen this in action when we created a Set:
def nums = [1, 6, 3, 9, 3] as Set
The as tells Groovy that you want to convert the item to be of the specified data type (class) - in the example above I use Set. The code below demonstrates a few more conversions:
assert 3.14 as Integer == 3
assert 101 as String == '101'
assert true as String == 'true'
assert '987' as Integer == 987
You’ll note that the cast can be lossy - 3.14 as Integer caused the value to be truncated to 3. Not all values can be cast to all types and code such as 'hello, world' as Integer causes an exception.
Identity Operator
The Identity operator (is) determines if two variables are referencing the same object instance. This “operator” is really a method that you call by using obj1.is(obj2) to check if obj1 and obj2 reference the same instance.
As we saw in the chapters on Equality Operators and Relational Operators, Groovy uses the == operator to determine if two objects are equivalent based on their state. Using == for this purpose is really useful and improves code readability but it means that the traditional Java use of == to determine if two objects reference the same instance needs a replacement in Groovy. The is method is that replacement.
In the code below I describe a Person class and use a very helpful annotation (@groovy.transform.EqualsAndHashCode) so that Groovy sets up the approach to determining if two instances of Person are the same - such that == returns true. I’ve decided that all people will have a unique identifier and, provided two instances have the same identifier, they’re the same person. This means that all three variations (fred, freddie, frederick) of the person with the ID 345 are equal (==) to each other. However, by using is I can see that, whilst fred and freddie point to the same instance of Person, frederick points to a different instance.
@groovy.transform.EqualsAndHashCode(includes="id")
class Person{
def id
def name
}
def fred = new Person(id: 345, name: 'Fred')
def freddie = fred
def frederick = new Person(id: 345, name: 'Frederick')
//Check that they're all the same person
assert fred == freddie
assert fred == frederick
assert freddie == frederick
//Check which variable points to the same instance
assert fred.is(freddie)
assert ! fred.is(frederick)
Type Comparison
The Type Comparison operators (instanceof and in) is used to determine if a variable is an instance of the specified class.
In this next example I check to make sure that fred is a Person:
class Person{
def name
}
def fred = new Person(name: 'Fred')
assert fred instanceof Person
assert fred in Person
Checking the variable’s type can be useful in dynamically typed languages such as Groovy as it lets us check before we call a property or method that may not be there:
class Person{
def name
}
def fred = new Person(name: 'Fred')
if (fred instanceof Person) {
println fred?.name
}
In my Person example I’m not really using the full benefits of object-oriented programming that we can leverage in Groovy - primarily because we’re yet to get up to that. However, trust me when I say that class hierarchies and interfaces give us a handy way to build up a family tree of classes and that we can use instanceof or in to check if the object instance has a legacy that helps us achieve an outcome. For example, the Integer and Float classes are a subclass (child) of the Number class.
In the example below I set up an add method that adds two numbers (handy!). Before I try to add those two numbers I use in to make sure they’re actually Numbers. If they aren’t, I throw an exception at you.
def add(num1, num2) {
if (num1 in Number && num2 in Number) {
return num1 + num2
}
throw new IllegalArgumentException('Parameters must be Numbers')
}
assert add(1, 6) == 7
assert add(3.14, 9.2) == 12.34
add('Rabbit', 'Flower')
Field Operator and Method Reference
The Field operator (.@) provides direct access to an object’s property (field) rather than using a getter/setter. Use this with a lot of caution or, even better, don’t use it at all.
The Method Reference operator (.&) returns a reference to an object method. This can be handy when you’d like to use the method as a closure. This is a very useful feature so use it at will!
In the example below I describe the Person class. When I then create an instance called example you’ll notice that:
-
example.name = 'Fred'causessetName()to be called -
println example.namecausesgetName()to be called -
example.@name = 'Jane'andprintln example.@nameboth access thenameproperty directly. -
def intro = example.&introduceSelfsetsintroas a pointer (closure) to theintroduceSelfmethod.- Which is then called using
intro()
- Which is then called using
class Person {
def name
def setName(name) {
println 'You called setName()'
this.name = name
}
def getName() {
println 'You called getName()'
return this.name
}
def introduceSelf() {
println "Hi, my name is ${this.name}"
}
}
def example = new Person()
//example.name actually calls the getter or setter
example.name = 'Fred'
println example.name
//example.@name directly access the field
example.@name = 'Jane'
println example.@name
//intro holds the reference to the introduceSelf method
def intro = example.&introduceSelf
//This next line calls introduceSelf()
intro()
IV Control Flow Statements
39. Introduction
Most code needs to reflect a decision-making process. A decision may be an either-or in which we process one set of statements rather than another. Another decision may be to run the same set of statements for a finite (or infinite) period.
Groovy supports a range of control-flow statements:
- The conditional statements:
-
ifandif-else switchtry-catch-finally
-
- The looping statements:
for-
for-each while
- The branching statements:
breakcontinuereturn
This section will describe the conditional and looping statements and discuss how and where the break and continue branching statements fit in.
The try-catch-finally statement will be explored in the Exceptions section.
The return statement will be explored in the Methods section and the Closures section.
40. Blocks
Groovy uses curly brackets {..} to enclose blocks of code. These are primarily used to group a set of statements within elements such as control flow, class, method and closure declarations. Blocks also let you “partition off” parts of code so that items such as variables aren’t visible to other parts of your code - referred to as “scope”.
Groovy doesn’t allow the use of anonymous code block such as the one below:
{
def count = 0
assert count == 0
}
You need to label the block provided above if you want to use it in Groovy code:
Block1:{
def count = 0
assert count == 0
}
This limitation is primarily due to the closure syntax - labelling the block ensures it isn’t confused with a closure.
Blocks appearing within blocks are called “nested blocks”:
Block1:{
def count = 0
assert count == 0
NestedBlock: {
assert count == 0
}
}
If the above code was a Groovy script the block structures really would be redundant “noise” - you’re not likely to see usage such as Block1:{..} very often. You’re more likely to see blocks used with control flow statements (such as if):
if (true) {
//some code
}
… in class declarations:
class Person {
}
… in method declarations:
def doStuff() {
}
… in closure declarations
{name ->
println "Hello, $name"
}
Variable Scope
Variable Scope refers to the visibility of a variable from other blocks. A variable declared at the top level is visible to blocks nested within it. The reverse, however, is not true. This lets us declare variables within a block that is specific to that block (and any nested blocks) but doesn’t interfere with the rest of the program.
In the example below, the code within Block1 can “see” the count variable so both asserts work:
def count = 0
Block1: {
assert count == 0
}
assert count == 0
The second assert will fail as count is not in scope in the main body of the script:
Block1: {
def count = 0
assert count == 0
}
assert count == 0
In the next example, count is visible to the nested bock (Block2):
Block1:{
def count = 0
Block2:{
assert count == 0
}
}
What all of this means is that you need to keep an eye on where the variable can be “seen”. In the example below, the volume variable is visible (within scope) of the if block but the dbLevel variable is local to the if block.
def volume = 11
if (volume > 10) {
def dbLevel = 'extreme'
println "A volume of $volume is $dbLevel"
//more code
}
I repeatedly make a mistake in which I declare a variable within a try block but I need to use the variable later on. The code below is an example of my mistake - println myObj will never work as myObj is not visible at that level.
try {
def myObj = new Object()
} catch (any) {
//Do something to handle the exception
}
println myObj
I’ve put the def myObj = new Object() into the try block as the instantiation may cause an exception. What I needed to do was separate the variable definition (def) from the creation of a new instance (instantiation):
def myObj
try {
myObj = new Object()
} catch (any) {
//Do something to handle the exception
}
println myObj
41. The if Statement
Few programs consist of a set of statements read one after another from top-to-bottom. At various points we need the code to evaluate one set of statements rather than another - depending on the current context in which the program is running. The if statement is key to directing which route to take.
As an example, let’s say we have some code that displays the result of a division. It’s very important that we don’t try to divide a number by 0 as this causes an error. In the code below we use the if statement to check if the denominator is 0 before we perform the division:
def numerator = 0
def denominator = 0
// ... various statements
if (denominator != 0) {
println numerator / denominator
}
if evaluates the conditional expression between the parentheses - (..) - and will only process the statement block if the conditional result is true.
if - else
An else section can be provided where you want to process statements when the conditional result is false.
if - elsedef numerator = 0
def denominator = 0
// ... various statements
if (denominator != 0) {
println numerator / denominator
} else {
println 'I refuse to divide by zero'
}
if - else if - else
if and else let you deal with situations where you have two possible outcomes but sometimes you might have a few conditions that you want to check for:
if - else if - elsedef game = 'tennis'
if (game == 'chess') {
println 'I like to play chess'
} else {
if (game == 'tennis') {
println 'I can play tennis if you want'
} else {
println "Sorry, I don't know how to play $game"
}
}
The code above places another if check within the else block and checks if the player is asking for a different game (“tennis”). This looks (sort of) clean but start to picture a larger set of checks and the code gets confusing. Instead of nesting the second if within the else block, Groovy lets you use else if:
def game = 'tennis'
if (game == 'chess') {
println 'I like to play chess'
} else if (game == 'tennis') {
println 'I can play tennis if you want - just let me warm up'
} else if (game == 'golf') {
println 'I can play golf if you want but I get very angry'
} else {
println "Sorry, I don't know how to play $game"
}
The code above tidies up the nesting by allowing the second if to be part of the else block. Essentially you can provide a long series of checks in a single if-else if set and Groovy will evaluate each until one resolves to true. You can optionally provide an else block at the end to ensure that can all other outcomes (defined or otherwise) be dealt with.
It’s important to note that once an if evaluates to true, no other if expressions are evaluated. It’s a case of the first positive match wins. In the code below, the conditional (game=='chess' || game == 'tennis') is redundant because an earlier condition would have returned true ((game == 'chess'))
if (game == 'chess') {
println 'I like to play chess'
} else if (game == 'tennis') {
println 'I can play tennis if you want'
} else if (game=='chess' || game == 'tennis') {
println 'Can you really play both of these at once?'
} else {
println "Sorry, I don't know how to play $game"
}
That last point is also important as Groovy will also not evaluate any expressions used in further if expressions. In the example below, --i is never evaluated as the first if expression resolves to true:
def i = 10
if (++i > 10) {
//do something
} else if (--i < 10) {
//do something
}
assert i == 11
42. The switch Statement
There are times when the number of possibilities are larger than a readable if-else-if statement can handle. There are also times where we want to execute a specific set of statements but then “fall through” to others. It’s in these places that the switch statement comes in handy.
Let’s take a look at an example:
switch (game) {
case 'chess':
println 'I like to play chess'
break
case 'go':
println 'I can play go if you want'
break
case 'ludo':
println 'I can play ludo if you want'
break
default:
println "Sorry, I don't know how to play $game"
}
The switch statement evaluates an expression - in the example above it’s the value of a variable (game) but it could be the result of an operation. This is called the switch value.
The rest of the switch block is broken up into cases and (optionally) a default. Each case is assessed against the switch value and the first match is selected. Each case is declared:
- prefixed by the keyword
case, followed by- an expression, and lastly,
- a colon
:
- a colon
- an expression, and lastly,
The case expression can be a more complex expression but in our example above I’ve used a string value (e.g. chess). If the value of game was 'ludo' then the statements under case 'ludo': are evaluated.
The break statement indicates the end of the set of statements for the case and signals that the switch statement has completed. In the example above I’ve used break for every case but this isn’t required. If break isn’t provided, execution of the switch is said to “fall through” to the next set of statements. Essentially, Groovy will keep evaluating expressions until either a break is provided or the end of the switch block is reached.
Falling through can be useful if you want to perform the same set of statements for more than one case. The example snippet below provides an example of such a case (pun intended):
case 'snowboarding':
case 'snowball fight':
println 'But it\'s summer!'
break
Here’s another example of falling through:
def score = 2
println 'You win: '
switch (score) {
case 3:
println '- gift voucher'
case 2:
println '- toy'
case 1:
println '- stamp'
default:
println '- certificate'
}
In the code above the prizes are accumulated depending on your score and a score of 2 sees you win a toy, stamp and certificate - lucky you! Our default ensures that every child wins a prize, regardless of their score.
The Versatile Groovy switch
The Groovy switch statement is much more powerful than Java’s and can work across all data types.
In Java
switchis limited to the primitive types (and their object wrappers), Strings and Enums and thecaseexpression is limited to a value (not an operation).
Groovy achieves through the use of the isCase method defined for the Object class and overloaded by subclasses such as Pattern. Essentially, the switch value is passed to the case instance. In the example below, 10.isCase(score) would be called:
switch (score) {
case 10:
//etc
}
If this all sounds a little foreign, don’t worry, just check out the following sections to see how versatile the switch statement can be.
Using Ranges
Ranges can be used in the case and is selected when the switch value is in the range.
Let’s play some blackjack:
switch (hand) {
case 1..16:
println 'HIT'
break
case 17..21:
println 'STAND'
break
default:
println 'BUST'
break
}
Using Regular Expressions
Groovy extends the Java regular expression Pattern class to provide for their use in switch statements. This can be really handy if you want to test for a number of patterns.
In the example below I set up a list of URI’s1 and assess them against regular expressions based on various URI formats.
def location = ['urn:isbn:0451450523',
'http://en.wikipedia.org/wiki/Uniform_resource_locator',
'HTTPS://secure.example.com/',
'mailto:duncan@example.com',
'fax:53454567567']
location.each {
switch( it.toLowerCase() ) {
case ~/^urn:.*/ :
print 'This looks like a URN'
break
case ~/^https?:.*/ :
print 'This looks like a HTTP(S) URL'
break
case ~/^mailto:.*/ :
print 'This looks like an email address'
break
default:
print 'Not sure what this is'
}
println " ($it)"
}
Using Class Checks
Groovy’s switch can use a data type (Class) for comparison. Essentially, the switch will use the instanceof operator to compare the switch value with a class name provided in the case. In the example below I iterate through a list containing elements of various types. I use the switch statement to then determine the type of each list item:
def objList = [ 10,
'hello',
[1, 5, 8],
[name: 'Dave'],
~/\n/
]
for (item in objList) {
switch (item) {
case String:
println 'You gave me a string'
break
case Number:
println 'You gave me a number'
break
case List:
println 'You gave me a list'
break
case Map:
println 'You gave me a map'
break
default:
println "Sorry, I can't handle instances of ${item.class}"
}
}
- See http://en.wikipedia.org/wiki/Uniform_resource_identifier↩
43. The for Loop
The for loop will repeat a block of code whilst its condition is true:
forfor (<condition>) {
//statements
}
The for-in Loop
The for-each loop basically says “for each element is this collection, perform the following”:
for-infor (<var> in <iterator>) {
//statements
}
In the Groovy for-in loop we have a variable (var) provided as the next item in the iterator1. In most cases this is a collection of objects such as a list or map.
You can’t change the iterator within a loop - it’d just be too confusing! That means code such as the following causes an exception and won’t run:
def scores = [4, 8, 2]
for (i in scores) {
scores << i**2
}
Using a range
Consider a variable called countdown to hold a range:
def countdown = (10..0)
By itself, countdown probably doesn’t seem too useful but let’s look at a for loop:
def countdown = (10..0)
for (i in countdown) {
println "Launch in T-$i seconds"
}
println 'Blast off!'
So let’s break down for (i in countdown) {:
- The
(...)parentheses holds the condition - The variable
iwill hold the next element incountdown- You can name this as you would any other variable
- The element to the right of the
inreserved word is the variable being iterated (looped) over -
{starts the loop body- and its matching
}closes it
- and its matching
If you run this code in groovyConsole you’ll see our launch sequence displayed.
To make our code even more compact (yet readable), we can use the literal value for the range (10..0) in our for condition:
for (i in 10..0) {
println "Launch in T-$i seconds"
}
println 'Blast off!'
Lists
Looping through the items in a list is quite straight forward now you’ve seen the range example:
def planets = [
'Mercury',
'Venus',
'Earth',
'Mars'
]
for (planet in planets) {
println planet
}
Maps
Iterating through maps is much the same as we did for lists but the iteration variable consists of the key and the value for that map item. The next code segment will just display the value of each map item:
def domains = [
'com': 'Corporate sites',
'org': 'Non-commercial sites',
'mil': 'Military sites'
]
for (site in domains) {
println site
}
The code above will display a set of lines such as com=Corporate sites - illustrating that site contains a key/value pair.
Instead of printing out the iteration variable (site) we can be a little smarter and access the key (site.key) and value (site.value) individually:
def domains = [
'com': 'Corporate sites',
'org': 'Non-commercial sites',
'mil': 'Military sites'
]
for (site in domains) {
println site.key << ': ' << site.value
}
The Java for-each
Groovy supports Java’s version of a for-each loop:
for (<Type> <var>: <iterator>) {
//statements
}
Unlike Groovy’s for-in loop, the Java version:
- uses
:instead ifin - Requires you to declare a data type for the iteration variable
- Which makes lists consisting of elements with different data types a little more tricky.
Re-writing the previous planets example in the Java for-each style we’d see the following:
def planets = [
'Mercury',
'Venus',
'Earth',
'Mars'
]
for (String planet: planets) {
println planet
}
The Java version has no real benefit over the Groovy approach so I’d stick with the Groovy for (<var> in <iterator>). The Groovy approach also makes for easier iteration over maps.
If you really want to set a data type for your iteration variable you can still be Groovy about it:
def planets = [
'Mercury',
'Venus',
'Earth',
'Mars',
]
for (String planet in planets) {
println planet
}
A C-style for Loop
Java (and Groovy) both offer the for loop syntax found in the C programming language:
forfor (<init variable>; <condition>; <update expression>) {
//statements
}
-
<init variable>initialises the loop variable before the first iteration -
<condition>sets the condition to be met for the iteration to commence -
<update expression>is evaluated after each iteration
This next example does the same as for (i in (10..1)) but is more verbose:
for (i = 10; i >= 0; i--) {
println i
}
So what’s happening in (i = 10; i >= 0; i--)?
-
i = 10initialises the loop variableito10 -
i >= 0is the conditional that says “keep looping untiliis no longer greater than or equal to 10” -
i--is evaluated after each iteration -iis decremented by 1.
The <update expression> can be a more complex expression:
for (i = 0; i <= 20; i += 2) {
println i
}
Infinite loops
The C-style for loop can let you set up infinite loops:
for (;;) {
}
These are often used in event-based systems. Essentially, the program will enter a loop and await incoming events such as a mouse-click. It’s a very interesting aspect to coding but outside the scope of these tutorials.
The C-style loop doesn’t protect you from altering the thing you’re working on and, perhaps inadvertently, creating an infinite loop. That means that the code below needs the safety brake provided by (&& i < 20) as the loop keeps altering the size of scores. If you take out && i < 20 and run the code below it won’t stop unless you interrupt it or you run out of system resources:
def scores = [4, 8, 2]
for (i = 0; i < scores.size && i < 20; i++) {
println scores[i]
scores << scores[i]**2
}
- Many Groovy classes implement a feature (interface) named
Iterableand these let you easily iterate over a collection of items. Lists and Maps are both iterable, making it very easy to loop through their contents.↩
44. The while loop
The while loop will repeat a block of code whilst its condition is true:
while (<condition>) {
//statements
}
while loops feature the following:
-
<condition>can be a value or expression - the loop will only iterate if<condition>istrue. - The
whileloop syntax does not manage an iterator variable - you must do this yourself- It’s very easy to create an infinite
whileloop if you’re not paying attention
- It’s very easy to create an infinite
The example below uses a common approach for while loops and sets a flag to indicate when the desired state has been reached and the loop can stop:
def flag = false
def num = 0
while (!flag) {
num++
if (num**2 == 64) {
flag = true
}
}
println "The square root of 64 is $num"
The code above will increment num by 1 each iteration and test to see if num^2 is equal to 64. Once the correct num is reached, flag is change to true and the while condition now resolves to false - indicating that the while loop should run the next iteration.
The while loop can also be used to create an infinite loop: while(true) {}
There is no do...while loop
Unlike Java, Groovy does not have a do...while loop1. Don’t be sad.
45. Branching statements
Groovy has three branching statements:
breakcontinuereturn
break
We first came across the use of break in the switch statement - it’s used to indicate the end of the set of statements for the case and signals that the switch statement has completed.
The break reserved word is also used to exit out of a loop - even if there are more iterations possible. In the code below I iterate through the list until I reach the value 'Earth' and then break out of the loop:
def planets = [
'Mercury',
'Venus',
'Earth',
'Mars'
]
for (planet in planets) {
println planet
if (planet == 'Earth') {
break
}
}
When we looked at the while loop I gave an example of setting a flag variable and checking that as the loop’s condition. This could have been refined using break and not using flag at all:
def num = 0
while (true) {
num++
if (num**2 == 64) {
break
}
}
println "The square root of 64 is $num"
I’ll refine that while loop just a little further:
def num = 0
while (++num) {
if (num**2 == 64) {
break
}
}
println "The square root of 64 is $num"
As Groovy resolves a number other than 0 to be true, ++num will allow the loop to commence and we still rely on break to get us out of the loop.
continue
The continue reserved word will cause the next iteration of the loop - ignoring anything within the rest of the current iteration. In the loop below I use continue to ignore 'Earth'.
def planets = [
'Mercury',
'Venus',
'Earth',
'Mars'
]
for (planet in planets) {
if (planet == 'Earth') {
continue
}
println planet
}
Labelled branching
If you have a secret desire to create spaghetti code that quickly becomes unreadable then labels are for you!
Labels are used when you have nested loops - a loop within a loop. Both break and continue can be given a label that directs the program to another nesting level. In the example below I label the first loop flowerlist and, when I get to the colour 'Green' in the inner loop, my continue is directed not at the inner loop but at the outer one labelled flowerlist - this is called a “labelled continue”:
def colours = ['Red', 'Orange', 'Yellow', 'Green', 'Blue', 'Indigo', 'Violet']
def flowers = ['daisy', 'rose', 'tulip']
flowerlist:
for (flower in flowers) {
for (colour in colours) {
if (colour == 'Green') {
continue flowerlist
}
println "$colour $flower"
}
}
As you can see, the label consists of a name, followed by a colon (:) that appears above the loop being labelled. The code above will display the following:
Red daisy
Orange daisy
Yellow daisy
Red rose
Orange rose
Yellow rose
Red tulip
Orange tulip
Yellow tulip
A labelled break works much the same way and defers control back to the loop designated by the label.
There are times when labels are useful but really think about what you need to do before resorting to them. For example, using a break in the code above would have done the job:
def colours = ['Red', 'Orange', 'Yellow', 'Green', 'Blue', 'Indigo', 'Violet']
def flowers = ['daisy', 'rose', 'tulip']
for (flower in flowers) {
for (colour in colours) {
if (colour == 'Green') {
break
}
println "$colour $flower"
}
}
return
The return statement is used to hand control back to the caller1. In most cases, return is used in a method or closure to return a value. In the most basic usage, the keyword return just appears on a line by itself:
//some code
return
Any code that appears below the return is unreachable and is never evaluated:
//some code...
return
//unreachable code...
Return can be provided a value and this is returned to the caller:
//some code
return 3.14
You can use an expression in the return statement and the result is returned:
//some code
return circumference / diameter
Using return within the body of a script2 will cause it to exit as the command-line/terminal is the caller. When exiting you can choose to return a value - usually 0 if the script succeeds, or an error number if it fails.
V Exceptions
46. Introduction
Groovy takes on Java’s approach to raising, handling and reporting errors and exceptions:
- Errors are serious problems that usually cause an application to halt (“crash”). In most cases you won’t handle these - they’ll happen and the program will fall over.
- Exceptions are less serious and applications, with good exception handling set up, may be able to keep going.
At the heart of this model is the java.lang.Throwable1 class. Exceptions and Errors are are two sides to the Throwable family tree:
-
java.lang.Exceptionis the superclass (parent) of all exceptions -
java.lang.Erroris the superclass (parent) of all errors
When writing Groovy applications you’re likely to interact with exceptions in the following ways:
- Catching exceptions (using
try-catch) thrown by various classes, be they written by you, part of the Java/Groovy libraries or from a third-party. - Throwing your own exceptions using (
throw) to signal that something’s gone wrong in your code. - Being surprised and frustrated when exceptions “just happen”
Your goal should be to use defensive coding and testing that seeks to handle what you think is necessary but be prepared for issues to arise and use facilities such as logging to help you determine the root-cause.
- Check out the JavaDoc for Throwable↩
47. Common Exceptions
In the following sections we’ll throw some errors and exceptions (on purpose) so that we can check out some of the most common children of java.lang.Throwable you’re likely to see. As a bonus we’ll also discover a few approaches to avoiding them.
java.lang.NullPointerException
The good old NullPointerException (NPE) will haunt your debugging sessions for years to come. Basically it means that you’ve tried to call a method or access a property on an object that isn’t there (i.e. the variable is null). Let’s cause an NPE - it’s easy:
def tmp = null
tmp.class
To avoid these, check for null by:
- Using the Safe Navigation operator (
tmp?.class) - Checking the variable with an
ifstatement before trying to access it
java.lang.AssertionError
This is an Error, not an Exception and occurs when your assert expression evaluates to false:
assert true == false : 'This cannot be'
When your Groovy assertions fail you actually seem to receive a org.codehaus.groovy.runtime.powerassert.PowerAssertionError - a subclass of java.lang.AssertionError.
The assert statement is usually seen in tests and small scripts. It’s usually better to signal an incorrect state/situation using throws - more about them in a later chapter.
java.lang.NumberFormatException
Groovy can be used as a dynamic language so there are times where you may try to do something to a value that just can’t be done. Trying to convince something that it can be a number when it really can’t be will give you a NumberFormatException:
'Kitten' as Integer
If you really need a variable to be a specific type you could use the class check feature of the switch statement. In the code below I check if value is of a type within the Number family tree before I try to convert it to an Integer. If it isn’t, I could throw and exception or handle it in some other way:
def value = 'kitten'
switch (value) {
case Number:
value = value as Integer
break;
default:
println 'I should throw an exception'
}
groovy.lang.MissingPropertyException
This exception happens when you try to access an object’s property but it doesn’t have that property. In the example below, my Person class doesn’t have a name property:
class Person {}
def jim = new Person()
jim.name
Using try-catch around this sort of exception can let you duck type - an approach that uses an object’s properties and methods to determine if something is possible.
I reckon that the hasProperty() method available on all Groovy objects is a cleaner approach than the try-catch option. We can check the object has the property before trying to use it and without causing an exception:
class Person {}
def jim = new Person()
if (jim.hasProperty('name')) {
jim.name
}
groovy.lang.MissingMethodException
This exception appears when you call a method on an object that doesn’t support the method. The lack of a getName() method on the Person class will cause an exception for poor old jim:
class Person {}
def jim = new Person()
jim.getName()
There’s no hasMethod() method - it’s called respondsTo():
class Person {}
def jim = new Person()
if (jim.respondsTo('getName')) {
jim.getName()
}
The respondsTo() method just checks if the method exists but we may want to be certain that the methods exists and has the parameter list we’re after. To achieve this we need to call respondsTo() with a second parameter, a list of the method argument types we expect - respondsTo(String name, Object[] argTypes).
java.lang.IndexOutOfBoundsException
These appear when you attempt to get() an index from a list that isn’t there. The code below attempts to get the 5th element from a 3-element list:
def list = [0, 1, 2]
println list.get(5)
Note that if we’d written that code in a slightly different way, we’d get null returned rather than an exception raised:
def list = [0, 1, 2]
println list[5]
Checking list.size() (or the length property) before trying to access is another option:
def list = [0, 1, 2]
if (list.size() >= 5) {
println list.get(5)
}
Of course the for-in loop will iterate through the list and not try to give you an element that isn’t there.
def list = [0, 1, 2]
for (item in list) {
println item
}
java.lang.ArrayIndexOutOfBoundsException
If you just had to use an array (instead of a list) then you’ll get an ArrayIndexOutOfBoundsException if you attempt to use an array index that isn’t there:
Integer[] nums = [0, 1, 2]
nums[5]
We can use the length property to make sure we don’t try to access an element that isn’t there:
Integer[] nums = [0, 1, 2]
if (nums.length >= 5) {
nums[5]
}
The for-in loop is also handy for staying within the bounds:
Integer[] nums = [0, 1, 2]
for (item in nums) {
println item
}
48. Anatomy of an Exception
Throwable and all of its descendants provide a number of useful methods. Let’s start off with a very basic try-catch block so that we can then dissect the NullPointerException:
try {
def person = null
person.getName()
} catch (any) {
println "Exception received: ${any.class.name}"
println()
println "getMessage() returns: ${any.getMessage()}"
println()
println "getCause() returns: ${any.getCause()}"
println()
println 'getStackTrace() returned:'
for (item in any.getStackTrace()) {
println "${item.getFileName()}\t${item.getLineNumber()}\t${item.getClass\
Name()}\t${item.getMethodName()}\t${item.isNativeMethod()}"
}
}
any.class.name- Tells us the type of exception that was raised
- We get:
java.lang.NullPointerException getMessage()- Returns the message that was set by the thrower of the exception
- We get:
Cannot invoke method getName() on null object getCause()- This isn’t always set but can be handy to know. Essentially this is set if the exception is “relaying” another exception.
- We get:
null for (item in any.getStackTrace()) {..}- The
getStackTrace()method returns an array ofjava.lang.StackTraceElement. EachStackTraceElementcan then be further dissected to see what was happening when the exception occurred. - In my example I output a tab separated row for each
StackTraceElement- the methods that I call should be reasonably self-explanatory but you can always check the Java API for more information. - To just dump out the stack trace I could have just used
printStackTrace()
49. Try-Catch-Finally
The try-catch-finally statement can have three forms:
try-catchtry-catch-finallytry-finally
Groovy doesn’t support the try-with-resources syntax available in Java. Groovy’s closure infrastructure often takes care of closing resources for you (you may not even need a finally block).
Scope
Before getting into the specific syntax it’s important to point out that the try statement presents a block with its own scope. This means that variables declared within the try block can’t been seen outside the block. In the example below the assert fails not because score doesn’t equal 12 but because the score variable is out-of-scope:
try {
def score = 12
} catch (any) {
}
assert score == 12
In fact, the score variable won’t be visible to the catch block or a finally block. If you do need to access score outside of the try block then you should declare it before the try:
def score
try {
score = 12
} catch (any) {
}
assert score == 12
try-catch
The basic format of try-catch is as follows:
try-catchtry {
//statements...
} catch (<Exception type> <var>) {
//statements...
}
If an exception occurs within the try block:
- The catch variable (
var) is set to the exception instance - If
Exception typeis provided (this is optional) then thecatchblock will only be activated if the exception is of that type.
In the following example I generate an exception on purpose by dividing 10 by 0. The catch block is set up to catch any exception raised:
try {
10 / 0
} catch (any) {
println any.message
any.printStackTrace()
}
As we saw in an earlier chapter, exceptions in Groovy are objects - they have fields and methods, allowing me to display the message within the exception as well as display the stack trace.
An Exception type can be provided for a catch block. In the example below I only catch an ArithmeticException - any other type of exception is raised up to the caller:
try {
10 / 0
} catch (ArithmeticException e) {
println 'I just caught an ArithmeticException'
}
A try-catch statement can consist of multiple catch blocks, each targeting specific exceptions. In this next example I explicitly catch ArithmeticException and have a default catch to pick up any other exception raised:
try {
10 / 0
} catch (ArithmeticException e) {
println 'I just caught an ArithmeticException'
} catch (any) {
println 'What just happened?'
}
In this next example I explicitly catch IllegalStateException and ArithmeticException and have a default catch to pick up any other exception raised:
try {
10 / 0
} catch (IllegalStateException e) {
println 'I just caught an IllegalStateException'
} catch (ArithmeticException e) {
println 'I just caught an ArithmeticException'
} catch (any) {
println 'What just happened?'
}
If we wanted to handle a number of exception types (sometimes called a multicatch) in the same manner, the | operator can be used within the same catch to provide a separator for the exception types:
try {
10 / 0
} catch (IllegalStateException | ArithmeticException e) {
println 'I just caught an exception I want to handle'
} catch (any) {
println 'What just happened?'
}
The last catch block (catch (any)) is a very useful one to reflect on when considering how you deal with exceptions. By providing a catch block you are flagging an intent to actually do something useful with an exception. If you don’t actually intend to add any value to the situation then I’d suggest not catching the exception. That way it will pass up the chain to the calling code (which may chose to actually handle the exception). The buck stops at the top-level code (e.g. the script) and, without explicit handling, the exception will be displayed and the program halted.
My preference is to use try-finally if I just want to tidy up resources (such as files) if an exception occurs - that way the exception will pass up to the caller but I don’t get in the way. In most cases I use the explicit form of catch and indicate which Exception type I am prepared to handle.
try-catch-finally
The try-catch statement can have an optional finally block. This is run regardless of if an exception is raised. The finally block doesn’t receive any incoming parameter and can appear no more than once per try:
try-catch-finallytry {
//statements...
} catch (<Exception type> <var>) {
//statements...
} finally {
//statements
}
In the code below, the println in the finally block will run regardless of whether an exception was raised or the try block completed successfully:
try {
10 / 0
} catch (any) {
println any.message
} finally {
println 'I think we survived'
}
But why use finally? Exceptions are used in a large number of places, including:
- Failure to read/write a file
- Failure to access a database
- Trying to access
null
The finally block comes in handy when you need to tidy up resources before either completing the try block or losing control to an exception. You’ll most commonly see finally used to close files, disconnect from databases or return the system to a state in which it can continue.
try-finally
The third form of the try statement doesn’t provide a catch block:
try-finallytry {
//statements...
} finally {
//statements
}
Essentially we’re indicating that any exceptions will just be raised up to the caller but we need to tidy up some resources before losing control:
try {
10 / 0
} finally {
println 'Finally block has been evaluated'
}
50. How Much Should We try?
Whilst you could wrap an entire script/method/closure in a huge try statement this will quickly get confusing - imagine how many catch blocks you’ll need at the end of a 150-line script! Yes, you can catch (any) but you’d really have no clue what caused the exception.
Take the following example:
try {
methodOne()
methodTwo()
//148 more lines of code :)
} catch (MethodOneException e) {
} catch (MethodTwoException e) {
}
I tend to “localise” my try blocks so that they deal more specifically with the exception arising from a specific method call:
try {
methodOne()
} catch (MethodOneException e) {
}
try {
methodTwo()
} catch (MethodTwoException e) {
}
Although that last example results in more code I suggest it’s more useful as it helps localise the exception. In the first example I could end up catching a MethodTwoException from my call to methodOne - probably not what I really intended. If both methods throw the same exception type then localising really helps as I’ll know which method threw the exception.
Additionally, if you go with the rule that you’re only catching exceptions you’re prepared to actually do something with, a lot of your code may not be wrapped with a try statement at all!
51. Causing an Exception
The throw statement will cause an exception to be thrown. You’ll use this inside your own code to either throw an exception type already provided by Java or Groovy or to throw an exception type that you have developed. Remembering that exceptions are classes, you can create your own subclass of Exception for your own project. Let’s take a small step back for now and see how we throw an exception.
Often, new is used within a throw statement to initialise a new exception instance. The example below will throw a new instance of the IllegalStateException. As part of creating the new exception instance I pass it a message to help inform the user as to why they’re getting an exception:
def numerator = 10
def denominator = -1
try {
if (denominator < 0) {
throw new IllegalStateException('I haven\'t learnt how to divide negative numb\
ers')
} else {
return numerator / denominator
}
} catch (any) {
println "${any.message} (${any.class.name})"
}
You can use new to create a new instance of an exception but this won’t cause the exception to be thrown - you’ll need to throw it. The long-form version of the previous example would appear as:
def ise = new IllegalStateException('I haven\'t learnt how to divide negative nu\
mbers')
throw ise
In the code above I throw an exception (IllegalStateException) to indicate a limitation in my program. As before, the catch will receive the thrown exception but this time it could be either the IllegalStateException or the ArithmeticException:
def numerator = 10
def denominator = -1
try {
if (denominator < 0) {
throw new IllegalStateException('I haven\'t learnt how to divide negativ\
e numbers')
} else {
return numerator / denominator
}
} catch (IllegalStateException e) {
println 'I just caught an IllegalStateException'
} catch (ArithmeticException e) {
println 'I just caught an ArithmeticException'
} catch (any) {
println 'What just happened?'
}
The code above makes a little more sense than my earlier example as denominator may be 0 or a negative number and we are concerned with both possibilities. As mentioned earlier, we can use | to handle more than one exception type within the same catch block:
def numerator = 10
def denominator = -1
try {
if (denominator < 0) {
throw new IllegalStateException('I haven\'t learnt how to divide negativ\
e numbers')
} else {
return numerator / denominator
}
} catch (IllegalStateException | ArithmeticException e) {
println 'Stand back, I know how to handle this'
} catch (any) {
println 'What just happened?'
}
Constructing an Exception
There are a few approaches to constructing an exception, the main ones being:
new IllegalStateException()- Creates a new instance without a message
new IllegalStateException('Sorry, Dave, I cannot allow this')- Creates a new instance with a message
new IllegalStateException('Sorry, Dave, I cannot allow this', e)- Creates a new instance with a message and provides the exception (
e) that caused the exception you’re now throwing.
Let’s look at an example usage of the last variation. In the following code snippet I catch two possible exceptions and bundle e into a new exception instance but pass e to the new instance so that the caller could determine the cause:
catch (IllegalStateException | ArithmeticException e) {
throw new IllegalStateException('Unable to perform operation', e)
}
Upon having the exception thrown at me I could use the getCause() method to determine if there was an underlying cause.
Creating Your Own Exception
Whilst you can write your own Exceptions (they’re just objects after all), you should look to the pre-packaged ones and see if they meet your needs. Alternatively, consider if you can write a subclass that provides refinement to an existing exception rather than just extending Exception.
52. Catching Errors
Before we go too far on this one please note that errors indicate serious/abnormal problems and shouldn’t be caught.
Errors are different to exceptions as they indicate a fundamental issue rather than a recoverable problem. It’s highly unlikely you’ll ever need to handle an error so treat it like a cold and don’t try to catch one. They may “crash” your program but it’s likely any treatment that you try to apply will make things worse. For example, if somehow you managed to catch a java.lang.OutOfMemoryError, how would you respond?
One more time: don’t catch errors.
Errors are objects and can be caught much like exceptions but the following won’t work:
try {
assert true == false
} catch (err) {
println 'I caught the error!'
println err.message
}
The code above doesn’t do what we hoped as, by default, the catch is looking for Exception or one of its subclasses1 - probably because we shouldn’t catch errors.
In order to catch an error we must provide Error (or a subclass of Error) as the data type in the catch:
try {
assert true == false
} catch (Error err) {
println 'I caught the error!'
println err.message
}
- This is why, when we write our own exception we extend
Exceptionrather than implementThrowable.↩
53. Methods and Exceptions
The code in this chapter is rather skewed as we’d rarely throw an exception and catch it within the same try-catch block. Rather, we’re most likely to throw an exception from a method back to the caller and we use try blocks to catch exceptions from methods we’re calling.
Throwing an exception from a method results in no return value being returned to the caller - the caller needs to handle the exception. It’s important to note that, where the try and/or catch block contain a return statement, the finally block will be evaluated before the return is actually processed. In the next two examples below, the println in the finally block will always display.
return in catchdef testMethod() {
try {
10 / 0
} catch (any) {
return
} finally {
println 'Finally block has been evaluated'
}
}
return in trydef testMethod() {
try {
return 100
} catch (any) {
println 'Exception'
} finally {
println 'Finally block has been evaluated'
}
}
testMethod()
We’re about to get to the section on Methods.
VI Methods
54. Introduction
Methods (sometimes also called functions) are blocks of code that can be run more than once and encapsulate a segment of logic. We define a method by writing the code that will be run when the method is called. Calling a method is the process of your code asking the method to start.
Groovy, like Java, is object-oriented and works around classes. C and Pascal are procedural and work around functions. Whilst the methods described here may look a bit like C-style programming that lets you build libraries of functions, what is really happening is Groovy wraps your code in a class definition behind the scenes. You’re only likely to create “raw” methods, like the ones below, as a means to break up your scripts. More usually you’ll create methods within your classes.
Methods have a number of features:
- Methods have names
- this allows you to call your method in a meaningful way
- Methods can accept parameters
- these are inputs into your method that can affect how your method operates
- Methods can return a result value
- this can be captured by a variable from the code calling the method
- Methods have their own scope
- they can have their own variables and not inadvertently affect the rest of your program
We’ve already looked at various methods for use with variables such as lists and maps so you’ve seen methods being called throughout the previous chapters.
55. The Basics
Let’s start by examining a new method we’ll write to calculate the average of the numbers in a list:
def determineAverage(list) {
return list.sum() / list.size()
}
Breaking that code up we can see:
- The
defreserved word is used to commence the method declaration- Much like we use when defining a variable
-
determineAverageis the name of the method - The method accepts a single parameter,
list - A single value is returned using the
returnreserved word- In this case it’s the result of
list.sum() / list.size()
- In this case it’s the result of
The method name (determineAverage) may look a bit odd but it uses a naming strategy called “lower Camel Case”. The camel aspect is the use of upper-case letters to indicate individual words in the name (hence Average). The first word in the method name is a verb (determine) to indicate that a method “does” something.
Let’s return to that determineAverage method and get a complete script together - you can copy and paste this into groovyConsole and run it to experience the method first-hand:
def determineAverage(list) {
return list.sum() / list.size()
}
def scores = [2, 7, 4, 3]
def result = determineAverage(scores)
println result
Let’s look at the main components of that script:
- The
determineAveragemethod is defined as before- This can appear above or below the other code
- A new list of numbers is created:
def scores = [2, 7, 4, 3] - The method is called with the
scoresvariable passed as a parameter - The return value (result) of
determineAverageis stored in theresultvariable.
In the example I called the method using determineAverage(scores) but, in many cases, I don’t need to use the parentheses and determineAverage scores would have also worked. That’s why println 'hello, world' works just fine. This works really well when you start to use Groovy to construct domain-specific languages.
56. Parameters
Let’s look at the last example from the previous chapter:
def determineAverage(list) {
return list.sum() / list.size()
}
def scores = [2, 7, 4, 3]
def result = determineAverage(scores)
println result
You might be wondering what happened to the scores variable once it was passed to determineAverage as a parameter. Basically, Groovy gave it another name (list) for use within the method. Inside the method, list is just another variable. This means that if determineAverage changes list in some way, this is reflected in the scores variable used in the main script:
def scores = [2, 7, 4, 3]
def result = determineAverage(scores)
println result
println scores
def determineAverage(list) {
list << 9
return list.sum() / list.size()
}
The code above is very poorly behaved - it modifies list by adding a new item. Unless you provided documentation that explicitly states that you will change a parameter, most developers will assume that their parameters will be safely untouched by your method.
Declaring data types for parameters
Groovy lets you designate a data type for your parameters:
def determineAverage(List list) {
return list.sum() / list.size()
}
As you start to develop classes and larger programs, methods create your Application Programming Interface (API). Such methods can be called by other people’s code and they could be using another JVM language (such as Java). It can make their life a little easier if you indicate the data types you’re expecting for your parameters. Alternatively, you can stay true to dynamic typing and let people know through your documentation.
Multiple parameters
Let’s look at another method - one that needs several parameters:
def callFriend(name, phone, message) {
println "Dialling $name on $phone"
println "Hi, $name - $message"
}
Either of these calls would work - it just depends if you want to use the parentheses:
callFriend('Barry', '0400 123 456', 'Did you see that local sporting team?')
callFriend 'Alex', '07 3344 0000', 'Could you please check on my pets whilst I\'\
m away?'
Each parameter may be typed if needed:
def callFriend(String name, String phone, String message) {..}
You can provide a mix of typed and untyped parameters but this is a little messy and I think it’s bad form so I can’t be bothered encouraging such an action by providing an example.
57. Default Values for Parameters
One or more parameters can be defined with a default value. This can be really useful if most calls to the method will use the defaults:
def displayMessage (message,
title = 'Important message:',
border = true) {
def borderText = ''
if (border) {
borderText = '--------------------------'
}
println """\
$borderText
$title
\t $message
$borderText
"""
}
displayMessage 'Preparing to shut down. Please save your work'
The displayMethod can be called in a number of ways:
displayMessage 'Preparing to shut down. Please save your work'displayMessage 'The system appears to have crashed', 'Error!'displayMessage 'Be prepared for the happiness patrol', 'Public announcement:', false
When you get to method overloading and other object-oriented concepts you’ll see that default parameter values can aid in reducing the variations of a method that you might need to provide.
58. Named Arguments
You can use named arguments by having the first parameter be a Map. Consider the method below:
def displayMessage (options, message) {
def borderText = ''
if (! options.containsKey('border') || options.border) {
borderText = '--------------------------'
}
def title = 'Important message:'
if (options.title) {
title = options.title
}
println """\
$borderText
$title
\t $message
$borderText
"""
}
displayMessage(title: 'Canberra', border: true, 'The capital of Australia')
The options parameter is actually a Map and this lets the caller use an interesting Groovy syntax when calling the method. Instead of passing a Map ([:]) to the options parameter, the caller can use the key: value format in their method call. This lets us call displayMessage in many ways, including:
displayMessage(title: 'Canberra', border: true, 'The capital of Australia')displayMessage title: 'Time', "It is now ${new Date()}"displayMessage border: false, 'Hang in there little buddy!'
My recommendation is to use named parameters for non-essential parameters and to make sure that your method can operate correctly if a named parameter is not provided.
If others are to be using your method or you need to remember which named parameters are available, then you’ll make sure that you add some useful documentation to the method.
59. Variable Arguments (Varargs)
There are times where we want to pass a variable number of parameters to the method. However, the parameter list for a method is fixed.
One approach is to use a list for a catch-all parameter, such as items does in the code below:
def buyGroceries(store, items) {
println "I'm off to $store to buy:"
for (item in items) {
println " -$item"
}
}
buyGroceries 'The Corner Store', ['apples', 'cat food', 'cream']
Whilst the list path is an option, Groovy supports the use of variable arguments (varargs) using the “three-dot” (...) notation for the last (and only the last) parameter:
def buyGroceries(... items) {
for (item in items) {
println item
}
}
buyGroceries 'apples', 'cat food', 'cream'
We can set a specific data type for the items parameter by placing the type before the ...:
def buyGroceries(String... items) {
for (item in items) {
println item
}
}
buyGroceries 'apples', 'cat food', 'cream'
Let’s return to the first example in this chapter and rewrite it using varargs:
def buyGroceries(store, ... items) {
println "I'm off to $store to buy:"
for (item in items) {
println " -$item"
}
}
buyGroceries 'The Corner Store', 'apples', 'cat food', 'cream'
So the items parameter is actually a list inside buyGroceries but the caller just passes a series of values to the method.
60. Return value
When we started this tutorial I provided a very basic method for calculating averages. I’ve rewritten it slightly to use varargs and this is a good starting point into using the return statement:
println determineAverage(10, 20, 30, 40)
def determineAverage(... list) {
return list.sum() / list.size()
}
In the code above I return the average to the caller so, instead of printing out the result I could also assign it to a variable: def avg = determineAverage(10, 20, 30, 40).
Using the return reserved word isn’t required as Groovy will return the result of the last statement:
println determineAverage(10, 20, 30, 40)
def determineAverage(... list) {
list.sum() / list.size()
}
You can use return to explicitly exit a method. By itself, return actually returns null. In the useless method I provide below, I explicitly provide return:
def printer(message) {
println message
return
}
printer('hello, world')
That use of return in the last bit of code was redundant as the method would exit anyway (it had nothing left to do). However, this can be handy if the last expression to run in a method returns a value that we don’t want as the return value for our method.
Anything after a return is inaccessible, as illustrated by my even more useless method:
def printer(message) {
println message
return
println 'Help, I don\'t exist'
}
That last line in the method will never, ever, ever be called. But if I really wanted it to be called I can use the try-finally approach:
def printer(message) {
try{
println message
return
} finally {
println 'Help, I don\'t exist'
}
}
Now, that last bit of text will be displayed as it’s in a finally block. This example is rather daft but it serves to illustrate how finally can be used to clean up something like an open file before the return is actioned.
Multiple Returns
You can have more than one return statement in a method but only one will ever be evaluated. This is really handy as it localises the return and prevents the method from further evaluation. You can also place a return at the very end of the method block to ensure that the method always returns a value. In the code below I use two return statements in the switch but also have return false at the bottom of the method just in case something slips through (most likely when I add in code at a later date):
def checkAnimalAsPet(animal) {
switch(animal){
case 'dog':
case 'cat':
return true
default:
return false
}
return false
}
assert checkAnimalAsPet('cat')
assert checkAnimalAsPet('dog')
assert checkAnimalAsPet('lion') == false
assert checkAnimalAsPet('pterodactyl') == false
You’ll note that, in the checkAnimalAsPet method I have a switch with no breaks. Essentially, the return is breaking out of the switch and the method all at once.
Declaring data types for return values
A data type can be declared for the return value by replacing def with the class name:
e.g. Number determineAverage(... list){..}:
Number determineAverage(... list) {
return list.sum() / list.size()
}
println determineAverage(10, 20, 30, 40)
This is very handy if your method is to be accessed as part of an API, especially by Java programs.
You may notice some methods defined with a return type of void. This indicates that the method won’t return a value:
void displayText() {
println 'Hello, World'
}
I can still use return within the method - I just can’t return a value.
Sequential method calls
In many examples I have used a method’s returned value to set a value of a variable, in an assert or as the input to a println. As the return value has its own type, we can actually call a method straight from the method call. This can be useful if one method call is just an intermediary step towards our goal and we don’t want to explicitly store its return value.
In the example below I call the tokenize method which returns a List of the words in the poem I then call the size method for that list to determine how many words are in the poem:
def poem = '''\
Once a jolly swagman camped by a billabong
Under the shade of a coolibah tree,
And he sang as he watched and waited till his billy boiled:
"Who'll come a-waltzing Matilda, with me?"
'''
poem.tokenize().size()
61. Throwing an exception
A method is able to throw an exception just as we saw in the Exceptions tutorial. In the code below I throw an exception if the caller to determineAverage() tries to pass a String through as a parameter:
def determineAverage(...values) throws IllegalArgumentException {
for (item in values) {
if (item in String) {
throw new IllegalArgumentException()
}
}
return values.sum() / values.size()
}
//This works:
assert determineAverage(12, 18) == 15
//This does not work - we get an exception
determineAverage(5, 5, 8, 'kitten')
None of that code is new to you except for the throws IllegalArgumentException that forms part of the method’s signature1. The use of throws helps describe our method a little better by making callers aware of what to expect.
Multiple exceptions can be listed against throws, as seen in the example below:
def determineAverage(...values)
throws IllegalArgumentException, NullPointerException {
for (item in values) {
if (item in String) {
throw new IllegalArgumentException()
}
}
return values.sum() / values.size()
}
Groovy doesn’t require that you explicitly provide a throws listing if your method throws an exception or passes up an exception that it doesn’t handle. However, if your method is to be used by others, I’d suggest that including throws is worth the effort.
You may note that, in that last example, I placed throws on a second line - this helps readability as it breaks up the display of the signature just slightly.
- This is the section of the method definition contain the return type, method name, parameters and thrown exceptions. As always, Wikipedia has some further information↩
62. Documenting a method
The groovydoc command that comes with the Groovy installation can be used to generate HTML documentation from comments within your code. GroovyDoc is based on JavaDoc and uses much the same syntax.
Let’s look at a Groovy method that features GroovyDoc comments:
/**
* Returns the average of the parameters
*
* @param values a series of numerical values
* @throws IllegalArgumentException if a values parameter is a String
* @returns The average of the values
*/
def determineAverage(...values)
throws IllegalArgumentException {
for (item in values) {
if (item in String) {
throw new IllegalArgumentException()
}
}
return values.sum() / values.size()
}
Taking a look at the commenting:
- The multi-line comment block starts with
/**to indicate that this is a GroovyDoc - The first piece of text provides the summary of the method. It’s one line and meant to be terse.
- A set of
@paramtags can be provided to describe each parameter.- The format is
@param <parameter name> <summary> - You don’t provide the parameter type even if you declare one
- The format is
- Each exception that can be thrown by the method is listed against a
@throwstag and provides a summary as to when the exception may be thrown.- The format is
@throws <exception class> <summary>
- The format is
- The
@returnstag describes what the method willreturn- The format is
@returns <summary>
- The format is
If you copy the sample code into a file named Average.groovy you can then run the following command in your command line/terminal:
groovydoc -d doc Average.groovy
This will produce a directory named doc that contains a set of documentation files. Inside the doc directory you’ll see index.html - open this in a browser to view your documentation.
As you click through the various links you’ll find the documentation for the determineAverage() method. It’ll contain the following information (but look a lot prettier):
java.lang.Object determineAverage(java.lang.Object… values)
Returns the average of the parameters
- throws:
- IllegalArgumentException if a parameter is a String
- returns:
- The average of the values
- Parameters:
- values - a series of numerical values
If you keep clicking links in the html files but can’t find it, look in the DefaultPackage directory for a file name Average.html - that’ll be what you’re after.
63. Techniques
I’d like to tell you that your programming career will be all about writing perfect code that never has problems but I’d just be lying. Here are some techniques to help make sure your methods are more robust and helpful to other programmers.
Valid parameters
We understand that the method determineAverage(...values) is expecting a list of numbers and have used a reasonably clear naming strategy (determineAverage) to display that the method is number-oriented but what happens when our colleague gives us something like:
determineAverage(5, 5, 8, 'kitten')
Clearly, kittens aren’t something that the average calculation can understand1. If you try to run that code you’ll get a nasty error that basically says your code has failed. Don’t be too hard on your colleague though - perhaps they’ve loaded data from a file that’s become corrupted by felines.
Comment your method
Firstly, make sure that determineAverage has some useful documentation such as:
/**
* Returns the average of the parameters
*
* @param values a series of numerical values
* @returns The average of the values
*/
def determineAverage(... values) {
values.sum() / values.size()
}
In the example above I’ve just added a GroovyDoc comment block that describes what the method does, its parameter and what it will return. At the very least, other developers will see how they should be using my method.
Check the parameters
Next, I can be more defensive in my coding and make sure that the method has a prerequisite that needs to be met before it attempts to run.
/**
* Returns the average of the parameters
*
* @param values a series of numerical values
* @throws IllegalArgumentException if a parameter is a String
* @returns The average of the values
*/
def determineAverage(...values)
throws IllegalArgumentException {
for (item in values) {
if (item in String) {
throw new IllegalArgumentException()
}
}
values.sum() / values.size()
}
//This works:
assert determineAverage(12, 18) == 15
//This does not work - we get an exception
determineAverage(5, 5, 8, 'kitten')
The approach above checks to make sure that no parameter is a String - if you pass one to the method you’ll get an exception thrown back at you. In reality I should make sure that only numbers can be passed in and my check won’t pick up a Boolean value - more on this in a moment.
What do you think would happen if I called the method with no parameters - determineAverage()?
(pause)
Well, the division would attempt to divide by zero and that’s a fail so I need to also check that values isn’t empty (I’ll leave out the comments for brevity):
def determineAverage(...values)
throws IllegalArgumentException {
for (item in values) {
if (item in String) {
throw new IllegalArgumentException()
}
}
if (!values) {
return 0
}
values.sum() / values.size()
}
assert determineAverage() == 0
Note that if no parameters are passed, I return 0. I really don’t like returning null from methods as it makes other developers then have to check for null. I also don’t want to raise an exception - I’m happy enough to say that the average of no values is 0.
Get really typed
If I really want to get specific with the data types I’ll take as parameters and return from the method then I can switch to static typing. I can make sure that all my parameters are of type Number (or one of its subtypes) and that I will return a value of type Number. The code below really gets specific about data types:
/**
* Returns the average of the parameters
*
* @param values a series of numerical values
* @throws IllegalArgumentException if a parameter is a String
* @returns The average of the values
*/
Number determineAverage(Number...values) {
if (!values) {
return 0
}
values.sum() / values.length
}
The following two calls to the method would work:
assert determineAverage(2, 7, 4, 4) == 4.25
assert determineAverage() == 0
…but the following two calls won’t work:
determineAverage(2, 7, 4, 4, 'kitten')
determineAverage(2, 7, 4, 4, true)
If you are writing a method that needs to be very specific about data types for parameters and/or return values then this is the way to go.
Testing
I’d get into a lot of trouble from experienced developers if I just left this chapter without mentioning testing. So, here’s a little example using Spock!
Firstly, this won’t run in your groovyConsole. You need to copy the code into the online Spock web console2 and then click on “Run Script”:
import spock.lang.Specification
class MathDemo {
/**
* Returns the average of the parameters
*
* @param values a series of numerical values
* @throws IllegalArgumentException if a parameter is a String
* @returns The average of the values
*/
static determineAverage(... values)
throws IllegalArgumentException {
for (item in values) {
if (!(item instanceof Number)) {
throw new IllegalArgumentException()
}
}
if (!values) {
return 0
}
return values.sum() / values.size()
}
}
class AvgSpec extends Specification {
@Unroll
def "average of #values gives #result"(values, result) {
expect:
MathDemo.determineAverage(*values) == result
where:
values || result
[ 1, 2, 3 ] || 2
[ 2, 7, 4, 4 ] || 4.25
[ ] || 0
}
@Unroll
def "determineAverage called with #values throws #exception"(values, excepti\
on) {
setup:
def e = getException(MathDemo.&determineAverage, *values)
expect:
exception == e?.class
where:
values || exception
[ 'kitten', 1 ] || java.lang.IllegalArgumentException
[ 99, true ] || java.lang.IllegalArgumentException
[ 1, 2, 3 ] || null
}
Exception getException(closure, ... args) {
try {
closure.call(args)
return null
} catch (any) {
return any
}
}
}
When you run this in the Spock web console you should get:
AvgSpec
- average of [1, 2, 3] gives 2
- average of [2, 7, 4, 4] gives 4.25
- average of [] gives 0
- determineAverage called with [kitten, 1] throws class java.lang.IllegalArgume\
ntException
- determineAverage called with [99, true] throws class java.lang.IllegalArgumen\
tException
- determineAverage called with [1, 2, 3] throws null
So there’s a lot going on here that we haven’t covered in the tutorials so far but let’s try to break it down:
- I wrapped the
determineAverage()method in a class namedMathDemoand made it astaticmethod- I won’t explain this here - just trust me that you can call
MathDemo.determineAverage() - But do note that I’ve changed
determineAverage()to better check that the parameters are numbers.
- I won’t explain this here - just trust me that you can call
- I then created a spock test
Specificationsubclass calledAvgSpec- The first test is
def "average of #values gives #result"(values, result)- This runs a series of tests using the data table in the
where:block - Yes, that’s right, Groovy will let you use a string as the name of the method - that’s v.cool but you can’t use interpolation (
${}).
- This runs a series of tests using the data table in the
- The second test is
def "determineAverage called with #values throws #exception"(values, exception)- This checks to make sure that the
IllegalArgumentExceptionis thrown for incorrect parameters
- This checks to make sure that the
- The first test is
As I say, there are a number of topics such as classes and closures that I haven’t covered - this example was just a quick one and should make sense as you learn about those additional concepts.
- Pun intended↩
- I’ve published the code to make it easy for you but can’t promise that this link will always work.↩
VII Closures
64. Introduction
Closures represent a reference to a function (method) that is accompanied by a referencing environment. This means that you can store function references in a variable and pass them to a function and that the original scope of the closure is available. Confused? Well, let’s get into it!
65. Introducing Closures
In the last tutorial we looked at methods and this prepares us as we start to look at closures. If you take a look at the following code you’re likely to quickly see what the printer() method does:
def printer() {
println 'Hello, world'
}
def cls = this.&printer
cls()
So what about def cls = this.&printer? Well, .& is the Method Reference operator and it returns a reference to the printer() method. I use this in the script as I need to reference the current instance in which I’m running - remember that Groovy wraps the script in a class.
Once I have the reference I can then call the closure with cls().
Note the following:
- When I define the closure (
def cls = this.&printer) I don’t put the parentheses after the method name (printer) - When I call the closure I pass in the parameters
Say I set this up a little differently and create a Test class with two printer methods - one that takes a parameter and one that doesn’t:
class Test {
static printer() {
println 'Hello, world'
}
static printer(name) {
println "Hello, $name"
}
}
def cls = Test.&printer
cls()
cls('Newman')
You’ll see if you run that last example that the call to the closure (cls) will result in the associated method being called depending on the parameters I provide.
Anonymous Functions
In the first examples of this chapter I used the Method Reference operator to point to an existing method that I had defined in a class. Closures can also be defined using anonymous functions. This lets us create a function at the point we define the variable.
In the next example I create an anonymous function using the regular block syntax ({..}) and store the function reference in cls:
def cls = { println 'Hello, world' }
cls()
That’s pretty nifty! We can define a function when needed and store it in a variable. This variable can then be passed to methods and other closures as a parameter.
The ‘it’ parameter
Anonymous functions get a single parameter named it by default. That means that you can use it as a parameter inside your function and it will contain the parameter passed in the call to the closure.
Let’s write a version of the printer method that uses the it parameter:
itdef cls = { println "Hello, $it" }
cls('Jerry')
66. Parameters
We just saw that closures have an in-built it parameter but we can specify a parameter when we declare the closure:
def cls = { name -> println "Hello, $name" }
cls('Jerry')
In the example above I declare the name parameter and this replaces it - in fact, if I called it within the closure I’d get an exception.
The syntax of closures is starting to become evident:
- Start the closure with
{ - List parameters, followed by
-> - Write a set of statements for the closure body
- End the closure with
}
Each parameter is separated using a comma (,):
def cls = { name, pet -> println "Hello, $name. How is your $pet?" }
cls('Jerry', 'cat')
As the closure gets more complicated I like to break it up over a number of lines. I start the closure and declare the parameters on the first line. The body of the closure then follows much the same as a method body and a final line closes off the closure:
def cls = { name, pet ->
println "Hello, $name. How is your $pet?"
}
cls('Barry', 'Lemur')
Closure parameters let me do the same things I can do with method parameters:
- Use data types for parameters
- Provide default values
- Varargs
- Named parameters
Parameter data types:
def cls = { String name, String pet ->
println "Hello, $name. How is your $pet?"
}
cls('Sally', 'Echidna')
Default values:
def cls = { name, pet = 'dog' ->
println "Hello, $name. How is your $pet?"
}
cls('Barry')
Varargs:
def cls = { name, ... pets ->
println "Hello, $name. How are your $pets?"
}
cls('Herman', 'cat', 'dog', 'spider')
Named parameters:
def cls = { grades, name ->
println "This year $name received the following grades: $grades"
}
cls(maths: 'D', science: 'C', art: 'A', 'Albert')
So closures and methods are rather similar - there’s no black magic going on.
67. Returning Values
Just like methods, closures can return a value. In this next example, the result of the last expression is returned (the value of num1 or num2):
def max = { num1, num2 ->
if (num1 >= num2) {
num1
} else if (num2 > num1) {
num2
}
}
println max(14, 6)
Alternatively, we can use the return statement to explicitly exit the closure and return a value:
def myClosure = { num1, num2 ->
if (num1 >= num2) {
return num1
} else if (num2 > num1) {
return num2
}
}
println myClosure(14, 6)
Unlike a method, closures can’t explicitly define the data type of a return value. You might take a crack at Integer maxNumber = {num1, num2 -> ...} to set the return type but this statement won’t work as maxNumber doesn’t hold the result of the closure - it holds a reference to the closure.
Closure myClosure = { num1, num2 -> ...} will work as the myClosure variable is actually of the Closure data type.
68. Closures as Method Parameters
We often say closures are first-class citizens in Groovy. This means that you can use them across the language in a similar manner to other first-class citizens, such as variables.
The best example to start our exploration is the each method that’s available to your collections (lists and maps). each can be called on a list or a map and is passed a closure as a parameter, allowing you to perform operations on each member of the collection. In the next example I call each on the numList variable and pass it a very basic closure as a parameter:
def numList = [6, 9, 11, 4, 7]
def myClosure = { println it }
numList.each(myClosure)
However, we can avoid myClosure altogether as we don’t really need to use it anywhere else in our code. So, we use an anonymous closure - one that doesn’t get a name (i.e. assigned to a variable). This is really useful if we don’t need to use the closure outside of the method being called:
def numList = [6, 9, 11, 4, 7]
numList.each({ println it })
Whilst the closure can be placed within the (...) parentheses, this becomes cumbersome for larger anonymous closures so Groovy lets us drop the parentheses:
def numList = [6, 9, 11, 4, 7]
numList.each { println it }
For a final example, we can call the each method directly against the literal array, just to prove that Groovy has a versatile and flexible syntax:
[6, 9, 11, 4, 7].each { println it }
Methods with Closure Parameters
Your own methods can accept one or more closures as a parameter. When doing this we usually follow a basic convention of:
- Use
closureas the parameter name - Put the
closureparameter at the end of the parameter list
In the example below, the mutator method accepts a closure as the second parameter:
def mutator(value, closure) {
closure(value)
}
mutator 10, {it**2}
We are able to call mutator in a number of ways:
mutator(10, {it**2})mutator 10, {it**2}mutator(10) {it**2}
Those last two options are very useful if you’re going to pass a non-trivial closure as it helps the reader see that the last parameter is a closure and not some random block.
Here’s another example, a method findPrimes that accepts a list of numbers (such as a range) and a closure. The method loops through the list and, when it determines the item is a prime number it will call our closure:
def findPrimes(list, closure) {
list.each {
def isPrime = true
if (it != 2) {
for (divisor in (2..it / 2)) {
if (it % divisor == 0) {
isPrime = false
break
}
}
}
if (isPrime) {
closure(it)
}
}
}
def numList = (1..100)
findPrimes numList, { println "I found a prime: $it" }
If I wanted to be specific about my parameter data types, the correct data type for closure is Closure. This lets me prepare a static typed method signature of def findPrimes(List list, Closure closure)
One last round at this one - this time to set a return value from the findPrimes method. The code is not really different to the previous example but it throws a number of items together: a typed method signature, a closure parameter, and a return value for the method (the list of primes).
List findPrimes(List list, Closure closure) {
def result = [ ]
list.each {
def isPrime = true
if (it != 2) {
for (divisor in (2..it / 2)) {
if (it % divisor == 0) {
isPrime = false
break
}
}
}
if (isPrime) {
result << it
closure(it)
}
}
result
}
def primes = findPrimes 0..100, { println "I found a prime: $it" }
println primes
69. Loops and closures
A number of Groovy types (such as lists and maps) support methods like each which call a closure on each member of a collection. These are similar to loops (for and while) but each call to the closure is discreet and you can’t use the break branching statement to exit as you would with a loop. However, you can use return as somewhat of a proxy for continue.
In this chapter we’ll take a look at a number of these methods.
each
We looked at each in the previous chapter but let’s do one more. In the example below I determine the average of a list of numbers and then use the each method to tell us something about each number’s relationship to the average:
eachdef scores = [ 2, 4, 6, 8, 10 ]
def total = 0
def average = 0
for (i in scores) {
total += i
}
average = total / scores.size
println "The average of the scores ($scores) is $average"
scores.each {
print "The value $it is "
if (it > average) {
println 'above average'
} else if (it < average) {
println 'below average'
} else {
println 'average'
}
}
collect
The collect method calls a closure for each item in a list and returns a list of the results from each closure call. This next example takes a list of test scores and uses the closure’s algorithm for returning a list of grades:
collectdef grades = [ 45, 70, 95, 51 ].collect {
switch (it) {
case (90..100):
'A'
break
case (70..89):
'B'
break
case (50..69):
'C'
break
default:
'F'
}
}
println grades
sort
The sort method, when called on a list, will use the closure to evaluate a sorting algorithm and alter the list to reflect its sorted form.
In the next example I provide a very basic sorting closure - one that just returns the length of the string it’s passed. This means that the sort method will return a list with the shortest string first:
assert ['cat', 'rabbit', 'ox'].sort{it.length()} == ['ox', 'cat', 'rabbit']
In this use of sort the closure accepts a single parameter and returns a numerical value. sort uses this result to determine the list item’s new place in the sorted list. A string of length 2 will be placed at an earlier index to a string with a length of 6.
It’s important to remember that the list is changed by the sort method - the next example highlights this as the animals variable is different after sort is called.
def animals = ['cat', 'rabbit', 'ox']
animals.sort{it.length()}
assert animals == ['ox', 'cat', 'rabbit']
When the sort method is passed a closure that accepts two parameters then it works through the list by comparing neighbours. As sort changes the list, these neighbours change, resulting in the closure undertaking a number of comparisons, at least equal to the number of list items. This is powerful stuff so let’s look at a sorting closure I used when discussing Relational Operators:
sortdef nums = [ 42, -99, 6.3, 1, 612, 1, -128, 28, 0 ]
//Ascending
nums.sort { n1, n2 -> n1 <=> n2 }
assert nums == [ -128, -99, 0, 1, 1, 6.3, 28, 42, 612 ]
70. Useful Methods That Use Closures
Groovy adds a number of methods to java.lang.Object that gives you the power of closures baked into many of the data types you’ll use on a daily basis.
any
The any method is passed a closure that evaluates a criteria (condition). If any element in the collection meets that criteria, true is returned. Importantly, any will only iterate through the list until it the criteria is met.
def scores = [10, 8, 11, 6]
assert scores.any {it > 10} == true
find and findAll
The find method locates the first item in a collection that meets the criteria set in the closure:
def animals = ['dog', 'rat', 'cat', 'mouse']
assert animals.find {it in ['rat', 'mouse', 'wild pig'] } == 'rat'
The findAll method is similar to find but returns all collection items that meet the criteria set by the closure:
def animals = ['dog', 'rat', 'cat', 'mouse']
assert animals.findAll {it in ['rat', 'mouse', 'wild pig'] } == ['rat', 'mouse']
split
The split method splits a collection into two lists: the first list contains all items that meet the criteria set by the closure parameter and the second list contains all remaining items.
In the example below I use the split method to get a list of those who got a score over 100 and those that didn’t.
splitdef players = [
[ name: 'Fred', topScore: 120 ],
[ name: 'Sally', topScore: 200 ],
[ name: 'Felix', topScore: 101 ],
[ name: 'Albert', topScore: 12 ],
[ name: 'Jane', topScore: 20 ]
]
def result = players.split { it.topScore > 100 }
result[0].each { println "$it.name is in the hall of fame" }
result[1].each { println "$it.name missed out" }
with
The with method provides a handy approach to calling several methods and manipulating fields for an object.
In the example below I use with to perform a set of operations on an instance of the Person class:
withclass Person {
def name
def email
def mobile
def printBusinessCard() {
println "$name"
println "e: $email"
println "m: $mobile"
}
}
def john = new Person()
john.with {
name = 'John Smith'
email = 'john@example.com'
mobile = '0401 999 888'
printBusinessCard()
}
This approach can be really useful when creating an object. In the snippet below I create a new Person and set up their details at the same time:
with at instantiation timeclass Person {
def name
def email
def mobile
def printBusinessCard() {
println "$name"
println "e: $email"
println "m: $mobile"
}
}
def stacey = new Person().with {
name = 'Stacey Jane'
email = 'stacy@example.com'
mobile = '0401 333 666'
//This is the same as saying 'return it':
it
}
stacey.printBusinessCard()
71. Closure scope
In the first chapter on closures I mentioned that: Closures represent a reference to a function (method) that is accompanied by a referencing environment. Up to now we’ve mainly used closures as methods that can be referenced by variables or passed as parameters. Methods declared in classes can access the fields in their class and closures can also access items such as variables available in the context from which they were created.
I’ve tried to demonstrate this concept in the example below. You’ll notice that my basic closure refers to a variable code that isn’t a declared parameter of the closure nor is it a variable declared within the closure. Rather, code references a variable available within the scope in which the closure is declared - i.e. code can be accessed by the doubleCross closure as both are declared in the same block.
def spyMethod(closure) {
closure()
}
def code = 'eagle'
//This is the closure
def doubleCross = { println "The code is $code" }
spyMethod(doubleCross)
code = 'badger'
spyMethod(doubleCross)
A More Involved Example
My doubleCross was quite basic and perhaps makes the usefulness of this concept appear to be ho-hum. In fact, it’s extremely useful and opens the door to techniques such as Domain Specific Languages - something for you to research later. For now, I’ll take you through a step-by-step example of a more complex use of closure context.
First of all I’ll create a very basic class to describe an address book Contact. For each contact I’ll record their name and phone number. I’ll also define a closure named call and this is a simple function that I can use when calling the contact.
class Contact {
def name
def phone
final call = { message ->
println "Calling ${this.name} on ${this.phone} with the message: '$messa\
ge'"
}
}
Once I’ve defined the Contact class I’ll create a couple of contacts - Andrew and Sally.
def andrew = new Contact(name: 'Andrew', phone: '+61 432 321 736')
def sally = new Contact(name: 'Sally', phone: '+61 400 800 900')
I’ll then create a list of Contacts I need to call back (perhaps my mobile phone battery died) and add Andrew and Sally. You’ll note that I don’t add the Contact instances to the call-back list, I actually add the closure for each contact. Think of this as the statement “I’ll add to the list the activity of calling the contact”.
def needToCallBack = []
needToCallBack << andrew.call
needToCallBack << sally.call
Imagine that a whole lot of other code now “does stuff” and eventually we discard the andrew and sally variables:
andrew = null
sally = null
Now this is where it gets interesting. What if my mobile battery is now recharged and I want to start calling people back? Surely the fact that I blew away my andrew and sally variables would make this impossible? Well, remember how my needToCallBack list contains references to the call closures? These closures actually hang on to their original context - the andrew and sally instances.
All of this means that I can now use the each method on needToCallBack and I can realise those closures:
needToCallBack.each { it('It\'s Duncan here, sorry I missed your call') }
This will now cause each of the call closures to be called - allowing me to get back in touch with andrew and sally.
I broke up the code in the discussion so present it all here in full for you copy and try out for yourself:
class Contact {
def name
def phone
//A closure for calling the contact
final call = { message ->
println "Calling ${this.name} on ${this.phone} with the message: '$messa\
ge'"
}
}
def andrew = new Contact(name: 'Andrew', phone: '+61 432 321 736')
def sally = new Contact(name: 'Sally', phone: '+61 400 800 900')
def needToCallBack = [ ]
needToCallBack << andrew.call
needToCallBack << sally.call
// Lots of other code ......
andrew = null
sally = null
needToCallBack.each { it('It\'s Duncan here, sorry I missed your call') }
VIII Object-oriented programming
72. Introduction
This section introduces a range of object-oriented terminology and provides you with a set of resources that will help you really hone those object-oriented programming skills.
Object-oriented programming is often referred to by its acronym “OO” or “OOP” and has been around for some time. We won’t delve into history here - check out Wikipedia if you’d like to learn more. For now, let’s describe the essentials of OOP through a Groovy lens.
The object-oriented programming approach models concepts based on a combination of properties and methods. The concept being modelled may be a real-world entity such as a person, a car or a tree. It may also be a “virtual” concept such as a bank account, an HTTP server or a sales report.
The properties of an object (also referred to as fields) hold data that is important to the object’s state.
Methods (less often referred to as functions) provide a means of accessing and manipulating the object’s properties and behaviours. Encapsulation is an important concept in OOP and relates to the use of methods to hide and even protect an object’s properties from direct access. Essentially, other code interacts with the object via its methods - often referred to as its interface.
73. Expando
Before getting stuck into formal object definitions, let’s take a look at the Expando class that ships with Groovy. Expando provides a very flexible way to construct an object on the fly.
In the example below the monster variable is dynamically assigned a set of fields and methods (through the use of closures).
def monster = new Expando()
monster.with {
//Let's add some properties
name = 'Dr Frankensteins Monster'
owner = 'Dr Frankenstein'
height = 8
//Add some closures (methods)
getOwner = { owner }
getName = { name }
getHeight = { height }
scareVillage = { village ->
println "Look out $village here comes $name!"
}
}
monster.scareVillage('Darmstadt')
The monster Expando looks to be acting in a manner similar to a Map but it gives us more functionality. Whilst the properties can be assigned to an Expando instance in the same way as a Map, the addition of a closure illustrates the difference. In the example below the use of a Map to define the vampire variable demonstrates that the scareVillage can’t rely on an instance field (name) so must refer back to the vampire map:
def vampire = [ : ]
vampire.name = 'Dracula'
vampire.scareVillage = { village ->
println "Look out $village here comes $vampire.name!"
}
vampire.scareVillage('London')
By using the Expando class instead of a Map, the instance fields can be accessed.
Using Expando with CSV data
Expando can be useful when we want to consume data from a source (such as a file) and manipulate it as an object. One such example is an application that reads a comma-separated file (a CSV) that contains a header row and multiple subsequent data rows. The header row tells us the fields in our data objects and we can start to throw in some methods to help handle our data.
I’ll start with a full listing of a script that accepts CSV data (I’ll just use a String but it could be from a file) about various contacts. Expando will help me then produce a vCard for each contact. Take a read of the full listing and we’ll then break it down into easier chunks.
//This is a basic CSV (Comma-separated file) described as a string
def table = '''\
name,email,phone
Fred,fred@email.com,555-678345
Alex,alex@email.com,555-987123
Simon,simon@example.com,555-567321
'''
//We define the separator as the comma character
def separator = ','
//Read the CSV in and break it up by linebreaks
def csv = table.tokenize()
//Extract the first row - it contains the headers (field names)
header = csv[0].tokenize(separator)
csv.remove(0)
def contactList = [ ]
for (row in csv) {
Expando contact = new Expando()
//Now setup the contact class with field names based on the header
row.tokenize(separator).eachWithIndex { key, value ->
contact.setProperty header[value], key
}
contact.getVCard = {
"""BEGIN:VCARD
VERSION:4.0
N:$name
EMAIL:$email
TEL;TYPE=work,voice;VALUE=uri:tel:$phone
END:VCARD"""
}
contactList << contact
}
contactList.each {
println it.vcard
}
The handy tokenize method is used to break the CSV data into individual rows. The first row is actually a header row and we perform another tokenize to extract each header item (field) and then remove the header row from the data table:
def csv = table.tokenize()
header = csv[0].tokenize(',')
csv.remove(0)
A contactList is then defined - this will hold our list of contacts:
def contactList = []
The code now iterates through the data table. For each row, an instance of Expando is declared:
Expando contact = new Expando()
tokenize is again used to separate each field in the row. The eachWithIndex method passes the field’s value and its index into the closure’s key and value parameters respectively. I use the index to work out the field name in header and set the value as the field from the row:
//Now setup the contact class with field names based on the header
row.tokenize(',').eachWithIndex { key, value ->
contact.setProperty header[value], key
}
The getVCard closure is then added to the contact - this will construct a vCard for use in other systems:
contact.getVCard = {
"""BEGIN:VCARD
VERSION:4.0
N:$name
EMAIL:$email
TEL;TYPE=work,voice;VALUE=uri:tel:$phone
END:VCARD"""
}
contactList << contact
Once each row has been consumed we can display our contactList:
for (contact in contactList) {
println contact.getVCard()
}
74. The basics of OO
This chapter will provide a whirlwind tour of the various object oriented programming concepts supported by Groovy.
Classes
Object-oriented programmers use classes to classify objects. As such, a class defines the properties (fields)1 and methods of an object.
In Groovy the class keyword if used when declaring a new class:
class Person {}
Objects consist of properties (data) and methods for interacting with that data. For example, the code below describes a Person class with a name property and a getName method:
class Person {
def name
def getName() {
return this.name
}
}
In order to create an instance of the Person class we use the new keyword and assign the result to a variable
def john = new Person(name: 'John')
println john.getName()
The call to new Person(...) is actually using a special method called a “constructor”. Classes can define a variety of constructors to help with creating an instance and Groovy has some handy tricks we’ll explore later.
Instead of using the def keyword the variable could be declared as being of the Person type:
Person john = new Person(name: 'John')
Instance and Class Elements
In the getName method you’ll notice the keyword this is used. You can translate this to mean “this instance”. Groovy supports instance properties and methods - those operating on a specific instance of the class. This means that your code isolates one instance from another and prevents you from inadvertently altering instances.
Static fields/properties and methods are also supported - these apply at a class level. By preceding a field or a method with the keyword static we indicate that it is relevant to all instances of the class. In the example below I set the specie field to be static and this means I access it at the class level by referring to Person.specie.
static keywordclass Person {
static specie = 'homo sapien'
def name
}
println Person.specie
Constants
An (English) language lawyer might think that the keyword static indicates that the value of specie can’t be changed. However, if you try Person.specie = 'tubulidentata' you’ll see that we can turn Person into a different specie! This is definitely not what we want so we need to declare specie as a constant.
The final keyword precedes static/instance fields and methods to make them constant:
finalclass Person {
static final SPECIE = 'homo sapien'
def name
}
Constructors
Constructors are a special type of method that is called when a new instance is created. We saw that Groovy provides a built-in constructor when we called new Person(name: 'John'). This takes a map in which the keys match the fields in the Person object.
To define a custom constructor we define a method with the same name as the class but without the def preceding it. The example below declares a constructor this way (Person(name)):
class Person {
def name
Person(name) {
this.name = name
}
def getName() {
this.name
}
}
def john = new Person('John')
println john.dump()
Overloading
The overloading feature of Groovy classes allows us to create multiple versions of the same method. The parameter list for each version of the method varies to allow callers to provide either a different number of parameters (as in the example below) or with the same number of parameters but with different types. Overloading is useful but also consider using default values for parameters as this can help reduce the number of methods you need to write and maintain.
mean methodclass Math {
static mean(num1, num2) {
(num1 + num2) / 2
}
static mean(... nums) {
nums.sum() / nums.size()
}
}
println Math.mean(10, 20)
println Math.mean(2, 4, 6, 8)
Interfaces
Interfaces provide a method for defining programming interfaces. Interfaces, for the most part, just define method signatures and not their implementation. Classes implement these interfaces in a manner that reflect the class’s role/model/context.
The example below defines an interface named Exercise with a single method run. The Athlete class then implements the interface:
interface Exercise {
def run(int distance)
}
class Athlete implements Exercise {
def name
def run(int distance) {
println "I'm off for a ${distance}km run."
}
}
def robert = new Athlete(name: 'Rob')
robert.run(10)
Inheritance
A superclass is one from which other classes inherit functionality. The “child” classes are referred to as being subclasses. A subclass inherits from a superclass through the use of the extends keyword.
In the code below, StaffMember is a subclass of Person. This allows StaffMember to access the name field defined in Person:
class Person {
def name
}
class StaffMember extends Person {
def staffID
def getIdentification() {
println "${this.name} - ${this.staffID}"
}
}
def sally = new StaffMember(name: 'Sally', staffID: 765)
sally.identification
Unlike interfaces, superclasses can provide implemented methods and fields that subclasses can utilise. However, Superclasses can work somewhat like interfaces and their methods can be declared as abstract to force subclasses to provide their own implementation.
Overriding methods
Subclasses can also override methods and fields implemented by superclasses. This lets subclasses provide more contextual implementations if needed. A subclass can refer directly to superclass fields and methods by using the super keyword.
In the example below, StaffMember is a subclass of Person. The StaffMember class overrides the getName method and prefixes a string to the name returned by the superclass.
class Person {
def name
def getName() {
this.name
}
}
class StaffMember extends Person {
def staffID
@Override
def getName() {
"Team member ${super.name}"
}
def getIdentification() {
println "${this.name} - ${this.staffID}"
}
}
def sally = new StaffMember(name: 'Sally', staffID: 765)
println sally.name
Traits
At first glance, traits can be considered as interfaces with an implementation but they offer a really useful approach to adding features or abilities to a class. A common example may be to add the flying trait to animals or vehicles. The trait may have its own fields and/or methods.
In the example below:
- A very basic
Projectclass is defined. It just stores the project name - An
Agiletrait provides some basic fields used to describe an agile aspect to projects. A very basic method (startIteration) gives us an example method to call. - A
Scrumclass is defined:- It extends the
Projectclass - It implements the
Agiletrait - Two Scrum-specific fields are added (
productOwner&scrumMaster)
- It extends the
- I can then create an instance of
Scrumand provide it information for both theProject/Scrumhierarchy as well as theAgiletrait.- I then call the
Agiletrait’sstartIterationmethod and our project is away!
- I then call the
class Project {
def name
}
trait Agile {
def iterationLength = 4
def backlog = [ ]
def developmentTeam = [ ]
def startIteration() {
println """\
We're staring our $iterationLength week iteration for $name
Team members: $developmentTeam
Backlog: $backlog
"""
}
}
class Scrum
extends Project
implements Agile {
def productOwner
def scrumMaster
}
def project = new Scrum().with {
name = 'Project X'
iterationLength = 2
productOwner = 'Charlie'
scrumMaster = 'Bobby'
developmentTeam = [ 'Dean', 'Sam' ]
backlog << 'As a User I want to press buttons'
backlog << 'As an Admin I want to lockout users'
//This returns 'it' (the new instance of Scrum)
it
}
project.startIteration()
Packages
As discussed earlier, Groovy allows programmers to group objects into packages. In the following snippet the Person class is allocated to the myobjects package:
package myobjects
class Person {}
Packages are central to using others’ code in your programs and allowing your code to be used elsewhere.
Summary
This chapter has provided an extremely brief overview of object-oriented programming supported by small Groovy examples. The following chapters in this section will explore fundamental aspects of fields and methods and the subsequent section will dive far deeper into how to really get OO with Groovy.
- At this stage I’ll use ‘field’ and ‘property’ interchageably - there is a difference but I’ll discuss this soon.↩
75. Properties and Fields
In this chapter we’ll delve more into properties and fields. They’re almost the same thing and are known more generally as member variables as they hold data regarding the state of an object instance. In less technical terms, they help describe a specific instance (e.g. Jim) of a class (Person).
Properties
The class below is composed of three properties and could be used to pass a person’s details around in a system. You may come across references to this type of structure as “Groovy beans”:
class Person {
def name
def email
def mobile
}
def astrid = new Person()
astrid.name = 'Astrid Smithson'
astrid.email = 'astrid@example.com'
astrid.mobile = '0418 111 222'
println astrid.dump()
In the code above I create a new instance of the Person class by calling new Person() and can then access each property using dot-point notation. This type of class can be really handy when you just need a structure for storing and handing around data - say, for example, you load a record from a database and want to feed it to other classes and their methods for processing.
Groovy provides a built-in approach to passing in property values when creating a new instance. The code below creates a new Person but sets the property values using named arguments:
def astrid = new Person(name: 'Astrid Smithson', email: 'astrid@example.com', mo\
bile: '0418 111 222')
We don’t have to set all of the properties, just the ones we need:
def astrid = new Person(name: 'Astrid Smithson', email: 'astrid@example.com')
Viewing an object’s properties/fields
If you try to use println to display the details for astrid you’ll get something like Person@46423706. It’s not very useful - just the type of the Object and an identifier. If you want to find out the field values, call the dump method that all objects inherit from Object:
println astrid.dump()
Typed properties
Just as we saw with variables, properties can be defined with a specific data type, rather than with a dynamic type. The code below redefines the Person class with typed properties:
class Person {
String name
String email
String mobile
}
People often ask if they should just use def or assign an explicit type. My answer is pretty straight-forward: if you know how you’ll use it and you’ll only use it one way, give it a type. The name property is a good example and I would use String. In other situations you may want to be flexible in what you can store so use def.
Fields
A field is pretty much the same thing as a property - it’s a member variable - but there’s a difference: fields are defined with an access modifier and properties are not. An access modifier is used to allow/block access from other code using the class and its member variables and methods.
In the code below I have rewritten the Person class using fields rather than properties:
class Person {
public name
private email
private mobile
}
Firstly, you’ll see that I haven’t used the def keyword - I don’t need to do this when I provide an access modifier. I could have declared public def name but it’s not good style as the def is implied. We can specify a type for a field by stating the type after the access modifier:
class Person {
public String name
private String email
private String mobile
}
Default values
Properties and fields are much like variables and can be declared with an initial value:
class Person {
public String name = 'anonymous'
private String email = 'anon@example.com'
private String mobile = ''
}
The initial value doesn’t have to be a literal, it can be determined from an expression.
Casting maps to objects
Groovy gives bean-style objects a really interesting approach to casting1 a map or a list to an object. Let’s get an example going first:
class Person {
def name
def email
def mobile
}
def astrid = [name: 'Astrid Smithson', email: 'astrid@example.com'] as Person
println astrid.dump()
Person gretchen = [name: 'Gretchen Gaul', email: 'gretchen@example.com']
println gretchen.dump()
For the first person (astrid) I explicitly cast the map to a Person instance using
[name: 'Astrid Smithson', email: 'astrid@example.com'] as Person. Groovy creates a new instance of Person and calls
the name and email setters.
In the case of gretchen I don’t need to call as Person as Groovy infers this from the fact I declared the variable’s
type (Person gretchen).
- Remember the
asoperator?↩
76. Getters and Setters
Getters and setters are methods:
- Getters are used to read the value of a member variable
- Their name begins with
getfollowed by the title-case version of the property name -
getName,getEmail,getMobile - Getter methods don’t have any parameters
- Their name begins with
- Setters are used to set the value of a member variable.
- Their name begins with
setfollowed by the title cased version of the property name -
setName,setEmail,setMobile
- Their name begins with
In Java code you often see a lot of anaemic setters and getters - basically the getters just return name and the setters just this.name = name. In a class with a lot of member variables this results in a lot of boilerplate code that really gets in the way of readability. Groovy, however, creates these anaemic setters/getters for properties behind the scenes so you don’t have to. In the next code example I use my basic Person class with three properties:
class Person {
def name
def email
def mobile
}
def jess = new Person()
jess.setEmail('jess_at_example.com')
println jess.getEmail()
I never wrote the getEmail and setEmail methods - Groovy just worked out that my email property would need associated getters and setters.
This means that most Groovy classes only need to provide getters/setters for properties if they need specific functionality or want to turn off the default behaviour. In the code below I define the setter for the email field as I want to make sure the caller is passing me a valid email address:
class Person {
def name
def email
def mobile
void setEmail(email) throws IllegalArgumentException {
def regex = ~/[a-zA-Z0-9._%+-]+@[a-zA-Z0-9.-]+/
if (email.matches(regex)) {
this.email = email
return
}
throw new IllegalArgumentException('Incorrect email format')
}
}
def jess = new Person()
jess.setEmail('jess@example.com')
println jess.dump()
//This will fail
jess.setEmail('jess_at_example.com')
println jess.dump()
What if I don’t want a setter or getter? You can define your own setter or getter, mark each with the private access modifier and document it. I also like to throw exceptions to really prove my point:
class Person {
def id
def name
def email
def mobile
/**
* Will NOT set the ID - do not call
* @throws Exception Always throws an exception
*/
private void setId(id) throws Exception {
throw new Exception('Method not available')
}
}
In the code above you’ll see that any call to setId will cause an exception to be thrown - whether it calls the setter directly (p.setId 1234) or indirectly (p.id = 1234).
Fields
Setters and getters aren’t generated for fields. You need to create your own setters and getters for fields (if you want them). In the code below
we can’t use p.setName('Bill') as the setter is not created for us - instead, we access the field directly with p.name = 'Bill':
class Person {
private String name
}
Person p = new Person()
p.name = 'Bill'
println p.dump()
If you do provide a setter for a field (such as setName in the code below), an attempt to directly set the field’s value (e.g. p.name = 'Bill') is deferred to the setter:
class Person {
private String name
void setName(name) {
println 'Setting name...'
this.name = name
}
}
Person p = new Person()
p.name = 'Bill'
println p.dump()
p.setName 'William'
println p.dump()
The call to p.setName also works but using p.name is a little cleaner in terms of aesthetics/style.
Pseudo properties
The Groovy model for setters and getters means that you can access Java and Groovy getter/setter methods as if they were
properties. For example, instead of calling myUrl.getText() on an instance of java.net.URL, I can just use myUrl.text:
def myUrl = new URL('http://www.example.com')
print myUrl.text
The URL class may have an underlying member variable called text but that’s not really our concern. What it does guide us to is
the fact that, provided we use the get and set prefix on methods we can then access them as if they were properties. Consider
a Person class that stores the person’s date of birth (DOB). When we know their DOB we can calculate their age:
import java.time.LocalDate
import java.time.Period
class Person {
String name
LocalDate dateOfBirth
Integer getAge() {
Period.between(dateOfBirth, LocalDate.now()).years
}
}
Person jim = new Person(dateOfBirth: LocalDate.of(1983, 06, 04))
println jim.age
In the code above I define the getAge getter to perform the calculation to determine the person’s age. This is better than
having an age property/field as this can be calculated from the DOB. The other advantage is in long-running systems - if we
stored the age then it becomes out of date as the system runs for days/weeks/months.
It’s important to note that we can’t call jim.age = 100 in the code above as we don’t provide a setter. Naturally, we could provide a setter
but it doesn’t make a lot of sense in terms of the Person’s age.
77. Methods
Methods were covered in their own section and we just looked at getters/setters so you’d think that we’ve covered it all. Well, there’s a bit more to say about methods in Groovy.
In The basics of OO I touched on instance and class elements:
- Instance elements are properties/fields and methods that relate to a specific instance of a class
- These are also referred to as member variables and member methods/functions
- Class elements are properties/fields and methods that relate to the class itself - not a specific instance
- These are covered in the chapter on Class Methods
In the code below I have two instance properties (name and email) and an instance method (getContact())
getContact is an instance methodclass Person {
String name
String email
String getContact() {
"$name <$email>"
}
}
Person jenny = new Person(name: 'Jenny', email: 'jen@example.com')
println jenny.getContact()
Person dave = new Person(name: 'Dave', email: 'dave@example.com')
println dave.getContact()
When we look at the two instances of People (jenny and dave) we can see that the call to getContact() is specific to each
instance of the class. This means that our request for jenny’s contact information doesn’t return us dave’s details.
There are times when we need to make sure we’re specific when referring to instance elements within a class. In order to do this, we use the this keyword:
thisclass Person {
String name
String email
void setName(name) {
this.name = name
}
String getContact() {
"$name <$email>"
}
}
Person jenny = new Person()
jenny.setName('Jenny')
jenny.setEmail('jen@example.com')
println jenny.getContact()
In the example above I have provided a setName(name) method and set the instance’s name property using this.name = name. This example
is demonstrating a primary use of this: to delineate between the method parameter and the instance property. this can be used for both
member variables (e.g. this.email) and when calling member methods (this.setEmail()) but is limited to elements within the class - it can’t
be called from outside the class (e.g. jenny.this.setName('Jenny')).
Overloading
I’ve deferred a really useful method feature for this section: method overloading. Overloading allows a class to declare a method with the same name more than once, provided each version of the method has different parameters.
In the example below I provide two implementations of the exercise method: one that takes no parameters and another
that takes one parameter (duration).
class Person {
String name
def exercise() {
println 'I am exercising but I\'m not sure for how long'
}
def exercise(duration) {
println "I am exercising for $duration minutes"
}
}
Person sam = new Person(name: 'Sam')
sam.exercise()
sam.exercise(10)
Whilst my example has just two versions of the exercise method, I could keep adding more
(def exercise(duration, location), def exercise(duration, location, activity)) to cover all of the cases I need. In many cases
I’ll need a baseline of functionality and, in order to save me writing this functionality into each version of exercise, I can
call from one method to another:
class Person {
String name
def exercise() {
//Generate a random number using java.util.Random
Random random = new Random()
//Use nextInt to get a random number between 0 and 120
exercise(random.nextInt(120))
}
def exercise(duration) {
println "I am exercising for $duration minutes"
}
}
Person sam = new Person(name: 'Sam')
sam.exercise()
In the previous versions of exercise I haven’t used parameter types so my overloads must be differentiated by the number of parameters
for each version of the method. However, if I provide specific parameter types I can have several variations of a method,
differentiated by the parameter types:
class Person {
String name
def exercise() {
println 'I am exercising but I\'m not sure for how long'
}
def exercise(Integer duration) {
println "I am exercising for $duration minutes"
}
def exercise(String activity) {
println "I think I'll go for a $activity"
}
def exercise(String activity, Integer duration) {
exercise(activity)
exercise(duration)
}
}
Person sam = new Person(name: 'Sam')
sam.exercise()
sam.exercise(10)
sam.exercise('walk')
sam.exercise('jog', 30)
Whilst I could have written another exercise method with exercise(Integer duration, String activity) I have already provided
exercise(String activity, Integer duration) so such an addition would, at best, be redundant but could also be confusing if
each variation did something functionally different. For example, say exercise(Integer duration, String activity) were to be written as:
def exercise(Integer duration, String activity) {
println "I'll go for a $activity in $duration minutes"
}
I can technically do this as the parameters are different to exercise(String activity, Integer duration) but you can see
that my intent is different to the intent seen in the other exercise methods. Avoid this type of coding - it really is a trap. Overloading
best works when you have the same functionality that can work with different parameters. Using overloading to provide different functionality, depending on parameters,
is likely to trip you up. Instead of overloading with that last example, I would have given the method a different signature that
better reflects what the method is doing: delayExercise(Integer duration, String activity).
Default parameter values can make this confusing
Try the code below in a groovyConsole:
class Person {
String name
def exercise() {
println 'I am exercising but I\'m not sure for how long'
}
def exercise(duration = 10) {
println "I am exercising for $duration minutes"
}
}
Person sam = new Person(name: 'Sam')
sam.exercise()
sam.exercise(10)
Unfortunately that example won’t even run - Groovy reports that method "java.lang.Object exercise()" that is already defined.
It’s not always clear where this clash lays - after all, I have explicitly written two versions of exercise, each with a different parameter list.
However, my use of a default value for a parameter (exercise(duration = 10)) is implicitly defining two versions of the exercise method:
-
exercise()- this is what clashes with the explicitly declaredexercise() exercise(duration)
In larger classes this can get a little confusing so, when it happens to you, start looking at the overloaded methods with default parameter values.
Overloading != Overriding
Before we move on, it’s worth highlighting two pieces of terminology:
- Overloading is when a class is defined with methods with the same name but different parameters to others within the class or its superclass(es).
- Overriding is when a subclass redefines a method from its superclass. We’ll see this in the chapter on Inheritance
When we looked at Operator Overloading we saw that we could write a plus method that aligns with the
+ operator. The overloading aspect indicates that the functionality for the operator (+) is being defined for certain operands
and this is using different parameter types in overloading.
78. Constructors
A constructor is a special type of method that is called when instantiating a new instance of a class. We create a new instance every time we use the new keyword:
class Person {
def name
def email
def mobile
}
def astrid = new Person()
In the code above I define the Person class with three properties and then create a new instance in the astrid variable. The new keyword indicates to Groovy that a new Person instance is to be created. The Person() aspect is actually a call to the constructor for the class. However, I haven’t actually provided a constructor for the Person class so what am I calling? Groovy classes all trace back to the Object class - where a class does not explicitly state that it inherits from (subclasses) another class it is automatically seen as a subclass of Object.
Groovy sees Person() and knows that the Person class doesn’t provide a no-parameter (aka no-argument or no-args) constructor but Object does so that is called and it doesn’t really do anything interesting. This whole arrangement means that your classes automatically have a no-argument constructor.
As always, Groovy adds a little extra on top and we’ve seen that we can use the map notation to assign values to member variables (properties/fields) when we create a new instance:
def astrid = new Person([name: 'Astrid Smithson', email: 'astrid@example.com'])
You can see that new Person is being passed a map consisting of keys that relate to properties in the class. This means you can prepare the map elsewhere in your code and then pass it into the constructor:
def details = [name: 'Astrid Smithson', email: 'astrid@example.com']
def astrid = new Person(details)
Groovy gives us that little bit of syntactic sugar and lets us drop the square brackets ([]) in the call:
def astrid = new Person(name: 'Astrid Smithson', email: 'astrid@example.com')
This looks like a built-in constructor that accepts a map (or map-like) syntax in which each of the keys match a name of a member variable. This is really useful for bean-type classes that we’re using to keep data fields together. However, this isn’t a true constructor as Groovy doesn’t generate a Person constructor that takes a map as its parameter. Instead, the no-args constructor is called followed by the setters for each key in the map. This isn’t usually a problem until you’re using final properties and fields.
Writing your own constructor(s)
Whilst the no-args constructor and map parameter approach can be useful, you’ll probably need to define your own constructors at some point. This may be due to a few reasons, such as:
- You need information when you create a new instance that is more than just the member variables - perhaps you need to calculate something
- You don’t want the caller to be able to populate a member variable - perhaps you’ll load that from a database or perform a calculation to determine its value
If you need to do something specific in order to sensibly create a new instance of your class you’ll need to define one or more constructors. So, let’s look at an example:
Personclass Person {
def name
def email
def mobile
//Here's the constructor:
Person(name) {
this.name = name
}
}
def astrid = new Person('Astrid Smithson')
println astrid.dump()
In order to define a constructor we declare a method that:
- Can have an access modifier (discussed in a later chapter)
- Has no return value declared - none, not even
void - Has the same name as the class in which it is defined - yes, it is case-sensitive
- Can take 0 or more arguments
Now that you’ve supplied a constructor you’ll lose the built-in “map constructor”. Be warned that this isn’t always obvious! If we create a new instance using named arguments, our dump will show us that astrid’s name becomes a list:
def astrid = new Person(name: 'Astrid Smithson', email: 'astrid@example.com', mo\
bile: '0418 111 222')
println astrid.dump()
This will display: <Person@45ceff52 name=[name:Astrid Smithson, email:astrid@example.com] email=null mobile=null>. You should be able to see that the name property is just plain wrong.
By adding the Person(name) constructor we’ve effectively changed Person so that it has two constructors: the no-argument constructor and one that accepts the Person’s name. If the coder using our Person class wanted to add an email or mobile number they’d have to do that after instantiating the instance.
We can define as many constructors as we feel necessary - they all carry the same name as their class but have different parameter lists (Ã la overloading). In the code below I provide two constructor definitions:
class Person {
private name
def email
def mobile
Person(name) {
this.name = name
}
Person(name, email) {
this(name)
this.email = email
}
}
def astrid = new Person('Astrid Smithson', 'astrid@example.com')
println astrid.dump()
You can probably work out what most of the code above does - one constructor allows for just a name argument and the other allows for both a name and an email. But what is this(name) doing? First, remember that this is used to refer to the current instance. What I wanted to do from Person(name, email) was call Person(name) so as to set the name - perhaps I was going to put some more complex logic in around setting the name. In order to call the Person(name) constructor from another constructor I need to to refer to this so this(name) is a call to another constructor within the class. This is commonly referred to as “constructor chaining”.
There is a specific rule we have to follow when constructor chaining - calls to other constructors must occur before any other statements. That means the following constructor code won’t compile:
Person(name, email) {
this.email = email
this(name)
}
Before moving on, there’s still that no-args constructor that we get even when we don’t ask for it. Sometimes we actually want to force
other developers to use a constructor with arguments. For example the Person(Integer id) might use the id parameter to load the
Person’s details from a file/database. In this case the no-args constructor could leave us with some sort of zombie person instance
with no information. One approach to avoiding this is to prepend the private modifier to indicate
that other coders shouldn’t use it:
private Person() {}
If you want to be really forceful, just throw an exception if someone tries their luck:
private Person() {
throw new IllegalArgumentException('Do not use the no-arg constructor')
}
Lists
Good old Groovy never stops giving us different ways to do things and, in the code below, we can cast a list of values into
a Person:
class Person {
String name
String email
String mobile
Person(name, email) {
this.name = name
this.email = email
}
Person(name, email, mobile) {
this(name, email)
this.mobile = mobile
}
}
def astrid = ['Astrid Smithson', 'astrid@example.com', '12345'] as Person
println astrid.dump()
Person gretchen = ['Gretchen Gaul', 'gretchen@example.com']
println gretchen.dump()
For astrid I cast the three item list explicitly using as Person because I didn’t supply a type when decalaring the
variable (def astrid). Groovy takes my 3 items, sees that there is a three-argument constructor, and passes it through.
In the case of gretchen I don’t need the explicit cast as I declared a type with the variable (Person gretchen). The
list has 2 items so the two-argument constructor is called.
There’s two really interesting things to keep in mind with this:
- The constructor is being called (unlike with the “map constructor”)
- This will work with all the various Groovy and Java classes
On that last point, let’s look at two quick examples to prove I’m not fooling you:
//Prepare a calendar using YYYY, MM, DD
def calendar = [2015, 01, 31] as GregorianCalendar
//Setup a URL
java.net.URL url = ['http', 'www.example.com', 80, '/index.html']
TupleConstructor annotation
The @groovy.transform.TupleConstructor is an annotation that we can add to our classes and have a variety of constructors automatically generated for us:
TupleConstructor annotation@groovy.transform.TupleConstructor
class Person {
def name = 'Anonymous'
def email
def mobile
}
def unknown = new Person()
def astrid = new Person('Astrid Smithson')
def john = new Person('John Hancock', 'john@example.com')
def kelly = new Person('Kelly Grant', 'kelly@example.com', '044 555 555')
def dave = new Person(name: 'Dave Smith', email: 'dave@example.com')
The TupleConstructor annotation gives us the map-based constructor as well as a set of constructors matching the member variables - effectively generating the following constructors:
Person(name)Person(name, email)Person(name, email, mobile)
You can see where the “telescoping” notion comes from - each constructor adds a parameter over the last.
You can configure the annotation to include and exclude specific fields so, when you’re wanting to give it a spin in your own code, check out @groovy.transform.TupleConstructor.
Instance initializer blocks
A stand-alone instance initializer block can be used to provide a base setup for a new instance. This is useful if you need a block of code in order to set default/original values for one or more member variables.
Instance initializer blocks appear inside the class itself, surrounded by curly braces {}:
class Person {
UUID id
String name
{
this.name = 'Anonymous'
this.id = UUID.randomUUID()
}
}
Person paul = new Person()
println paul.dump()
The code above offers nothing over setting the property defaults directly (UUID id = UUID.randomUUID()) - it’s just a simple example. You can use an initializer block or constructors, or both. The initializer block will be called before any constructor(s).
There is a small trap to be wary of when using an instance initializer block - the syntax Groovy uses for passing closures as parameters will cause a failure around initializer blocks in some conditions. The following code is an example of this and won’t run:
class Person {
private Integer id
private String name = 'Anonymous'
{
this.id = UUID.randomUUID()
}
}
Person fred = new Person(name: 'Fred')
In order to get around this, prefix the initializer block with a semicolon (;)1. This stamps a definite statement delimiter against the initializer block:
class Person {
private UUID id
private String name = 'Anonymous'
;{
this.id = UUID.randomUUID()
}
}
Person fred = new Person(name: 'Fred')
println fred.dump()
I’d suggest always using the prefix - it isn’t messy and makes sure that Groovy knows it’s looking at an initializer block.
When and How Things Happen
It can be frustrating when you’ve written a nice looking class but things don’t happen in the manner you intended.
This can be due to the stuff going on behind the scenes that isn’t always immediately obvious.
Let’s take a look at a Person object that uses an initializer block and a constructor as well as provide a field setter and a helper method:
class Person {
private String name
;{
this.name = 'Anonymous'
println "Initialised default name to ${this.name}"
}
public Person(name) {
this.name = name
println "Constructor called with name: ${this.name}"
}
public void setName(name){
this.name = name
println "setName called. Name is now: ${this.name}"
}
public void changeName(name) {
this.name = name
println "changeName called. Name is now: ${this.name}"
}
}
Person fred = new Person('Fred')
println "After instantiation, name is: $fred.name"
fred.name = 'Freda'
fred.changeName 'Frederique'
Running the code above will yield the following output:
Initialised default name to Anonymous
Constructor called with name: Fred
After instantiation, name is: Fred
setName called. Name is now: Freda
changeName called. Name is now: Frederique
From that output we can piece together a basic set of rules that helps us see how things happen:
- The initialiser block is called before the constructor
- Setting a field within object methods (e.g. with
this.name = name) performs a direct change of the field - Setting a field externally (e.g. with
fred.name = 'Freda') causes the setter (setName) to be called
Constructors and instance methods
In the last code example I set the name field directly in the constructor. When looking at the code you may wonder if it isn’t better to have the constructor call the setter (setName) so that I can place any logic around setting the field in a single method. Be careful with this as a more complicated setter may call on other instance fields that have not yet been initialised. Normally, the constructor code is self-contained and would only call other constructors or static methods (we’ll look at these shortly).
However, the changeName method may have been best to use setName rather than changing the field directly. This would allow me to centralise any associated logic.
If you do need to provide some checks or other logic before allowing a field to be set then it might be worth placing this logic in another (private) method that doesn’t change any instance fields directly. To achieve this, the method’s parameters would cover all of the required items for validation (e.g. private String checkName(name, validNameList)) and return the name (if valid) or throw an exception if the check fails. The code might look something like:
private String checkName(name, validNameList) throws IllegalArgumentException {
if (name in validNameList) {
return name
} else {
throw new IllegalArgumentException('The name is not in the list of valid\
names')
}
}
- Thanks to Jochen “blackdrag” Theodorou for his guidance on this↩
79. Class Methods and Variables
In the preceding chapters we looked at instance properties/fields (variables) and instance methods (including constructors) - the components of a class that pertain to individual instantiations of the class. This ensures that each instance works against its own state and doesn’t interfere with other instances. There are many times, however, when we want a class to provide a method that isn’t bound to an instance or when we want a field/property that is used across instances. This is where class methods and class variables are utilised.
So, when to use class methods and variables? There’s a number of answers to this but the following three are the main ones:
- When a single property is best shared across all instances
- This is often the case with configuration properties
- When a method isn’t really specific to an instance
- The method sits nicely with the class’s concepts but doesn’t need to relate directly to each instance
- When the class is really just a library of methods and constants
- Sometimes you just need a set of utility methods
It’s important to note a few things about class methods:
- They can’t access
thisas there’s no underlying instance - They can’t use instance (member) variables
Declaring a field/property or method as static is easy: you just prepend the static modifier. Lets look at an example:
import groovy.json.JsonSlurper
class Configuration {
static String databaseName = ''
static String databasePassword = ''
static String logFile = ''
static loadConfig() {
//This is the config file:
File file = new File('config.json')
//We use JsonSlurper to read a JSON file:
JsonSlurper slurper = new JsonSlurper()
//Now parse the config file
def config = slurper.parse(file)
//We can access the config file elements using dot-point notation:
databaseName = config.database
databasePassword = config.password
logFile = config.log
}
}
Configuration.loadConfig()
println """\
System database: ${Configuration.databaseName}
System database password: ${Configuration.databasePassword}
Log file: ${Configuration.logFile}
"""
The code above provides a common use of static variables as it reads in configuration from a source and makes that
configuration available to the rest of the system. In this case I have chosen to use JSON
notation to store the configuration and the file config.json appears thus:
{
"database": "CorporateData",
"password": "password",
"log": "/tmp/log.txt"
}
In the Configuration class you can see three class variables: databaseName, databasePassword and logFile. These
are accessed via the class, and not an instance, by using the <class name>.<variable name> form: Configuration.databaseName.
I’ve also defined the class method loadConfig and this is accessed through Configuration.loadConfig. You’ll see that
I don’t have to instantiate Configuration by calling new nor do I assign Configuration to a variable - I just access
Configurations’s class members when I need them.
I’ve used the String type for the static variables in Configuration but, should I want to use dynamic types, I just
use static <varName> and don’t need def:
static databaseName = ''
static databasePassword = ''
static logFile = ''
Whilst the Configuration class only defines class methods and variables, classes can have a mix of these elements. The
next example is more complex:
@Grab('org.javamoney:moneta:1.0')
import groovy.transform.ToString
import org.javamoney.moneta.Money
@ToString(includeNames = true)
class SilverCreditCard {
String cardNumber
String cardHolderName
Money balance = Money.of(0, currency)
static String currency = 'AUD'
static Money creditLimit = Money.of(5_000, currency)
static SilverCreditCard applyForAccount(String applicantName, Money totalAss\
ets, Money totalDebts) {
if (totalAssets.subtract(totalDebts).subtract(creditLimit).isPositive())\
{
// TODO: Create a new record in the database etc
return new SilverCreditCard(cardNumber: '0000 1111 2222 3333', cardH\
olderName: applicantName)
} else {
// TODO: Throw an exception - don't just return null
return null
}
}
static SilverCreditCard loadAccount(String cardNumber) {
// TODO: Lookup the number in our database
new SilverCreditCard(cardNumber: cardNumber, cardHolderName: 'Fred Nurk'\
, balance: Money.of(100, currency))
}
Money deposit(Money amt) {
//TODO: Implement
}
Money withdrawl(Money amt) {
//TODO: Implement
}
}
SilverCreditCard yourCard = SilverCreditCard.loadAccount('1234 5678 9876 5432')
println yourCard
SilverCreditCard myCard = SilverCreditCard.applyForAccount('Jim Smith',
Money.of(20_000, SilverCreditCard.currency),
Money.of(10_000, SilverCreditCard.currency))
println myCard
Running this code will cause an error to be displayed but don’t panic - it’s just saying that I haven’t provided a configuration for the Java money classes. It’s all cool and fine for this example.
In the code above I have described a credit card account - the SilverCreditCard. This class uses class
variables to describe the policy for the credit card product (bank speak) and class methods for accessing
individual accounts (after all, you don’t want people to just new CreditCard do you?):
- Class variables:
-
currencyis the currency used by all Silver Credit Cards -
creditLimitis the maximum limit allowed for this type of account
-
- Class methods:
-
applyForAccountis for new customers requesting an account - it would return an instance ofSilverCreditCardbeing the newly created account -
loadAccountis for existing customers wanting to access their account - it would return an instance ofSilverCreditCardwith information loaded from a database
-
The instance elements represent a single customer’s SilverCreditCard account and aid in tracking their account:
- Instance properties:
-
cardNumberis the unique number for the account -
cardHolderNameis the name of the card holder -
balanceis how much they’ve spent on their credit card
-
- Instance methods:
-
depositandwithdrawalwould let the person use their account
-
Static initializer blocks
Classes don’t have a constructor-style approach that you can use to prepare the class variables for use. However, there is a static form of the intializer block:
import groovy.json.JsonSlurper
class Configuration {
static String databaseName = ''
static String databasePassword = ''
static String logFile = ''
static {
//This is the config file:
File file = new File('config.json')
//We use JsonSlurper to read a JSON file:
JsonSlurper slurper = new JsonSlurper()
//Now parse the config file
def config = slurper.parse(file)
//We can access the config file elements using dot-point notation:
databaseName = config.database
databasePassword = config.password
logFile = config.log
}
}
println """\
System database: ${Configuration.databaseName}
System database password: ${Configuration.databasePassword}
Log file: ${Configuration.logFile}
"""
You’ll see that I’ve just moved the earlier loadConfig class method into a static initializer block (static { }).
This is probably a good idea as the initializer block is acted on before the class variables are accessed,
allowing me to make sure that the configuration is ready to go rather than relying on other developers to call loadConfig.
Additionally, the initializer block will only be called once so the config file is only read once
- much more efficient than if loadConfig is called over and over by other code.
- More on this in Access Modifiers↩
80. Final Variables
The final modifier can be prefixed to a class- or instance-variable declaration so as to declare it to be immutable (something that doesn’t change).
Once set, any attempt to change the value will result in a groovy.lang.ReadOnlyPropertyException but you have to be
mindful of a few gotchas, especially with collections and objects - we’ll cover these shortly.
First up, let’s look at the final modifier in action:
class Record {
static final String OWNER
final Date creationDate
}
In the code above I’ve declared one class variable (owner) and one instance variable (creationDate) as final.
You’ll notice that I’ve not actually set the value for these so that’s the next step. I have three options available to
me when setting the value for a final variable:
Option 1: At the point of declaration (class and instance variables):
class Record {
static final String OWNER = 'Secret Corp'
final Date creationDate = new Date()
}
Record myRecord = new Record()
Option 2: In an initializer block (class and instance variables):
class Record {
static final String OWNER
static {
owner = 'Secret Corp'
}
final GregorianCalendar creationDate
;{
creationDate = new GregorianCalendar()
}
}
Record myRecord = new Record()
Option 3: In the constructor (instance variables only):
class Record {
static final String OWNER = 'Secret Corp'
final Calendar creationDate
Record() {
creationDate = new GregorianCalendar()
}
Record(GregorianCalendar created) {
creationDate = created
}
}
Record record1 = new Record()
GregorianCalendar created = new GregorianCalendar(2015, 5, 4)
Record record2 = new Record(created)
Option 1 is usually best for simple assignments (such as a value or a minor expression) and Option 2 is handy if the you need a more complicated expression or set of expressions. The third option is mainly used when the value is passed by the client code into the constructor and then assigned to the instance variable either directly or following some evaluations.
Final fields and the map-like constructor
Just remember that the map-like constructor that comes as a Groovy beans bonus won’t help you with final variables.
The code below won’t work as Groovy is not setting creationDate in the constructor but through the setter after
instantiating the instance:
class Record {
final Date creationDate
}
Record myRecord = new Record(creationDate: new Date())
Final objects
When a variable is marked as final it is the value held by the variable that is immutable. This is fine for primitive values
(such as int) and some of the elementary classes (such as Integer and String) as their underlying value isn’t changeable once
instantiated.
However, if that value points to an object that is mutable (can be changed) then your class might find its variables
being changed by code outside the class. This isn’t a good thing as the class should be managing its own state. Let’s
take a look at how this can happen and how we can stop it.
First up, let’s consider a class FinalReport that is meant to hold a set of Records for archiving purposes. That means
that once a FinalReport has been prepared, we don’t want people tampering with it:
import groovy.transform.ToString
@ToString(includeNames = true)
class FinalReport {
final List records
FinalReport(List records) {
this.records = records
}
}
@ToString(includeNames = true)
class Record {
final Date creationDate = new Date()
String title
String text
Record(String title, String text) {
this.title = title
this.text = text
}
}
def recordSet = [
[ 'Record A', 'This is a record' ] as Record,
[ 'Record B', 'This is another record' ] as Record,
[ 'Record C', 'This is yet another record' ] as Record
]
FinalReport report = new FinalReport(recordSet)
report.records[1].text = 'REDACTED'
println report.records[1]
report.records << new Record('Record Z', 'You just got hacked')
println report
First of all you’ll notice the @ToString(includeNames = true) annotation. This is used to have a toString() method
generated for the class. This is really handy and I provide a description in the Useful Annotations chapter.
When setting up the FinalReport class I dutifully set final List records so that the list of records is final but
two sections of code just blew a hole in my archive-ready report. The first one altered the text of a record in the report:
report.records[1].text = 'REDACTED'
println report.records[1]
The second section of code added a new record to the report:
report.records << new Record('Record Z', 'You just go hacked')
println report
My FinalReport isn’t really very final and is quite open to tampering. This is one reason you write test suites for your code -
to make sure that you haven’t made an incorrect assumption. Let’s take a look at a more locked-down version of the previous
code:
finalimport groovy.transform.ToString
@ToString(includeNames = true)
class FinalReport {
final List records
FinalReport(List records) {
this.records = records.asImmutable()
}
}
@ToString(includeNames = true)
class Record {
final Date creationDate = new Date()
final String title
final String text
Record(String title, String text) {
this.title = title
this.text = text
}
}
def recordSet = [
[ 'Record A', 'This is a record' ] as Record,
[ 'Record B', 'This is another record' ] as Record,
[ 'Record C', 'This is yet another record' ] as Record
]
FinalReport report = new FinalReport(recordSet)
//This will fail with groovy.lang.ReadOnlyPropertyException
try {
report.records[1].text = 'REDACTED'
} catch (ReadOnlyPropertyException e) {
println 'Sorry, you can\'t change a record in a final report'
}
//This will fail with java.lang.UnsupportedOperationException
try {
report.records << new Record('Record Z', 'You just got hacked')
} catch (UnsupportedOperationException e) {
println 'Sorry, you can\'t add a record to a final report'
}
println report
You’ll notice I’ve made a number of changes to really lock things down:
- All of the properties in
Recordare now marked asfinal- This means that
Recordinstances can’t be tampered with post-creation
- This means that
- The
recordsproperty inFinalReportis still marked asfinal(final List records)- This means that the
recordslist can’t just be swapped over for another
- This means that the
- In the
FinalReportconstructor I callasImmutable()against therecordsparameter as this creates a copy of the list and marks it as immutable.- This means that the list can’t have new items added or removed.
My first stab at the code assumed that final List records meant that the list of records couldn’t be changed. This is
true to an extent - once records was assigned an instance of a list it couldn’t be assigned another. However, it didn’t mean
that the items in the list couldn’t be changed or the list have items added/removed. I needed to make sure that each list item
(each being a Record instance) was itself locked down by making all of its properties final. I also needed to lock down
the list being passed to my constructor by using the asImmutable() method to copy the incoming list and stop it from being changed.
The @Immutable annotation
As always, Groovy gives me a very handy approach to locking down my classes so that they’re immutable. The @Immutable
annotation does quite a number of things for me, including:
- Makes properties
final - Sets up a map-based constructor and a tuple constructor (as per
@TupleConstructor) - Ensures that certain types of parameter (such as
Dateand collections) are defensively copied - Prepares a
toStringmethod (as per@ToString)
So here’s how our FinalReport code now looks with the help of @Immutable:
@Immutable annotationimport groovy.transform.Immutable
@Immutable
class FinalReport {
final List records
}
@Immutable
class Record {
Date creationDate = new Date()
String title
String text
}
def recordSet = [
new Record(title: 'Record A', text: 'This is a record'),
new Record(title: 'Record B', text: 'This is another record'),
new Record(title: 'Record C', text: 'This is yet another record')
]
FinalReport report = new FinalReport(recordSet)
//This will fail with groovy.lang.ReadOnlyPropertyException
try {
report.records[1].text = 'REDACTED'
} catch (ReadOnlyPropertyException e) {
println 'Sorry, you can\'t change a record in a final report'
}
//This will fail with java.lang.UnsupportedOperationException
try {
report.records << new Record(title: 'Record Z', text: 'You just got hacked')
} catch (UnsupportedOperationException e) {
println 'Sorry, you can\'t add a record to a final report'
}
println report
You can easily see that the code for my FinalReport and Record classes has been cut right back. This is really
helpful in many situations but @Immutable can’t do everything so make sure you read the documentation.
Copying and cloning
Just wandering a little off the final path, let’s take a quick look at how we could defensively handle mutable objects.
Defensively copying basic objects such as String and Integers is easy as it happens at assignment time:
Integer i = new Integer(10)
Integer j = i
i = 20
assert !i.is(j)
This works because i = 20 causes i to be assigned a new instance of Integer. Similarly, I can copy a list
of numbers quite easily:
def yourList = [2, 4, 6]
def myList = [*yourList]
assert myList == yourList
assert !myList.is(yourList)
This is all reasonably straight-forward as I’m only dealing with basic objects. However, how do I defensively copy
an object that consists of several properties/fields? Earlier, I re-programmed the Record class to make all of the
properties final and this meant that I didn’t really need to defensively copy instances.
Sometimes I don’t get that option, especially for existing or third-party developed classes. In such cases I have a few
options:
- Don’t copy the whole instance, just extract the fields I actually need and copy them
- Create a new instance using the object’s current state as input
- Call the
clone()method if one exists.
The second option is possible if I can use the object’s properties to create another instance via the constructor and/or setters:
import groovy.transform.Canonical
@Canonical
class Assignment {
final String studentName
String answers
}
@Canonical
class SubmissionSystem {
Map submissions = [:]
def submitAssignment(Assignment sub) {
if (!submissions.get(sub.studentName)) {
submissions.put sub.studentName, new Assignment(sub.studentName, sub\
.answers)
}
}
}
Assignment myAssignment = new Assignment('Fred Nurk', 'I have no idea')
SubmissionSystem system = new SubmissionSystem()
system.submitAssignment(myAssignment)
println system
myAssignment.answers = 'A really good set of answers'
println system
In the code above the submitAssignment method calls the Assignment constructor to create a new instance. This helps
make sure that the student can’t mysteriously change their answers after submitting. You can see that it’s a pretty simple
example and a more complex classes will make this very difficult, especially if they have internal state that is hard to
reach.
The third option is to have a class implement the Cloneable interface. If a third-party class provides this then you’re
in luck and can make a copy (clone):
Cloneableimport groovy.transform.Canonical
@Canonical
class Assignment implements Cloneable {
final String studentName
String answers
@Override
protected Assignment clone() throws CloneNotSupportedException {
return new Assignment(studentName, answers)
}
}
@Canonical
class SubmissionSystem {
Map submissions = [:]
def submitAssignment(Assignment sub) {
if (!submissions.get(sub.studentName)) {
submissions.put sub.studentName, sub.clone()
}
}
}
Assignment myAssignment = new Assignment('Fred Nurk', 'I have no idea')
SubmissionSystem system = new SubmissionSystem()
system.submitAssignment(myAssignment)
println system
myAssignment.answers = 'A really good set of answers'
println system
As Assignment provides a clone method we just need to call it and we’re returned a copy for our own use. Naturally,
this doesn’t help us if the author of Assignment doesn’t provide us with a clone method.
Check out the Useful Annotations chapter for the @Canonical annotation.
Final classes and methods
The final modifier can also be used against class and method declarations. We’ll look into this in the
chapter on Final Classes
81. Access Modifiers
Classes are used to embody an abstraction of some real or virtual entity. You can probably guess what a BankAccount or an EmailMessage class embodies. In some cases we might be happy for other code to change a value held in a class instance or to run a method. However, in the case of a BankAccount class we are likely to need some sort of information hiding that moderates what other code is allowed to do:
- The
balancefield shouldn’t be directly accessible. Rather, two methodsdepositandwithdrawalhave to be used. - The
withdrawalmethod should not allow you take take out more money than the current balance.
In Groovy we can implement the business logic just described through the use of Access Modifiers.
Access modifiers are keywords (public, private, protected) that determine if another class can use an element (such as a property, field or method) of the class being described.
-
publicelements can be accessed by all other classes and code -
privateelements are only accessible from within the class itself -
protectedelements are only accessible from subclasses and within their own package
Two things to keep in mind:
- Groovy applies
publicby default so you don’t need to explicitly declare anything aspublic. - Providing an access modifier means that
defisn’t needed when you’re using dynamic types:-
private balance = 0is preferred overprivate def balance = 0 - Similarly for methods:
private applyAccountCharges() {...}rather thanprivate def applyAccountCharges() {...}
-
For our BankAccount class we can make the balance field private:
class BankAccount {
private Integer balance = 0
Integer withdrawal(amount) {
if (amount > balance) {
throw new Exception('Insufficient balance')
}
balance -= amount
}
Integer deposit(amount) {
balance += amount
}
}
def acct = new BankAccount()
acct.deposit(100)
acct.withdrawal(150)
In the example above I set the balance field to private and then provide two public methods to allow for other code to perform a deposit or a withdrawal. The latter method even throws an exception if you try to take out too much.
Now here’s “the rub”. Groovy doesn’t actually enforce the access modifier. That means that, given my BankAccount class I could still write acct.balance = 1_000_000 and access the field directly. A Python programmer might shrug at this and state that it’s a matter of respecting the original programmer’s intention. A Java programmer might be shocked that Groovy doesn’t throw an exception or an error.
I’m usually pretty happy with the Python approach but if it was really a concern I could add the following method to my BankAccount class, as seen in the next example:
class BankAccount {
private Integer balance = 0
Integer withdrawal(amount) {
if (amount > balance) {
throw new Exception('Insufficient balance')
}
balance -= amount
}
Integer deposit(amount) {
balance += amount
}
private setBalance(amount) {
}
}
def acct = new BankAccount(balance: 200)
assert acct.balance == 0
def acct2 = new BankAccount()
acct.balance = 100
assert acct2.balance == 0
Groovy generates setters and getters for properties but I need provide them for fields. In the case of the balance field, the setter method named setBalance is actually called when I do something like acct.balance = 1_000_000. Knowing this, I overrode the setter Groovy would have created with my own version that does nothing and I also used the private modifier. This does two things:
- The
privatemodifier reinforces to other developers that they should not try to directly change the value ofbalance - If the other developers just don’t listen then I ignore their attempt to change the
balance.
Whilst my empty setBalance method helps prove a point, having to do that too often will reduce readability and annoy me with having to write lots of vacant code to protect my code from others who don’t listen. Essentially I take the approach that developers are (usually) sensible people that understand what they’re being asked not to fiddle with. If they fiddle then they can expect a weird outcome. So feel free to write a method with the signature private doSomethingEvil(), add some code that deletes all files and see who doesn’t pay attention :-)
Applying Access Modifiers
The following access modifiers are available:
- Classes:
publicprotected
- Fields
publicprivateprotected
- Methods
publicprivateprotected
Remember, you don’t need to explicitly declare an element as public as this is the default.
- If you want to really get into this topic, start with http://docs.oracle.com/javase/tutorial/essential/environment/security.html↩
82. Useful Annotations
Groovy comes with a number of handy notations that let you easily customise a class without doing the hard work yourself.
This chapter will take a brief look at some of the handier annotations in the
groovy.tranform package.
You can even write your own annotations but that’s something for another book…
ToString
The toString() method is used to provide a “human readable” representation of the object. It’s available on all
objects and you can override it but you can also just use the ToString annotation to make this even easier:
@groovy.transform.ToString
class Person {
def name
def email
def mobile
Person(name) {
this.name = name
}
}
def astrid = new Person('Astrid Smithson')
println astrid
ToString takes a few options:
-
@ToString(includeNames=true): will add in the property name, prefixing the property value -
@ToString(includeFields=true): by default, properties are used but this adds in fields
You can use several options at once:
@groovy.transform.ToString(includeNames=true, includeFields=true)
class Person {
def name
private email
private mobile
Person(name) {
this.name = name
}
}
def astrid = new Person('Astrid Smithson')
println astrid
EqualsAndHashCode
Determining if two instances are equal is something you have to add in yourself. Groovy will agree that two variables are the same if they point to the same instance of a class:
def agentSmith1 = new Person(id: 411, name: 'Agent Smith')
def agentSmith2 = agentSmith1
assert agentSmith1 == agentSmith2
However, this isn’t Groovy being clever, it’s just seeing that agentSmith1 and agentSmith2 point to the same thing.
In the code below you’ll see that a Person instance with the same id and name as another Person instance doesn’t
automatically equate to them being equal:
class Person {
def id
def name
}
def agentSmith1 = new Person(id: 411, name: 'Agent Smith')
def agentSmith2 = agentSmith1
def agentSmith3 = new Person(id: 411, name: 'Agent Smith')
assert agentSmith1 == agentSmith2
//This will fail
assert agentSmith2 == agentSmith3
By using the EqualsAndHashCode annotation I can tell Groovy that two instances of Person with the same id are actually
equal:
@groovy.transform.EqualsAndHashCode(includes='id')
class Person {
def id
def name
}
def agentSmith = new Person(id: 414, name: 'Agent Smith')
def agentSmith2 = new Person(id: 414, name: 'Agent X')
assert agentSmith == agentSmith2
Equality is not always easy to determine and will depend on the context in which you’re developing - my example above
is likely to cause some debate as to if matching only on id is enough. The EqualsAndHashCode annotation has a few options that are worth digging into.
Canonical
The Canonical annotation brings together functionality from a suite of other annotations:
ToStringEqualsAndHashCodeTupleConstructor
We’ve looked at these previously so let’s jump to an example:
@groovy.transform.Canonical
class Person {
def name
def email
def mobile
}
Person phil = new Person('Phil', '041414141')
println phil
This saves you from needing to stack your annotations:
import groovy.transform.EqualsAndHashCode
import groovy.transform.ToString
import groovy.transform.TupleConstructor
@ToString
@EqualsAndHashCode
@TupleConstructor
class Person {
def name
def email
def mobile
}
Person phil = new Person('Phil', '041414141')
println phil
Immutable
The Immutable annotation provides similar features as Canonical but locks down new instances so that they can’t be changed after creation.
Immutable objects can be very useful in systems using parallel processing or caching.
@groovy.transform.Immutable
class Person {
String name
String email
String mobile
}
def krusty = new Person(name: 'Krusty')
krusty.email = 'heyhey@example.com'
The code above will fail on krusty.email = 'heyhey@example.com' as the Immutable annotation marks the email field as final.
83. Let Go of That Instance!
Sometimes your variable (e.g. a class instance) can end up holding a large amount of data. For example, you might have placed the text of the complete works of Shakespeare into a property. The JVM performs a process called Garbage Collection so as to clean up data that you are no longer using. By assigning a variable to null we flag that the data previously held by the variable is no longer needed:
myInstance = null
For small Groovy scripts this may never be an issue but, for long running applications, data hanging around and not being used can start to soak up a serious amount of resources, especially memory. Once you’ve finished with a variable it’s worth assigning its value to null to let the JVM know you don’t need it anymore.
You don’t always need to explicitly set variables to null - this would make your code far less readable. The JVM knows that once a variable is no longer in scope, it’s no longer accessible and, thus, is no longer needed. This means that if you have a variable declared inside a method, its value is no longer needed once the method has completed. The same goes for variables declared within scopes such as loops. This can get a bit tricky when regarding closures and object references so it’s not all plain sailing.
There is an important caveat: if multiple variables refer to the same data then the JVM can only release resources once all references have “unlatched”. Let’s examine this in the code below:
class SampleText {
def text
}
def shakespeare = new SampleText(text: 'It was the best of times....')
def marlow = shakespeare
shakespeare = null
println marlow.text
I’ve defined a variable (shakespeare) to hold a new instance of the SampleText class and then said that another variable (marlow) points to that instance of SampleText. My call to marlow.text will still work despite my setting shakespeare to null. In this case we say that “marlow still holds a reference to the SampleText instance”. This means that the JVM can’t release the resources held by the instance until all references are set to null. I need to set marlow to null to completely release the resources.
There’s a lot more to garbage collection than I want to cover here but if you spend a few moments searching “Java Garbage Collection” you’ll be able to delve deep into the topic.
84. Enums
Enums are a special type of class that represent an enumerated type
- they’re used to define one or more constants. Sometimes people use strings for this but they aren’t always the best
option for checking identifiers and enums are a nicer approach to declaring a set of constants than having lots of
static final variables in a class.
Booleans represent an enumerated type1 that can be true or false but,
whilst these are English-language keywords, the boolean value true isn’t a string representing the text “true”:
String t = 'true'
Boolean b = true
//This will fail
assert t == b
So let’s take a look at a very simple enum:
enum Months {
JAN,
FEB,
MAR,
APR,
MAY,
JUN,
JUL,
AUG,
SEP,
OCT,
NOV,
DEC
}
// enums help comparisons
assert Months.JAN != Months.DEC
assert Months.APR == Months.APR
// enums aren't text strings
assert Months.OCT != 'Oct'
// Assign a variable to be the value of an enum constant
Months myMonth = Months.AUG
// Iterate through the months
for (month in Months) {
println month
}
//The values method returns a list of the constants in the enum
println Months.values()
First up you’ll see that the enum keyword replaces class. Next, I’ve named the enum Months and provided a set
of three-letter constants for each of the months in a year - these are the enum’s constants. The enum’s constants are
accessed using the same approach we use for static variables: Months.JAN. Essentially, the enum’s constant is much the
same as a class’s static final variables but the ability to loop through the enum with for (month in Months) {}
marks enums as managing a set of constants rather than individual variables/constants.
In the line Months myMonth = Months.AUG you’ll see that enums define types but in a manner different to that we saw in classes.
The myMonth variable is of the enum type Months but we don’t create the instance by calling Months myMonth = new Months().
Instead, we assign myMonth to the value of one of the constants as AUG is a constant of type Months.
One more point before moving on, the enum constants don’t have to be declared in upper-case, that’s just the usual approach
and mirrors how we declared constants using the static final modifiers. It’s a just a standard approach to style rather than
required by the language.
Let’s take a look at another example - this time I’ll create a Gender enum and use it in my Person class:
import groovy.transform.ToString
enum Gender {
MALE,
FEMALE
}
@ToString
class Person {
String name
String email
String mobile
Gender gender
}
Person jane = new Person(name: 'Jane', gender: Gender.FEMALE)
println jane
There’s probably nothing too new in that example but it helps us take a next step - to give the Gender enum constants a value:
import groovy.transform.ToString
enum Gender {
MALE('male'),
FEMALE('female')
final String value
Gender(value) {
this.value = value
}
@Override
String toString() {
value
}
}
@ToString
class Person {
String name
String email
String mobile
Gender gender
}
Person jane = new Person(name: 'Jane', gender: Gender.FEMALE)
println jane
Describing that last example can get a litle tricky so I’m going to step through it. First of all, I start the enum declaration as you’d expect:
enum Gender {
Then I list the enum’s constants but they look a little odd. In fact they look like constructor calls:
MALE('male'),
FEMALE('female')
Remember how we don’t call new Gender()? That’s because MALE is a analagous to single static instance of the Gender enum and the
call MALE('male') is instantiating MALE via the constructor. Importantly, enum constructors are called internally
by the enum and not from any external source - they’re private to the enum. The constructor is called once for each constant.
The next part of the Gender enum, as listed below, declares a member variable (value) and the constructor sets the
variable based on the incoming parameter:
final String value
Gender(value) {
this.value = value
}
I have declared value to be final as I don’t want others to change it. Whilst I could drop the final modifier
it’s not a great idea as enums are generally seen as a constant construct.
Lastly, I provide a toString method that helps us when displaying an enum constant:
@Override
String toString() {
value
}
The order within an enum is important and you must put the list of constants before any other items. I generally prefer to lay them out as follows:
- Constants
- Member variables
- Constructors
- Methods
Enums describe not just a set of constants but their order. Groovy provides the built-in next and previous methods
that help step through the constants in an enum. Let’s look at a school grades enum and the result of calling next on each constant:
enum Grades {
FAIL,
PASS,
CREDIT
}
println Grades.FAIL.next()
println Grades.PASS.next()
println Grades.CREDIT.next()
Running this script will yield:
PASS
CREDIT
FAIL
Unfortunately, according to Groovy, the next highest grade after CREDIT is FAIL - the next function just loops back to the first constant.
This next version will fix that by overriding the default behaviours for next and previous:
enum Grades {
FAIL,
PASS,
CREDIT
def next() {
switch (this) {
case FAIL:
return PASS
case PASS:
return CREDIT
case CREDIT:
return CREDIT
}
}
def previous() {
switch (this) {
case FAIL:
return FAIL
case PASS:
return FAIL
case CREDIT:
return PASS
}
}
}
println Grades.FAIL.next()
println Grades.PASS.next()
println Grades.CREDIT.next()
println Grades.FAIL.previous()
println Grades.PASS.previous()
println Grades.CREDIT.previous()
This approach can be really useful when dealing with constants that can be escalated. Think about examples such as
a Priority enum with constants such as LOW, MEDIUM and HIGH or a DeliveryTime enum with NORMAL, PRIORITY and
EXPRESS.
- However, Boolean is a class and extends
java.lang.Object. Enums implcitly extendjava.lang.Enum.↩
85. The synchronized modifier
The synchronized keyword is used in concurrent environments in which multiple threads are operating and there’s potential that code running on different threads are interacting on the same section of code. The synchronized modifier is used to indicate that the associated element can only be accessed by one caller at a time. In the code below you’ll see the various applications of synchronized available:
synchronizedclass PrizePool {
synchronized amount
static synchronized pools
synchronized calculateTotalPool() {
//synchronized code
}
def calculateWinnings() {
//non-synchronized code
synchronized (this) {
//synchronized code
}
//non-synchronized code
}
static synchronized removePool() {
//synchronized code
}
static addPool() {
//non-synchronized code
synchronized (PrizePool) {
//synchronized code
}
//non-synchronized code
}
}
- First of all, member and static variables can be marked as
synchronized- only one thread can read/write the variable at a time. - Instance and class methods can also be marked as
synchronized. Once called by one thread, any other threads are prevented from accessing the method until the first thread’s call has completed. - One or more blocks within an instance or class method can be
synchronized1:- Within an instance method the block is prefixed with
synchronized (this)- note the use of an object instance (this) - For a class method, the block is prefixed with
synchronized (PrizePool)- note the use of a class name (PrizePool)
- Within an instance method the block is prefixed with
A good starting place for understanding this topic is the Concurrency section of The Java Tutorials. Additionally, the GPars Framework provides a library to assist you in writing concurrent/parallel Groovy and Java code.
- Whilst the example blocks use
thisinstance and thePrizePoolclass, you can use other instances and classes.↩
IX More object-oriented programming
86. Introduction
Now that you have a handle on constructing classes we’ll explore the various Groovy constructs for creating a more extensible codebase:
- Interfaces: define a set of method signatures that are then implemented by a class (or classes).
- Traits: add abilities to a class
- Inheritance: Allows a class to inherit the functionality of another class and extend it.
- When
ChildClassinherits fromParentClass, we say thatChildClassis a subclass ofParentClassand thatParentClassis a superclass ofChildClass1.
- When
First up, we’ll look at how to organise your code before those classes get out of hand.
The Shapes demo
Throughout this section I’ll build up an example library for working with two-dimensional shapes. You’ll see this in chapters with the The shapes demo prefix and a full listing is available as an appendix.
As the Shapes demo source code is laid out as a larger project and divided into packages, you won’t be able to run it
via groovyConsole.
To support you in trying out the demo I’ve setup the shapes demo
mini site. This provides a number of handy resources:
- A guide to building (compiling) the code both directly using
groovycand with the Gradle build tool. - Links to download the code
- Various reports on the code
Once you’ve read through the chapters in this section, head to the shapes demo mini site and give it a try.
87. Organising your code
When you start writing larger code bases you’ll need to think about how to organise your code. You don’t have to do this if you’re using Groovy to write scripts that can fit into a reasonable file size (say, 400 lines) but really large files can become difficult to scroll through and debug. There are two complementary tactics you can use when working with larger bodies of code:
- Break the code into packages
- Put the code files into a directory structure that reflects your package structure
We’ll start by looking at packages and then move onto directory structures.
Packages
Code that doesn’t specify a package is said to be in the default package. Most of the code we’ve looked at so far has been lacking a specific package and is automatically put into the default package - this is perfectly fine for small applications and scripts. However, once you start to build larger codebase you’ll want to start breaking your classes, enums, interfaces etc into separate files and collect them into packages.
The generally agreed approach to structuring larger codebases is to:
- Declare one structure (e.g. class, interface, enum) per file
- Name the file after the structure declared in the file. For example, if you declare
class Person{...}then name the filePerson.groovy - Place these files into one or more packages
Following this approach will help you avoid a mess of files that makes it hard to debug problems later.
Let’s take a look at a basic example in which I have a script that declares a Person class and then tries to do something
with it:
package mypackage
class Person {
def name = ''
}
def jim = new Person()
println jim.name
If I put the above script into a file named Person.groovy and try to run it with groovy Person.groovy
it will give me the following error:
org.codehaus.groovy.control.MultipleCompilationErrorsException: startup failed:
Person.groovy: 3: Invalid duplicate class definition of class mypackage.Person :\
The source Person.groovy contains at least two definitions of the class mypacka\
ge.Person.
One of the classes is an explicit generated class using the class statement, the\
other is a class generated from the script body based on the file name. Solutio\
ns are to change the file name or to change the class name.
@ line 3, column 1.
class Person {
^
1 error
Essentially, this is caused by Groovy trying to create a Person class around the def jim = new Person() - Groovy
assumes that you want to create a class with the same name as the file but you have already declared a Person class in the file.
If we’re following the rule of “One structure per file”, we should only declare the Person class in Person.groovy:
package mypackage
class Person {
def name = ''
}
In the same directory we’ll then create Main.groovy and put it into the mypackage.app package as follows:
package mypackage.app
import mypackage.Person
def jim = new Person(name: 'Jim')
println jim.name
Note that I’m actually creating two packages:
-
mypackagewill contain thePersonclass -
mypackage.appwill contain theMainclass
As Person isn’t in the same package as Main, we need to import it using the fully qualified name for the Person
class: mypackage.Person.
Compiling and running
Now that you have a Person.groovy file and a Main.groovy file you can run
groovyc Main.groovy Person.groovy
to compile the two files1. Once groovyc has completed you’ll notice the following:
- A
mypackagesubdirectory has been created and containsPerson.class - A
mypackage/appsubdirectory has been created and containsMain.class
If I now run groovy Main I’ll get Jim’s name displayed as I expect but be warned that, whilst this call to groovy is
using the compiled Person class, it is actually using the Main.groovy file and not the compiled version. In most cases
you would keep Main.groovy as a script and not worry about putting it into a package - this is just for demonstration
purposes.
You can run your compiled Groovy classes using Java by doing the following:
- Download the groovy-all jar into the directory containing the
mypackagesubdirectory. - Now run
java -cp groovy-all-2.4.4.jar:. mypackage.app.Main
- Short form:
groovyc *.groovy↩
88. Naming your packages
If all Groovy and Java programmers just relied on the default package or mypackage it’d be almost impossible to
share code as it’s extremely likely more than one Person class would be created. The package naming convention helps to avoid this and there are two key elements to remember:
- Package names are written in lower-case to avoid clashing with elements such as class names.
- It is recommended that a reversed domain name is used as the base package name
The first point is straight-forward so let’s explore the second. If you or the company you work for own a domain name,
you basically just reverse it and then prefix specific package names. For example, as I own the groovy-tutorial.org
domain I should use:1
org.groovy_tutorial.mypackage
I would use org.groovy_tutorial as the basis and then start with a prefix that reflects a project or library name for
which I’m developing (e.g. org.groovy_tutorial.shapes). If I didn’t own a domain I could have used the name
of the site on which my code is hosted:
com.github.groovy_tutorial.shapes_demo
I’m not pretending to own github.com but I’ve also included the organisation name and project name to ensure uniqueness.
One final point to remember is that your chosen package name needs to be based on something that’s not likely to change
and isn’t pinned to a single person. I’ve seen email addresses used (e.g. com.gmail.example) but this isn’t the best idea.
Just take a moment before committing to a package name - you’ll thank yourself if the code is still going in five years.
- I’ve converted the hyphen (
-) to an underscore (_) as package names can’t contain a hyphen (and domain names can’t contain an underscore).↩
89. Packages and directory structure
Groovy is very forgiving and I can put all of my code files in a single directory, regardless of which package I say they’re
in. This, however, is poor practice and I should create a directory structure that mirrors my package structure. In the last
example I had two packages, mypackage and the sub-package mypackage/app and, when compiled, the following directory structure
appeared:
mypackage/
├── Person.class
└── app
└── Main.class
This structure reflects the one I should be using in my source:
mypackage
├── Person.groovy
└── app
└── Main.groovy
Here’s the logic:
-
Person.groovyis in themypackagepackage so I create amypackagedirectory and putPerson.groovyin there -
Main.groovyis in themypackage.apppackage:- As
appis a subpackage ofmypackageso I should create anappsubdirectory undermypackageand placeMain.groovythere.
- As
Once I’ve shuffled the files into the new structure I can compile them with:
groovyc -d classes mypackage/Person.groovy mypackage/app/Main.groovy
You’ll find the compiled class files in the classes directory (as set by the -d switch).
At this point you’re probably thinking that having to individually name all of the directories in a large codebase is going to be unwieldy and you’re absolutely correct. Once you get beyond a few files you’ll turn to a build system such as Gradle.
90. The Shapes demo - packages
You’ll find the following packages in the shapes demo source code:
org.groovy_tutorial.shapesorg.groovy_tutorial.shapes.triangleorg.groovy_tutorial.shapes.app
These are all organised under the src/main/groovy directory:
└── org
└── groovy_tutorial
└── shapes
├── Circle.groovy
├── Rectangle.groovy
├── ShapeUtil.groovy
├── Sides.groovy
├── Square.groovy
├── Triangle.groovy
├── TwoDimensionalShape.groovy
├── app
│ ├── Main.groovy
│ └── package-info.groovy
├── package-info.groovy
└── triangle
├── TriangleEquilateral.groovy
├── TriangleIsosceles.groovy
├── TriangleRightAngled.groovy
├── TriangleSubtype.groovy
└── package-info.groovy
Within each package’s folder you’ll notice a package-info.groovy file. This isn’t a script but the documentation for the
package. The groovydoc system will use this file when preparing the application’s documentation.
For further information, please check out the JavaDoc documentation section on “Package Comment Files”.
91. Interfaces
Interfaces provide a set of method signatures that are intended to be implemented by classes - they are an extremely useful construct that allows you to define a “contract” between your code and other developers.
Let’s take a look at an example:
interface SocialNetwork {
Member friend(Member friend)
Member unFriend(Member enemy)
}
The syntax looks much like that of a class but you’ll notice two key differences:
- The keyword
interfaceis used to declare an interface - There are two method signatures (
friendandunFriend) but I haven’t provided the code body for the method
That last point is an important one: interfaces don’t define implementations, they are used to define an API that is implemented by one or more classes. Well thought out interfaces are integral to code that can be reused and maintained over time. Some developers will start a new coding effort by determining the interfaces they’ll need by asking “what elements will interact and how?”.
An interface can’t be instantiated (e.g. SocialNetwork network = new SocialNetwork()) as it doesn’t actually do (implement) anything.
In order to implement an interface, the implements keyword, followed by the interface’s name, is used in the class declaration:
class Member implements SocialNetwork {
String name
def friends = [] as Set
@Override
Member friend(Member friend) {
friends << friend
friend
}
@Override
Member unFriend(Member enemy) {
friends -= enemy
enemy
}
}
In class Member implements SocialNetwork we bind the Member class to the SocialNetwork interface. This then means that
the class needs to provide implementations of the friend and unFriend methods. In the example above you’ll note that I’ve
annotated each implemented method with @Override. This indicates to the Groovy compiler that those two methods are related to
method signatures from an interface that is being implemented1.
Groovy (and Java) classes can implement more than one interface by listing them after the implements keyword - just
use a comma (,) between each interface:
interface SocialNetwork {
Member friend(Member friend)
Member unFriend(Member enemy)
}
interface Posts {
Map getPosts()
void addPost(String title, String body)
}
class Member implements SocialNetwork, Posts {
String name
def friends = [] as Set
Map posts = [:]
@Override
Member friend(Member friend) {
friends << friend
friend
}
@Override
Member unFriend(Member enemy) {
friends -= enemy
enemy
}
@Override
void addPost(String title, String body) {
posts << [title: body]
}
}
I’ve provided a full code listing of the example below so that you can take this for a test spin in the groovyConsole:
interface SocialNetwork {
Member friend(Member friend)
Member unFriend(Member enemy)
}
interface Posts {
Map getPosts()
void addPost(String title, String body)
}
class Member implements SocialNetwork, Posts {
String name
def friends = [] as Set
Map posts = [:]
@Override
Member friend(Member friend) {
friends << friend
friend
}
@Override
Member unFriend(Member enemy) {
friends -= enemy
enemy
}
@Override
void addPost(String title, String body) {
posts << [title: body]
}
}
def jim = new Member(name: 'Jim')
def gina = new Member(name: 'Gina')
def andrew = new Member(name: 'Andrew')
jim.with {
println 'Jim makes some friends: '
friend(gina)
friend(andrew)
friends.each { println " - $it.name" }
println '\nJim makes an enemy of Andrew'
unFriend(andrew)
println '\nJim now has these friends: '
friends.each { println " - $it.name " }
println '\nAdding a post'
addPost('My weekend', 'Just hung out and stuff')
println getPosts()
}
- It’s also used for methods overriding those declared in a superclass.↩
92. Referring to objects by their interface
An interface defines functionality rather than state. In many cases you just want to interact with a specific
set of an object’s functionality and referring to the interface rather than a specific class can make your code more adaptable.
Two interfaces, java.util.Map and java.util.List, come to mind when considering this:
-
java.util.Mapis implemented in a range of classes:-
java.util.Propertiesis used when reading and writing property files -
java.util.LinkedHashMapretains the order in which keys are inserted (and is used when youdef myMap = [:]) -
java.util.concurrent.ConcurrentHashMapprovides for full concurrency in retrievals and updates
-
-
java.util.List-
java.util.ArrayListprovides a resizable array (and is used when youdef myList = []) -
java.util.Stackis a last-in-first-out (LIFO) stack
-
So whilst I might choose a specific implementation class for my variable because of a need such as speed or concurrency,
other parts of my code may be more interested in the interface level (e.g. java.util.Map).
When declaring a variable I can provide an interface as the data type, e.g. Map posts = [:]. This means that I don’t
really care which implementation of Map is assigned to posts, I’ll only be accessing the methods declared by Map
(e.g. keySet). In a slightly more convoluted example, Posts p = new Member() indicates that the variable p is only
interested in the Member object’s Posts functionality.
Whilst handy for variable declaration, referring to interfaces when defining method parameters is extremely useful as it
makes the method more abstract. Consider a method that will accept a Map parameter and iterate through it:
def displayKeys(Map m) {
for (key in m.keySet()) {
println key
}
}
def myMap = [name: 'Bill', id: '1234']
displayKeys myMap
It’s a rather useless example but the point is that the displayKeys method can accept any value for parameter m,
provided m is an instance of a class that implements the Map interface. If I’d been specific and written the method
signature as def displayKeys(LinkedHashMap m), my method has a far narrower field of usage. As I’m just using the Map
interface’s keySet method, I don’t really need to limit the possible values for m.
Obviously, if you want/need to constrain usage to a specific implementation, you would declare that as the data type for the parameter.
If the method needed the storeToXML functionality of java.util.Properties then I’d need to use that instead of
java.util.Map - just take a moment to make sure it’s really required.
93. General advice for interfaces
Groovy interfaces don’t allow default methods
Java interfaces allow you to provide implementation for a method. Such methods are referred to as “default methods” as any implementing class doesn’t have to provide their own implementation. This might be helpful when an interface needs to be updated/improved as it saves having to go through an existing codebase and providing the implementation. However, it’s also a bit of a trap as that approach “wedges” in functionality that may not really fit the implementing classes (and their subclasses).
Groovy’s traits gives you a neater approach to this.
The constant interface antipattern
In my earlier examples I omitted the fact that you can declare constants in an interface. At first glance this might sound like I’ve denied a useful piece of functionality but, in reality, the declaration of constants inside an interface isn’t a good idea. Consider the following example:
interface SocialNetwork {
static final MAX_FRIENDS = 100
Member friend(Member friend)
Member unFriend(Member enemy)
}
The example above provides a strong example as to how this is a bad idea as MAX_FRIENDS really is an implementation detail
and, furthermore, the interface construct doesn’t let us actually enforce the logic. The SocialNetwork interface
relies on implementing classes to make the link.
If you focus your interfaces on providing method signatures, your code will be easier to maintain. When you need to define constants, consider the following alternatives:
- For enumerated constants, definitely use an enum
- If the constant is part of a class’s logic, declare the constant with the class
- Consider creating a utility class that defines general constants of use in your program
94. The Shapes demo - Interfaces
One interface is defined within the shapes library: TwoDimensionalShape:
TwoDimensionalShape interfacepackage org.groovy_tutorial.shapes
/**
* An interface for basic two-dimensional objects
*
* @see <a href="https://en.wikipedia.org/wiki/List_of_two-dimensional_geometric\
_shapes">
* Wikipedia: List of two-dimensional geometric shapes</a>
*
* @author Duncan Dickinson
*/
interface TwoDimensionalShape {
/**
* The length of the path surrounding a 2D shape
* @see <a href="https://en.wikipedia.org/wiki/Perimeter">Wikipedia: Perimet\
er</a>
* @return the perimeter of the shape
*/
BigDecimal getPerimeter()
/**
* The extent of a 2D shape in a plane
* @see <a href="https://en.wikipedia.org/wiki/Area">Wikipedia: Area</a>
* @return the area of the shape
*/
BigDecimal getArea()
/**
* A handy display string
* @return a text representation of the shape
*/
String getDisplayInfo()
/**
* @return the name of the shape
*/
String getShapeName()
}
The interface is declared using the interface keyword followed by the name: interface TwoDimensionalShape.
Within the interface is the following method signatures:
-
BigDecimal getPerimeter(): will return the shape’s perimeter -
BigDecimal getArea(): will return the shape’s area -
String getDisplayInfo(): is used to prepare a handy description of the shape -
String getShapeName(): returns the name of the shape (e.g. square or circle)
Each method signature is listed without a definition block ({...}) and it is up to the implementing class(es) to provide the “body” of the definition. The Circle class does just that:
Circle classpackage org.groovy_tutorial.shapes
import static java.lang.Math.PI
import groovy.transform.EqualsAndHashCode
import groovy.transform.ToString
/**
* Describes a circle
* @author Duncan Dickinson
*/
@EqualsAndHashCode(includes = 'radius')
@ToString(includeNames = true, includeFields = true, includePackage = true)
final class Circle implements TwoDimensionalShape {
private static final String SHAPE_NAME = 'Circle'
/** The radius of the circle */
final BigDecimal radius
/** The circle's perimeter (circumference) */
final BigDecimal perimeter
/** The circle's area */
final BigDecimal area
/**
*
* @param radius the radius of the circle (must be a positive number)
* @throws IllegalArgumentException if radius <= 0
*/
Circle(BigDecimal radius) throws IllegalArgumentException {
ShapeUtil.checkSidesException(radius)
this.radius = radius
this.perimeter = calculatePerimeter(radius)
this.area = calculateArea(radius)
}
/**
* Helper function - defers to calculatePerimeter
* @see #calculatePerimeter(Number)
* @param radius
* @return the circumference (perimeter)
* @throws IllegalArgumentException if radius <= 0
*/
static BigDecimal calculateCircumference(Number radius) throws IllegalArgume\
ntException {
calculatePerimeter(radius)
}
/**
* Calculates the perimeter of a circle using the formula: p = 2*Pi*r
* @param radius
* @return the perimeter
* @throws IllegalArgumentException if radius <= 0
*/
static BigDecimal calculatePerimeter(Number radius) throws IllegalArgumentEx\
ception {
ShapeUtil.checkSidesException(radius)
(2 * PI * radius) as BigDecimal
}
/**
* Calculates the area of a circle using the formula: a = Pi*r^2
* @param radius
* @return the area
* @throws IllegalArgumentException if radius <= 0
*/
static BigDecimal calculateArea(Number radius) throws IllegalArgumentExcepti\
on {
ShapeUtil.checkSidesException(radius)
(PI * radius**2) as BigDecimal
}
/**
* Calculates the circle's diameter using the formula: d = 2r
* @param radius
* @return the diameter
* @throws IllegalArgumentException if radius <= 0
*/
static BigDecimal calculateDiameter(Number radius) throws IllegalArgumentExc\
eption {
ShapeUtil.checkSidesException(radius)
(radius * 2) as BigDecimal
}
@Override
String getDisplayInfo() {
"$SHAPE_NAME: radius = $radius; diameter = $diameter; \
circumference = ${circumference}; area = ${area}"
}
/**
* Just a convenience - equivalent to getPerimeter
* @return the circumference
*/
BigDecimal getCircumference() {
perimeter
}
/**
* A pseudo getter
* @return the diameter
*/
Number getDiameter() {
calculateDiameter(this.radius)
}
@Override
String getShapeName() {
SHAPE_NAME
}
}
You’ll notice that the Circle class doesn’t explicitly provide an implementation for getPerimeter() and
getArea() as Groovy will generate these for the member fields.
95. Traits
Where classes can be used to describe real or virtual “things”, traits provide a construct for describing an ability or a set of related abilities. Let’s consider two contexts in which we might use traits:
- Using a
classwe might describe anAnimalin terms of its features (diet,distribution) and then enhance theAnimalwith traits such asHopping(for a wallaby) orClimbing(for a koala) or both (for a tree kangaroo). - A
BankAccountclass would have its properties (balance,accountHolder) but different accounts provides different abilities (or a combination thereof) such asDeposit,OverdraftorCurrencyConversion.
It’s sometimes difficult to determine where a set of methods might instead be better grouped as a trait but the following may help your decision making:
- If the methods describe an ability or feature that is common to a variety of classes they’re a good candidate for a trait
- Even if this is at the abstract level and would need to be more specific for subtypes1 - a wallaby hops differently to a frog.
- Where the various methods manipulate properties or fields that are otherwise not accessed or only read by the class.
Let’s take a look at an example trait:
trait Running {
void startEvent() {
println 'Ready, set, go!'
}
}
class SportingEvent implements Running {
String name
}
SportingEvent stawellGift = new SportingEvent(name: 'The Stawell Gift')
println "Welcome to $stawellGift.name"
stawellGift.startEvent()
This type of layout is much as we saw for class and interface definitions:
- The declaration starts with the
traitkeyword followed by the trait’s name - We use the CamelCase format for the trait’s name - as we did for classes and interfaces
- Similar to a class, the body of the trait then provides the required properties, fields and methods
- In the
Runningtrait you can see that there’s only one method declared:startEvent().
- In the
When it comes to use the trait in a class, the implements key is used: class SportingEvent implements Running. The class declaration can implement zero or more traits in the same way it can implement zero or more interfaces. In fact, a class declaration can implement a mix of traits and interfaces as can be seen in the snippet below:
class SportingEvent implements SafetyCheck, Running, Swimming {...}
At a guess, the Running and Swimming elements are traits and the SafetyCheck element could be a trait or an interface - we’d need to check the source code or groovydoc.
- We’ll look into this further in the chapter on Inheritance.↩
96. Trait properties and fields
Traits can also declare properties:
trait Running {
Integer distance
void startEvent() {
println 'Ready, set, go!'
}
}
class SportingEvent implements Running {
String name
}
SportingEvent stawellGift = new SportingEvent(name: 'The Stawell Gift', distance\
: 120)
println "Welcome to $stawellGift.name - a ${stawellGift.distance}m race"
stawellGift.startEvent()
As you can see in the example above, the Running trait’s distance property essentially becomes a property of the SportingEvent class. As for classes, getters and setters are generated for properties but you can supply your own if you need additional functionality.
Fields within traits are somewhat different to those in classes. This can get a bit tricky so let’s lay out the example code first:
trait Running {
Integer distance
public String raceType = 'foot race event'
private Integer maxCompetitors = 10
void startEvent() {
println 'Ready, set, go!'
}
}
class SportingEvent implements Running {
String name
String describeEvent() {
"This is a ${Running__raceType} for ${Running__maxCompetitors} competito\
rs"
}
}
SportingEvent dash = new SportingEvent()
assert dash.Running__raceType == 'foot race event'
assert dash.Running__maxCompetitors == 10
dash.Running__maxCompetitors = 99
assert dash.Running__maxCompetitors == 99
println dash.describeEvent()
In the Running trait above you can see:
- One property (as before):
Integer distance - A public field:
public String raceType = 'foot race event' - A private field:
private Integer maxCompetitors = 10
Unlike properties, we cannot refer to a field as though it was a member of the SportingEvent class. In order to access the public and private fields I need to call dash.Running__raceType and dash.Running__maxCompetitors respectively. This notation uses the trait’s fully qualified name followed by two underscores then the field: <PackageName>_<TraitName>__<fieldName> and is needed both in the implementing class and external code.
The fully qualified name format is a bit odd but, as we’ve looked at packages earlier it should be possible to clarify this:
- For a trait that is in the default package (i.e. not explictly put in a package), we just need
<TraitName>__<fieldName>- as seen inRunning__raceType - For a trait in a package, each package level is separated by an underscore (
_):- If
Runningwas declared in theeventspackage:events_Running__raceType - If
Runningwas declared in theevents.trackpackage:events_track_Running__raceType - and so on…
- If
97. Trait methods
Trait-defined methods are much the same as we saw with classes but the private access modifier prevents us from calling a trait’s private methods. In the example below, the call to the private SportingEvent.rigWinner method (race.rigWinner()) will work but the call to the Running trait’s private method (race.slow()) will cause a groovy.lang.MissingMethodException:
trait Running {
void startEvent() {
println 'Ready, set, go!'
}
private String slow() {}
}
class SportingEvent implements Running {
String name
private String rigWinner() {
'We know that Jane will win this'
}
}
SportingEvent race = new SportingEvent(name: 'The Dodgy Race')
println "Welcome to $race.name"
println race.rigWinner()
race.slow()
98. Trait static members
As demonstrated in the example below, traits can have static properties, fields and methods:
trait Running {
static final MAX_DISTANCE = 10_000
static public final MAX_COMPETITORS = 12
static describeRules() {
println 'Here are the rules of running....'
}
}
class SportingEvent implements Running {
}
assert SportingEvent.MAX_DISTANCE == 10_000
assert SportingEvent.Running__MAX_COMPETITORS == 12
SportingEvent.describeRules()
- Accessing a static property:
SportingEvent.MAX_DISTANCE - Accessing a static field:
SportingEvent.Running__MAX_COMPETITORS - Accessing a static method:
SportingEvent.describeRules()
Static member support doesn’t appear to be “fully baked” at this time so it’s a good idea to keep an eye on the Groovy documentation.
99. The class-trait relationship
When a trait is implemented by a class, the relation can be seen as the trait is “folded” into the implementing class. We saw this when we called the SportingEvents constructor and could see the Running trait’s properties. Because of this relationship, traits can refer to this to access instance members.
The code below reveals that a trait’s class is that of the implementer:
trait MyTrait {
Class whoIsThis() {
this.class
}
}
class MyClass implements MyTrait {}
assert new MyClass().whoIsThis() == MyClass
In the next example you can see this being used internal to the trait (this.distance = distance) and the class (${this.name}) but also from the class into the trait (${this.distance}):
this, againtrait Running {
Integer distance
void setDistance(distance) {
if (distance > 10_000) {
throw new IllegalArgumentException('Surely you can\'t run that far')
}
this.distance = distance
}
}
class SportingEvent implements Running {
String name
def getAdvert() {
"${this.name} is a ${this.distance}m event"
}
}
SportingEvent groovySprint = new SportingEvent(name: 'The Groovy 500', distance:\
500)
println groovySprint.advert
Self types
That last example could have been rewritten such that the getAdvert() method is declared in the trait (rather than the class):
thistrait Running {
Integer distance
void setDistance(distance) {
if (distance > 10_000) {
throw new IllegalArgumentException('Surely you can\'t run that far')
}
this.distance = distance
}
def getAdvert() {
"${this.name} is a ${this.distance}m event"
}
}
class SportingEvent implements Running {
String name
}
SportingEvent groovySprint = new SportingEvent(name: 'The Groovy 500', distance:\
500)
println groovySprint.advert
This works fine as SportingEvent has a name property but there’s nothing enforcing this and you’re exposed to the risk of a groovy.lang.MissingPropertyException being raised at runtime if the method/property/field can’t be found.
The @groovy.transform.SelfType annotation is used if a trait needs to be tied to a specific implementing class. The example below demonstrates the Running trait annotated with @SelfType(SportingEvent), indicating that the trait should only by implemented by SportingEvent (or one of its subclasses):
@SelfType annotationimport groovy.transform.SelfType
@SelfType(SportingEvent)
trait Running {
Integer distance
void setDistance(distance) {
if (distance > 10_000) {
throw new IllegalArgumentException('Surely you can\'t run that far')
}
this.distance = distance
}
def getAdvert() {
"${this.name} is a ${this.distance}m event"
}
}
class SportingEvent implements Running {
String name
}
By setting @SelfType(SportingEvent) we can ensure that Groovy will refuse to compile the following attempt:
class Imposter implements Running {}
Just be mindful with this capability - you want to make sure that you aren’t coupling your classes and traits too much. Thankfully, @SelfType can also be passed an interface, allowing for a more broadly implemented trait.
100. Traits and interfaces
As Groovy’s interfaces don’t support default implementations it may be tempting to favour traits. This isn’t a good idea and you should try to describe interactions within your code and with other developers via an API described in interfaces.
Once you’ve described your interface, a trait can implement the interface in the same manner as classes do, through the use of the implements keyword:
interface Locomotion {
String getDescription()
}
trait Hopping implements Locomotion {
@Override
String getDescription() {
'hop hop hop'
}
}
101. Implementing multiple traits
As mentioned earlier, a class can implement more than one trait. This is straight-forward if the traits don’t intersect in terms of members (properties/fields/methods), as is the case in the example below:
trait Hopping {
String hop() { 'I am hopping' }
}
trait Climbing {
String climb() { 'I am climbing' }
}
class TreeKangaroo implements Hopping, Climbing {}
TreeKangaroo lumholtz = new TreeKangaroo()
println lumholtz.hop()
println lumholtz.climb()
There’s nothing too difficult in the TreeKangaroo example but what if the traits had methods with the same name? Let’s belabour the sporting example one last time!
I believe that the Triathlon consists of three parts - Running, Swimming, and Riding - and the example below sets up each of these as traits that implement the same interface:
interface Event {
void startEvent()
}
trait Running implements Event {
@Override
void startEvent() {
println 'Start the running event'
}
}
trait Swimming implements Event {
@Override
void startEvent() {
println 'Start the swimming event'
}
}
trait Riding implements Event {
@Override
void startEvent() {
println 'Start the riding event'
}
}
class Triathlon implements Running, Swimming, Riding {
}
Triathlon competition = new Triathlon()
competition.startEvent()
It’s easy to see that the Triathlon class now has three possibilities when competition.startEvent() is called. In this scenario, Groovy will use the trait that was declared last - Riding. I’ve listed my traits in the order I want to run the events but I really do want to run all three events.
Groovy lets me manually determine how the colliding trait members will be treated. First of all, the Triathlon class will need to provide its own void startEvent() method. Then each trait’s startEvent() method will need to be called using the <TraitName>.super. prefix - e.g. Running.super.startEvent().
In the improved Triathlon example below you’ll notice that I’ve decided to implement the Event interface as a triathlon is an event consisting of three events:
class Triathlon implements Event, Running, Swimming, Riding {
@Override
void startEvent() {
Running.super.startEvent()
Swimming.super.startEvent()
Riding.super.startEvent()
}
}
This will now give me the three-stage event I was after.
Before leaving this topic, there are some things to note about the example:
- The traits don’t have to implement the same interface, there just needs to be a collision in one or more of the trait members
- I didn’t have to override the
startEventmethod - I could have used any name - but that would return to Groovy’s default of using thestartEventmethod of the last trait declared - Use of the
<TraitName>.super.prefix doesn’t have to occur just in cases of a collision - you may just use it to clarify a section of code. - Concepts such as overriding and
superwill be covered more fully in the chapter on Inheritance.
102. The Shapes demo - Traits
The Sides trait is based on the notion that a two-dimensional shape consists of a set of sides (edges). In most cases there’d be at least 3 sides to a 2D shape (circles being the exception with 1 side) and it’s possible to determine a shape’s perimeter by adding up the lengths of the sides. In the Sides trait I wanted to provide classes with the ability to name each side using a single lower-case letter (e.g. a, b, c) and associate the side’s length.
Let’s take a look at the code for the Sides trait and then examine its components.
Sides traitpackage org.groovy_tutorial.shapes
/**
* A basic trait describing the outer edges (sides) of a 2D shape.
*
* This trait uses the missingProperty method to allow implementations
* to define sides using lower case characters (e.g. a, b, c). These properties \
must:
* <ul>
* <li>Be a single, lower-case character (matching Sides.SIDE_NAME_PATTERN)<\
/li>
* <li>Be only assigned a positive numeric value</li>
* </ul>
*
* Once getPerimeter is called, the sides map is locked down and can't be modifi\
ed.
*
* @author Duncan Dickinson
*/
trait Sides {
/** Defines the acceptable naming strategy for sides */
static final SIDE_NAME_PATTERN = /[a-z]/
/** Used to hold the named list of sides */
private final Map sideMap = [ : ]
/** The perimeter, as determined by the sum of the sides */
private BigDecimal perimeter = null
/**
* Calculates the perimeter of the shape (once).
* After calling this method, the sides are locked down and you can't add or\
edit them
* via propertyMissing
* @return the sum of the sideMap (the perimeter)
*/
BigDecimal getPerimeter() {
perimeter = perimeter ?:sideMap.values().sum().toBigDecimal()
}
/**
* @return a CLONE of the sideMap
*/
Map getSideMap() {
sideMap.clone() as Map
}
/**
* Gets the value for a named side
* @param name the name of the side (e.g. a, b, c)
* @return the value of the side
* @throws MissingPropertyException if name not found
*/
def propertyMissing(String name) throws MissingPropertyException {
if (name.matches(SIDE_NAME_PATTERN)) {
return sideMap.get(name)
}
throw new MissingPropertyException("Property $name not found")
}
/**
* Sets the length (value) for a named side
* @param name the name of the side
* @param value the length of the side
* @return the value back to the caller
* @throws ReadOnlyPropertyException if the perimeter has been calculated
* @throws IllegalArgumentException if the value <= 0
* @throws MissingPropertyException if name doesn't match SIDE_NAME_PATTERN
*/
def propertyMissing(String name, value)
throws ReadOnlyPropertyException, IllegalArgumentException, MissingP\
ropertyException {
if (name.matches(SIDE_NAME_PATTERN)) {
if (perimeter) {
throw new ReadOnlyPropertyException(name, Sides)
}
if (value in Number) {
ShapeUtil.checkSidesException(value)
sideMap.put(name, value as Number)
return sideMap.get(name)
}
throw new IllegalArgumentException("The value [$value] is not a posi\
tive number.")
}
throw new MissingPropertyException("Property $name not found")
}
}
Reviewing the code you’ll see:
- Each side will be added to the
sideMapwith a lower-case letter as the key and the side’s length as the value- The
SIDE_NAME_PATTERNprovides a very basic pattern to limit the acceptable keys - The
getSideMap()will return a clone1 ofsideMap- this helps protect the property from changing externally to the trait.
- The
- The
perimeterfield will hold the perimeter of the shape- This is calculated via the
getPerimeter()method (more on this in a moment) - Note how the perimeter is calculated only once
- This is calculated via the
Aside from the items listed above, you’ll notice two versions of the propertyMissing method. This is a special Groovy method that is called when a getter or setter is called on a property that doesn’t exist. The propertyMissing(String name) is called when code attempts to access (get) a non-existent property and propertyMissing(String name, value) is called when an attempt is made to mutate (set) a non-existent property. The getter is reasonably straight-forward as it just checks that the requested property name matches the SIDE_NAME_PATTERN and, if so, tries to access the property from sideMap.
The setter version of propertyMissing is a little more complex and, stepping through the method, we can see:
- The requested property
namemust matchSIDE_NAME_PATTERN - If the
perimeterhas already been calculated we throw an exception assideMapis locked down onceperimeterhas been set - The
valuefor the side (it’s length) must be aNumber - A utility method
ShapeUtil.checkSidesExceptionis called to ensure thatvalue > 0as we don’t want negative- or zero-length sides - Once all of those preconditions are met the property can be set
All of this results in the Sides trait providing implementing classes with not only the ability to store a list of sides and calculate the perimeter but also lets them use a nice letter-based notation for the sides.
Both the Triangle and Rectangle classes implement the Sides trait as well as the TwoDimensionalShape interface. By implementing Sides, these classes are provided with an implementation of the getPerimeter() method required by the TwoDimensionalShape interface.
We can see the interaction between the a shape class and the Sides trait by examining the Rectangle class:
Rectangle classpackage org.groovy_tutorial.shapes
import groovy.transform.EqualsAndHashCode
import groovy.transform.ToString
/**
* Describes a rectangle
*
* @author Duncan Dickinson
*/
@EqualsAndHashCode(includes = 'length,width')
@ToString(includeNames = true, includeFields = true, includePackage = true)
class Rectangle implements TwoDimensionalShape, Sides {
private static final String SHAPE_NAME = 'Rectangle'
/** The area of the rectangle */
final BigDecimal area
/**
*
* @param length
* @param width
* @throws IllegalArgumentException if one of the sides <= 0
*/
Rectangle(Number length, Number width) throws IllegalArgumentException {
a = length
b = width
c = length
d = width
//Calling this causes the Sides trait to calculate the perimeter
//and lock off its sideMap
this.perimeter
this.area = length * width
}
@Override
String getDisplayInfo() {
"$SHAPE_NAME: length = $a; width = $b; perimeter = $perimeter; area = $a\
rea"
}
@Override
String getShapeName() {
SHAPE_NAME
}
}
Most of Rectangle’s use of the trait is seen in the constructor as we set the sides of the rectangle though a really easy-to-understand notation:
a = length
b = width
c = length
d = width
The use of the Sides trait means that instances of Rectangle can use notation such as myRectangle.a.
The Rectangle constructor also calls this.perimeter so as to calculate the perimeter - not because we specifically need it in the constructor but because it locks down the set of sides for the rectangle instance.
- Cloning was mentioned previously↩
103. Inheritance
Inheritance provides a strategy for building up new types by drawing upon existing implementations. In Groovy this focuses on the class structure and we can use inheritance to create a class that builds on and refines the concepts defined in another class. This approach is supported by the interface structure for defining programming interfaces and the traits structure for encapsulating abilities or features that could be applicable to one or more classes.
The options available in Groovy for combining these three structures are as follows:
- Interfaces can:
- Implement zero or more interfaces
- Traits can:
- Implement zero or more interfaces
- Implement zero or more traits
- Classes can:
- Implement zero or more interfaces
- Implement zero or more traits
- Extend zero or one class
The extends keyword is the gateway to inheritance in Groovy and the spartan example below demonstrates a how a we declare that a class (SuperHero) will inherit from another class (Person):
class Person {}
class SuperHero extends Person {}
Some inheritance theory
Before we go much further into how inheritance is undertaken I’d like to explore some background aspects that are worth your consideration.
- Subclass and superclass
- When
ChildClassinherits fromParentClass, we say thatChildClassis a subclass ofParentClassand thatParentClassis a superclass ofChildClass - Overriding
- When
ChildClasssubtypesParentClassandChildClassprovides a method with the same signature as a method declared inParentClass(or a supertype thereof and so on) then that method is said to beoverridden. - Overriding provides a mechanism for the subtype to provide a more specific implementation than the supertype’s.
- Single and multiple inheritance
- Groovy supports single inheritance which means that a class can only be a subclass of a single superclass.
- Other languages, such as C++, allow for multiple inheritance and this allows a class to have more than one superclass.
- Multiple inheritance can suffer from the diamond problem in which the multiple paths through which subtyping occurs can make it difficult to determine the origin of an overridden method.
- Groovy’s class inheritance, being based in single inheritance, doesn’t suffer from this problem as there is only one path back through the hierarchy.
- However, Groovy classes can implement multiple traits and this can lead to the same problems encountered in multiple inheritance. The two approaches to resolving this (manual- or automatic-resolution) were discussed in the chapter on Traits.
- Implementation inheritance or interface inheritance
- Inheritance is often viewed through two facets: implementation inheritance or interface inheritance.
-
Interface inheritance occurs when the implements keyword is used by a class to inherit an
interface. - Implementation inheritance occurs when the extends keyword is used by a class to inherit from another class.
- As an interface contains no implementation the implementing class can’t be “injured” through its association with the interface unless the author of the interface changes the method signatures. This shouldn’t happen if the interface is well designed. The class implementing the interface is wholly responsible for the implementation details for the interface’s methods.
- A subclass can be significantly injured by changes in the superclass as implementation inheritance reuses the parent class’s implementation and this is a form of coupling that can silently introduce bugs into your program.
- The lure of reuse through implementation inheritance is often in its perceived time-saving value. However, as requirements change and the classes are refactored and other changes made, the use of implementation inheritance can create a house of cards. Interface inheritance, by not passing through implementation, avoids this.
- Composition can combine the benefit of reuse seen in implementation inheritance with the flexibility and independence of interface inheritance.
- Aim to use interface inheritance heavily and implementation inheritance sparingly.
- Leaky implementation/abstraction
- Inheritance may help in terms of code-reuse but it’s important to make sure that a class correctly encapsulates the desired concepts and doesn’t suffer from implementation leakage. As a superclass gets more complex or the subtype hierarchy gets deeper, implementations from higher-level supertypes start to build up and the lower-level subclasses end up with a large number of methods that may have no utility to that class. This will also blow out the number of tests you’ll need.
- Composition
- The super-/sub-class association in implementation inheritance works well when the subclass truly is a refined definition (subtype) of the superclass. I find that the relationship usually breaks down once the superclass becomes quite complex and the leaks start to pour out. If you find that you’re constantly changing a superclass in order to resolve issues in a subclass it’s probably time to rethink the design and consider composition.
- In composition the candidate superclass is used as a member variable of the candidate subclass. Instead of using
extends, the subclass just declares a member variable (a property or field) that holds an instance of the candidate superclass. At that point the candidate superclass isn’t actually a superclass, it’s just a member variable. - Sometimes human language leads us astray and the notion of a
StudentClassListmakes us think that such a class couldextendan existingListimplementation. However, it’s likely thatStudentClassListreally just needs aListas a member variable and will provide a set of methods to manage the business logic around the list. - It is often safer to use composition instead of inheritance if you’re considering creating a subclassing a class in a package that you don’t have control over. Whilst your class might just be a wrapper class brokering the interaction between its interface and the member variable, this is very useful if the other class changes.
- It can be tempting to use implementation inheritance to “pass down” useful instance methods. Where this occurs it’s likely to be more useful take the composition approach or consider providing such methods as
static, especially if the method logic is broadly useful.
A quick web search on these topics will yield a wealth of articles that will help you refine your practice. I’d also recommend “Effective Java (2nd edition)” by Joshua Bloch as a great starting place.
104. Subclassing
As we saw in the previous chapter, the extends keyword announces that a class is a subclass of another:
class Person {}
class SuperHero extends Person {}
Let’s put something a little more useful together:
class Person {
String name
String toString() {
"Name: $name"
}
}
class SuperHero extends Person {
String superHeroName
String toString() {
"Name: $superHeroName (alias: $name)"
}
}
SuperHero groovyMan = new SuperHero(name: 'Gary Grails', superHeroName: 'Groovy \
Man!')
println groovyMan
In the expanded example you can see the following:
- The
Personclass is much like we’ve seen previously - it provides anameproperty and atoString()method -
SuperHeroextendsPerson:- By extending
Person, the SuperHero class has (inherits) thenameproperty -
SuperHeroalso has asuperHeroNameproperty - An implementation of
toString()is provided to give more details about the hero
- By extending
In order to create a new instance of SuperHero, the Groovy-supplied constructor is called and the name and superHeroName properties set:
new SuperHero(name: 'Gary Grails', superHeroName: 'Groovy Man!')
The script will output:
Name: Groovy Man! (alias: Gary Grails)
At this point the SuperHero class demonstrates two aspects of inheritance:
- Subclasses inherit the superclass’s properties and these are accessible to the subclass’s instances
- By providing a
toStringmethod that has the same signature as the superclass,SuperHerois said tooverridethe supertype’s declaration of the method.
The next example builds just slightly on the previous:
super on a SuperHeroclass Person {
String name
String toString() {
"Name: $name"
}
}
class SuperHero extends Person {
String superHeroName
@Override
String toString() {
"Name: $superHeroName\nAlias:\n ${super.toString()}"
}
}
SuperHero groovyMan = new SuperHero(name: 'Gary Grails', superHeroName: 'Groovy \
Man!')
println groovyMan
The script will output:
Name: Groovy Man!
Alias:
Name: Gary Grails
- The
@Overrideannotation signals that thetoStringmethod provided inSuperHerois overriding a method defined by the superclass.- This is a helpful annotation as Groovy will throw a compilation error if no pre-defined method signature exists - for example, if I mistyped the method as
tooString. - In fact I could have used the
@Overrideannotation in thePersonclass as well becausetoStringis a method defined injava.lang.Object, the superclass for all Groovy classes.
- This is a helpful annotation as Groovy will throw a compilation error if no pre-defined method signature exists - for example, if I mistyped the method as
- The
SuperHeroimplementation oftoStringincludes the call tosuper.toString(). Thesuperkeyword allows subclasses to specifically access the superclass’s methods and member variables (properties and fields) 1
It is possible to access the superclass’s constructors from within a subclass constructor:
super in a constructorclass Person {
String name
Person(String name) {
this.name = name
}
}
class SuperHero extends Person {
String superHeroName
SuperHero(String name, String superHeroName) {
super(name)
this.superHeroName = superHeroName
}
}
SuperHero groovyMan = new SuperHero('Gary Grails', 'Groovy Man!')
assert groovyMan.name == 'Gary Grails'
assert groovyMan.superHeroName == 'Groovy Man!'
The call to super(name) invokes a call to the Person(String name) constructor and Groovy determines the matching constructor by the parameters being passed. Importantly, the call to the superclass constructor (super()) must occur first - before any other statements in the constructor.
Type comparison
The in operator2 makes it possible to determine if one class extends another class or implements an interface or a trait. The example below demonstrates a set of checks against the SuperHero class
class Person {}
interface SuperPower {}
trait Flying implements SuperPower {}
class SuperHero extends Person implements Flying {}
assert SuperHero in Object
assert SuperHero in Person
assert SuperHero in Flying
assert SuperHero in SuperPower
Where the example above investigates the SuperHero class, the example below is somewhat more useful as it checks to see what’s available to a variable (superGroovy):
class Person {}
interface SuperPower {}
trait Flying implements SuperPower {}
class SuperHero extends Person implements Flying {}
def superGroovy = new SuperHero()
assert superGroovy in Person
assert superGroovy in SuperHero
assert superGroovy in SuperPower
assert superGroovy in Flying
assert superGroovy.class == SuperHero
The ability to check superGroovy in Flying is useful before we push superGroovy off a building and expect him not to hit the pavement!
- We also saw
superin the chapter on traits when considering a trait that implements other traits.↩ - Refer back to the chapter on Object Operators↩
105. Final Classes and Methods
A class marked with the final modifier cannot be extended (subclassed) by another class. In the example below we draw a line at SuperHero and the attempt to create a SuperSuperHero will cause a compilation error:
final cannot be extendedclass Person {
//...
}
final class SuperHero extends Person {
//...
}
//This isn't allowed as SuperHero is declared as final
class SuperSuperHero extends SuperHero {
//...
}
Why do this? Whilst reuse is highly regarded in programming it’s important to keep good encapsulation and code maintainability in mind. By marking a class as final we can lock down the implementation and ensure that no-one is tempted into believing that we’ll support their subclass implementation.
When a method is marked as final it cannot be overridden. This is very useful if you want to block future implementations from altering the implementation. In the example below, the getName method in SuperHero is marked as final and the attempt by the BizarroSuperHero to override it will cause a compilation error:
final cannot be overriddenclass Person {
private String name
final setName(name) {}
}
class SuperHero extends Person {
final String getName() {
'Unknown'
}
}
class BizarroSuperHero extends SuperHero {
//This will NOT be allowed:
String getName() {
name
}
}
Importantly, marking a method as final does not transfer to its overloaded siblings. In the example below, I try to protect my hero’s identity but am not thorough enough:
final cannot be overriddenclass Person {
String name
}
class SuperHero extends Person {
final String discoverName() {
'Unknown'
}
String discoverName(Boolean mindRead) {
'Unknown'
}
final setName(name) {}
}
class BizarroSuperHero extends SuperHero {
//This WILL be allowed:
@Override
String discoverName(Boolean mindRead) {
name
}
}
def batBoy = new BizarroSuperHero(name: 'Bryce Rain')
assert batBoy.discoverName() == 'Unknown'
assert batBoy.discoverName(true) == 'Bryce Rain'
In that last example, the BizarroSuperHero can’t override String discoverName() but is allowed to override String discoverName(Boolean mindRead). If I’d been thorough in my information hiding attempts I’d have marked all discoverName methods as final or been really certain and marked SuperHero as final.
106. Abstract classes
When a class is marked with the abstract modifier it cannot be instantiated. The code below will cause a compilation error:
abstract class Thing {}
def myObj = new Thing()
The main reason you would create an abstract class is to establish a base class for a number of subclasses. This is somewhat similar to an interface as abstract classes usually also define one or more method signatures that need to be implemented. Unlike interfaces, abstract classes can provide a mix of method signatures and method implementations.
The abstract modifier can be attached to a method signature to indicate that a subclass will need to provide an implementation for the method. A class containing an abstract method must also be marked as abstract. In the code below, the abstract Thing class provides an abstract describe() method signature which is then implemented in the Blob subclass:
abstract class Thing {
abstract String describe()
@Override
String toString() {
'This is a thingy'
}
}
class Blob extends Thing {
String describe() {
'I am an amorphous blob'
}
}
def myObj = new Blob()
assert myObj.describe() == 'I am an amorphous blob'
Some things to keep in mind:
- Abstract classes can implement interfaces and traits
- The abstract class may choose not to provide an implementation of some or all of the interface methods - any missing implementations must be provided by the class extending the abstract class.
- You can provide class (static) methods in an abstract class - however,
staticmethods can’t be abstract. - An abstract class can extend (subclass) another abstract class
- The subclass doesn’t need to implement any/all of the abstract methods of the superclass - the responsibility is passed down to a non-abstract subclass
- This option is rarely useful and interfaces are likely to be a better approach
Before committing to an abstract class it’d be well worth your time determining if a combination of an interface and a “base” concrete class; or an interface and a trait; or just an interface; wouldn’t be more flexible. If you’re wanting to create a subtype then it’d be worth using an interface for this purpose and then implementing a concrete base class. In some cases an abstract class is just used to provide class methods but it is likely that a utility class containing these methods is a better idea.
107. The Shapes demo - Inheritance
The class hierachy for the Shapes demo is provided below:
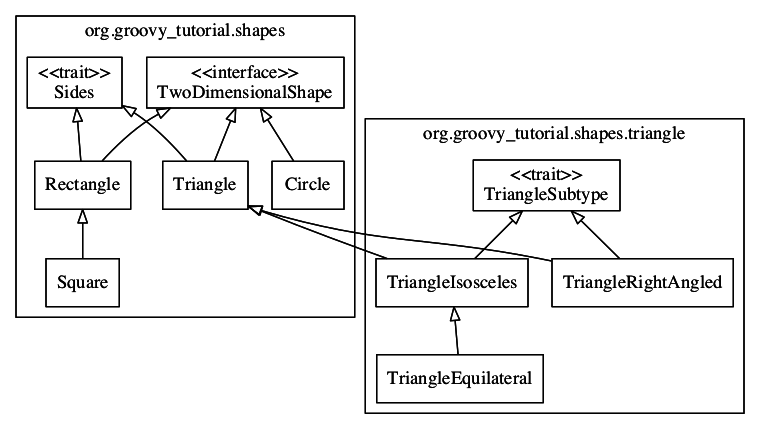
Inheritance is used in a number of places:
- The
Squareclass is a subclass ofRectangleas squares are a special type of rectangle in which all four sides have the same length.-
Squaredoesn’t need to do much over the already providedRectangleclass
-
- The
Triangleclass is extended by two subtypes:TriangleRightAngledandTriangleIsosceles-
TriangleEquilateralis a subclass ofTriangleIsosceles
-
The three Triangle subtypes encapsulate specific refinements such as the definition of the sides and refinement of the calculateArea calculation. By making calculateArea a static method, each subtype makes the calculation easily available to other code as well as tying the calculateArea instance method to the static method.
The Square, TriangleRightAngled and TriangleEquilateral classes are both declared as final because I decided they couldn’t be refined any further. This is an important aspect to designing/developing classes: only allow for inheritance if you will support it. By marking these classes as final I’ve indicated that the implementations can’t/shouldn’t be further enhanced. Naturally, another developer could extend Triangle with their own implementation as it isn’t marked as final because I believe Triangle to be a sound generic basis for describing triangles.
X Going further
108. Other Topics
This book can’t cover everything but hopefully it’s shown you a solid body of Groovy skills that will get you started. In this chapter I’ll very briefly touch on a few additional items that you may be interested in and give you some links to help you research further.
Type Checking
Groovy doesn’t check data types at compile time. Thinking of Groovy as a dynamic language helps you see why this may be the case - variables could be changing types as they move through the system and my code can use approaches such as duck typing to focus on behaviours rather than types. However, you may want to be specific about types and catch incorrect type allocations at compile time.
Consider the following code:
class Person {
String id
Integer getId() {id}
}
def pete = new Person(id: 12.3)
println pete.id
Groovy will compile this code with groovyc but when you try to run the code you’ll get a Groovy runtime exception (org.codehaus.groovy.runtime.typehandling.GroovyCastException) when we try to return 12.3 from getId - Groovy handles converting 12.3 to the id field as it’s a String but fails when trying to convert that String into an Integer. Naturally I could have written the Person class to be a lot more dynamic but you can also see that I’ve mucked around my types by declaring id as a String but return an Integer from its getter.
The @groovy.transform.TypeChecked annotation can be applied to the class to make sure types are checked at compilation time:
@groovy.transform.TypeChecked
class Person {
String id
Integer getId() {id}
}
def pete = new Person(id: 12.3)
println pete.id
Instead of a runtime exception I now get a compile-time error for trying to return an Integer from getId(). If I only want to have
type checking performed on a specific method, I can just annotate that method:
class Person {
String id
@groovy.transform.TypeChecked
Integer getId() {id}
}
def pete = new Person(id: 12.3)
println pete.id
For more information please refer to the Static type checking and Type checking extensions sections in the Groovy documentation.
Static Compilation
The @groovy.transform.CompileStatic annotation combines the functionality of @groovy.transform.TypeChecked with direct method invocation. Essentially, this removes the need for the Groovy runtime to be involved when using statically compiled classes and methods.
For more information please refer to the Static compilation section in the Groovy documentation. 10 things your static language can’t do, Compiling groovy code statically, and the Java Performance Tuning Guide are also good reads.
Metaprogramming
In the Shapes demo I touched very briefly on metaprogramming when I used the propertyMissing method to provide properties at runtime. That only glanced the surface of what’s possible and, by digging deeper you’ll discover how to:
- Use the
invokeMethodandmethodMissingmethods ofgroovy.lang.GroovyObjectto let your class handle and provide methods on-the-fly - Intercept method calls with
groovy.lang.GroovyInterceptable - Access another class’s
MetaClassto add methods
That last item lets you extend the functionality of existing classes - here’s a silly example:
Number.metaClass.addSeven << {
delegate + 7
}
Number n = 10
assert 27 == 20.addSeven()
For more information please refer to the Metaprogramming section in the Groovy documentation.
Generics
Generics allow classes, interfaces or methods to adapt to an instance-specified data type. You most often see generics used with collections such as Lists and Maps. The following snippet uses the diamond notation (<>) to indicate that the nums list should contain subtypes of Number:
List<Number> nums = [1, 2, 3, 4, 5]
However, Groovy isn’t overly respectful of generics and the following also works:
List<Number> nums = [1, 2, 3, 4, 'rabbit']
… so we can turn on type checking to catch my mistake:
@groovy.transform.TypeChecked
class NumberLister {
List<Number> nums = [1, 2, 3, 4, 'rabbit']
}
The Java Tutorial features a section on Generics and there’s a Generics in Java article in Wikipedia.
Inner Classes
Inner classes are classes that are declared within another class. Often used to improve encapsulation, you can
sometimes cause healthy debate when you ask “should I use an inner classes or a closure?”. In the example below I’ve decided that the Address inner class would be a useful way to handle the address field:
import groovy.transform.ToString
@ToString
class Person {
String name
Address address
@ToString
class Address {
String street
String suburb
String country
String prepareMailingSticker() {
"$name\n$street\n$suburb\n$country\n"
}
}
Person(name, street, suburb, country) {
this.name = name
this.address = new Address(street: street, suburb: suburb, country: coun\
try)
}
String getMailingSticker() {address.prepareMailingSticker()}
}
Person phil = new Person('Phil', '12 Smith St', 'Kimba', 'Australia')
println phil
print phil.mailingSticker
The Groovy documentation covers inner classes.
Single abstract methods
A number of classes related to responding to events implement an interface with a Single Abstract Method (SAM). Such interfaces have one method signature defined and this is usually focused on handling an event raised by an invoking class. A common example is a class such as a Button that handles user events such as a mouse click - the Button doesn’t necessarily know what you need it to do and it concerns itself more with presentation in the user interface.
Traditionally, Java developers would use what’s called an anonymous class. These are just written to handle the event but, as a class, aren’t useful as a more generic member of the codebase. This book hasn’t delved into them but Groovy supports anonymous classes and the example below will give you an indication of what one looks like:
interface Command {
public void handle(String eventTitle)
}
class Invoker {
private final commands = [ ]
void addReceiver(Command command) {
this.commands << command
}
private void event(String title) {
commands.each { cmd ->
cmd.handle(title)
}
}
void onClickEvent() {
event('Clicked')
}
void onDoubleClickEvent() {
event('Double Clicked')
}
}
def window = new Invoker()
window.addReceiver(new Command() {
public void handle(String eventTitle) {
println "I just received a '$eventTitle' event"
}
})
window.onClickEvent()
window.onDoubleClickEvent()
In the example above you’ll see that the window.addReceiver method is passed an interesting piece of syntax in new Command() {...}. An anonymous class is declared with the new keyword being invoked on an existing interface or class that the anonymous class will extend and then the body of the class is provided. For SAM interfaces this is usually what you can see in the example - a single-method anonymous class. As soon as you get an even moderately functional user interface you’ll start to see anonymous classes everywhere.
Luckily, Groovy allows you to use a closure instead of an anonymous class for SAM interfaces and this helps unclutter the code:
interface Command {
public void handle(String eventTitle)
}
class Invoker {
private final commands = [ ]
void addReceiver(Command command) {
this.commands << command
}
private void event(String title) {
commands.each { cmd ->
cmd.handle(title)
}
}
void onClickEvent() {
event('Clicked')
}
void onDoubleClickEvent() {
event('Double Clicked')
}
}
def window = new Invoker()
window.addReceiver { println "I just received a '$it' event" }
window.onClickEvent()
window.onDoubleClickEvent()
In the code above, Groovy transparently coerces the closure to the correct interface type. Prior to Groovy 2.2 you needed to cast the closure to the interface through use of the as keyword.
window.addReceiver { println "I just received a '$it' event" } as Command
The Groovy documentation has a section on SAMs and Wikipedia describes the Command Pattern on which this model of interaction is based.
Observable Maps
The ObservableMap, ObservableList and ObservableSet classes, located in the groovy.util package, can alert implementations of the java.beans.PropertyChangeListener interface when a member of the collection has changed. As PropertyChangeListener is a SAM interface, we can use closures:
PropertyChangeListenerdef myInfo = [ name: 'Jane',
pet : 'Mittens' ] as ObservableMap
myInfo.addPropertyChangeListener { evt ->
println "$evt.propertyName was changed: from $evt.oldValue to $evt.newValue"
}
myInfo.pet = 'Fido'
This models the Observer pattern.
Threads
The Thread class is used to create new execution threads in an application, allowing program tasks to work concurrently. Starting a thread requires passing the start method an implementation of java.lang.Runnable which, you guessed it, is a SAM interface:
Runnableprintln 'Start'
new Thread().start {
println 'This is a new thread'
}
println 'End'
The example above is somewhat Java-centric and Groovy’s addition of a static start(Closure closure) method to the Thread class avoids the need to call new Thread():
Thread.start {
println 'This is a new thread'
}
109. The great beyond
That covers most (not all) of the Groovy syntax. My goal was to introduce you to the “core” syntax of Groovy so that you can start programming with a good working knowledge in the language. From this point I hope you’ll find this book and the Groovy documentation to be essential companions in your Groovy programming efforts.
There are further Groovy features you may like to use in your projects:
- Develop a domain specific language
- Try your hand at metaprogramming
- Utilise various Groovy modules:
As I mentioned at the very beginning of this book, Groovy in Action (2nd Edition) is also a great reference for those wanting to go further.
Build large applications
Gradle is a build automation tool that should be your go-to when building non-trivial programs. In fact, I would suggest that checking out Gradle is a great next-step after reading this book.
For those coming from the Java world, Gradle is an excellent replacement for Apache Maven and Apache Ant.
Use the Groovy ecosystem
There are several high-quality projects that use Groovy, it’s worth checking them out:
-
Grails - a full-stack web application framework for the Java Virtual Machine
- That means it’s a great tool-set for building web applications
- Griffon - a desktop application toolkit
- Spock - a testing framework
- CodeNarc - a code analysis tool for Groovy
Whilst it’s not written in Groovy, the Spring Boot project is worth a look as you can use Groovy to quickly write some nifty applications using the Spring framework.
Appendix: The Shapes demo code listing
This chapter consists purely of the code listing for the Shapes demo. Please check out the Shapes demo mini site as it provides the source code and a range of other reports and information.
package org.groovy_tutorial.shapes
TwoDimensionalShape
package org.groovy_tutorial.shapes
/**
* An interface for basic two-dimensional objects
*
* @see <a href="https://en.wikipedia.org/wiki/List_of_two-dimensional_geometric\
_shapes">
* Wikipedia: List of two-dimensional geometric shapes</a>
*
* @author Duncan Dickinson
*/
interface TwoDimensionalShape {
/**
* The length of the path surrounding a 2D shape
* @see <a href="https://en.wikipedia.org/wiki/Perimeter">Wikipedia: Perimet\
er</a>
* @return the perimeter of the shape
*/
BigDecimal getPerimeter()
/**
* The extent of a 2D shape in a plane
* @see <a href="https://en.wikipedia.org/wiki/Area">Wikipedia: Area</a>
* @return the area of the shape
*/
BigDecimal getArea()
/**
* A handy display string
* @return a text representation of the shape
*/
String getDisplayInfo()
/**
* @return the name of the shape
*/
String getShapeName()
}
ShapeUtil
package org.groovy_tutorial.shapes
/**
* A general utility class
*
* @author Duncan Dickinson
*/
class ShapeUtil {
/**
* The shapes library supports sides of length > 0. This method helps check \
this.
* @param sides a series of parameters, each reflecting a side's length
* @return true if all sides are valid, false otherwise
*/
static boolean checkSides(Number... sides) {
for (side in sides) {
if (side <= 0) {
return false
}
}
true
}
/**
* Helper method - throws an exception if checkSides returns false
* @param sides a series of parameters, each reflecting a side's length
* @throws IllegalArgumentException if one of the sides <= 0
*/
static void checkSidesException(Number... sides) throws IllegalArgumentExcep\
tion {
if (!checkSides(sides)) {
throw new IllegalArgumentException('The side must be a positive numb\
er.')
}
}
}
Sides
package org.groovy_tutorial.shapes
/**
* A basic trait describing the outer edges (sides) of a 2D shape.
*
* This trait uses the missingProperty method to allow implementations
* to define sides using lower case characters (e.g. a, b, c). These properties \
must:
* <ul>
* <li>Be a single, lower-case character (matching Sides.SIDE_NAME_PATTERN)<\
/li>
* <li>Be only assigned a positive numeric value</li>
* </ul>
*
* Once getPerimeter is called, the sides map is locked down and can't be modifi\
ed.
*
* @author Duncan Dickinson
*/
trait Sides {
/** Defines the acceptable naming strategy for sides */
static final SIDE_NAME_PATTERN = /[a-z]/
/** Used to hold the named list of sides */
private final Map sideMap = [ : ]
/** The perimeter, as determined by the sum of the sides */
private BigDecimal perimeter = null
/**
* Calculates the perimeter of the shape (once).
* After calling this method, the sides are locked down and you can't add or\
edit them
* via propertyMissing
* @return the sum of the sideMap (the perimeter)
*/
BigDecimal getPerimeter() {
perimeter = perimeter ?:sideMap.values().sum().toBigDecimal()
}
/**
* @return a CLONE of the sideMap
*/
Map getSideMap() {
sideMap.clone() as Map
}
/**
* Gets the value for a named side
* @param name the name of the side (e.g. a, b, c)
* @return the value of the side
* @throws MissingPropertyException if name not found
*/
def propertyMissing(String name) throws MissingPropertyException {
if (name.matches(SIDE_NAME_PATTERN)) {
return sideMap.get(name)
}
throw new MissingPropertyException("Property $name not found")
}
/**
* Sets the length (value) for a named side
* @param name the name of the side
* @param value the length of the side
* @return the value back to the caller
* @throws ReadOnlyPropertyException if the perimeter has been calculated
* @throws IllegalArgumentException if the value <= 0
* @throws MissingPropertyException if name doesn't match SIDE_NAME_PATTERN
*/
def propertyMissing(String name, value)
throws ReadOnlyPropertyException, IllegalArgumentException, MissingP\
ropertyException {
if (name.matches(SIDE_NAME_PATTERN)) {
if (perimeter) {
throw new ReadOnlyPropertyException(name, Sides)
}
if (value in Number) {
ShapeUtil.checkSidesException(value)
sideMap.put(name, value as Number)
return sideMap.get(name)
}
throw new IllegalArgumentException("The value [$value] is not a posi\
tive number.")
}
throw new MissingPropertyException("Property $name not found")
}
}
Circle
package org.groovy_tutorial.shapes
import static java.lang.Math.PI
import groovy.transform.EqualsAndHashCode
import groovy.transform.ToString
/**
* Describes a circle
* @author Duncan Dickinson
*/
@EqualsAndHashCode(includes = 'radius')
@ToString(includeNames = true, includeFields = true, includePackage = true)
final class Circle implements TwoDimensionalShape {
private static final String SHAPE_NAME = 'Circle'
/** The radius of the circle */
final BigDecimal radius
/** The circle's perimeter (circumference) */
final BigDecimal perimeter
/** The circle's area */
final BigDecimal area
/**
*
* @param radius the radius of the circle (must be a positive number)
* @throws IllegalArgumentException if radius <= 0
*/
Circle(BigDecimal radius) throws IllegalArgumentException {
ShapeUtil.checkSidesException(radius)
this.radius = radius
this.perimeter = calculatePerimeter(radius)
this.area = calculateArea(radius)
}
/**
* Helper function - defers to calculatePerimeter
* @see #calculatePerimeter(Number)
* @param radius
* @return the circumference (perimeter)
* @throws IllegalArgumentException if radius <= 0
*/
static BigDecimal calculateCircumference(Number radius) throws IllegalArgume\
ntException {
calculatePerimeter(radius)
}
/**
* Calculates the perimeter of a circle using the formula: p = 2*Pi*r
* @param radius
* @return the perimeter
* @throws IllegalArgumentException if radius <= 0
*/
static BigDecimal calculatePerimeter(Number radius) throws IllegalArgumentEx\
ception {
ShapeUtil.checkSidesException(radius)
(2 * PI * radius) as BigDecimal
}
/**
* Calculates the area of a circle using the formula: a = Pi*r^2
* @param radius
* @return the area
* @throws IllegalArgumentException if radius <= 0
*/
static BigDecimal calculateArea(Number radius) throws IllegalArgumentExcepti\
on {
ShapeUtil.checkSidesException(radius)
(PI * radius**2) as BigDecimal
}
/**
* Calculates the circle's diameter using the formula: d = 2r
* @param radius
* @return the diameter
* @throws IllegalArgumentException if radius <= 0
*/
static BigDecimal calculateDiameter(Number radius) throws IllegalArgumentExc\
eption {
ShapeUtil.checkSidesException(radius)
(radius * 2) as BigDecimal
}
@Override
String getDisplayInfo() {
"$SHAPE_NAME: radius = $radius; diameter = $diameter; \
circumference = ${circumference}; area = ${area}"
}
/**
* Just a convenience - equivalent to getPerimeter
* @return the circumference
*/
BigDecimal getCircumference() {
perimeter
}
/**
* A pseudo getter
* @return the diameter
*/
Number getDiameter() {
calculateDiameter(this.radius)
}
@Override
String getShapeName() {
SHAPE_NAME
}
}
Rectangle
package org.groovy_tutorial.shapes
import groovy.transform.EqualsAndHashCode
import groovy.transform.ToString
/**
* Describes a rectangle
*
* @author Duncan Dickinson
*/
@EqualsAndHashCode(includes = 'length,width')
@ToString(includeNames = true, includeFields = true, includePackage = true)
class Rectangle implements TwoDimensionalShape, Sides {
private static final String SHAPE_NAME = 'Rectangle'
/** The area of the rectangle */
final BigDecimal area
/**
*
* @param length
* @param width
* @throws IllegalArgumentException if one of the sides <= 0
*/
Rectangle(Number length, Number width) throws IllegalArgumentException {
a = length
b = width
c = length
d = width
//Calling this causes the Sides trait to calculate the perimeter
//and lock off its sideMap
this.perimeter
this.area = length * width
}
@Override
String getDisplayInfo() {
"$SHAPE_NAME: length = $a; width = $b; perimeter = $perimeter; area = $a\
rea"
}
@Override
String getShapeName() {
SHAPE_NAME
}
}
Square
package org.groovy_tutorial.shapes
import groovy.transform.EqualsAndHashCode
import groovy.transform.ToString
/**
* Describes a square
*
* @author Duncan Dickinson
*/
@EqualsAndHashCode(callSuper = true)
@ToString(includeNames = true, includeFields = true, includePackage = true, incl\
udeSuper = true)
final class Square extends Rectangle {
private static final String SHAPE_NAME = 'Square'
/**
* @param length
* @throws IllegalArgumentException if one of the sides <= 0
*/
Square(Number length) throws IllegalArgumentException {
super(length, length)
}
@Override
String getDisplayInfo() {
"$SHAPE_NAME: length = ${a}; perimeter = $perimeter; area = $area"
}
}
Triangle
package org.groovy_tutorial.shapes
import groovy.transform.EqualsAndHashCode
import groovy.transform.ToString
import groovy.util.logging.Log
/**
* Describes a generic triangle.
*
* For more specific types, use a class from {@link org.groovy_tutorial.shapes.t\
riangle}
*
* @author Duncan Dickinson
*/
@Log
@EqualsAndHashCode(includes = 'sideMap')
@ToString(includeNames = true, includeFields = true, includePackage = true)
class Triangle implements TwoDimensionalShape, Sides {
static final String SHAPE_NAME = 'Triangle'
final BigDecimal area
/**
* Configures the sides (a, b, c) of the triangle and calls the perimeter pr\
operty
* of the Sides trait in order to make the sides (mostly) immutable and lock\
in
* the perimeter calculation
*
* The protected calculateArea method is called to determine the area of the
* triangle. The result is assigned to the <code>area</code> field.
*
* @param a One of the triangle's three sides
* @param b One of the triangle's three sides
* @param c One of the triangle's three sides
* @throws IllegalArgumentException if one of the sides <= 0
*/
Triangle(Number a, Number b, Number c) throws IllegalArgumentException {
this.a = a
this.b = b
this.c = c
//Calling this causes the Sides trait to calculate the perimeter
//and lock off its sideMap
this.perimeter
this.area = calculateArea()
}
/**
* Determines the area of this triangle.
* In this implementation we call the static calculateArea(a, b, c) method
*
* Subclasses can override this method if they feel they're able to provide a
* leaner calculation.
*
* @return the area
*/
protected BigDecimal calculateArea() {
calculateArea(a, b, c)
}
/**
* Uses Heron's formula to determine the area of the Triangle
*
* @see <a href="https://en.wikipedia.org/wiki/Heron%27s_formula">Wikipedia \
- Heron's Formula</a>
* @throws IllegalArgumentException if a, b or c are <= 0
*/
static final BigDecimal calculateArea(Number a, Number b, Number c) throws I\
llegalArgumentException {
log.info "Triangle.calculateArea was called with a=$a, b=$b, c=$c"
ShapeUtil.checkSidesException(a, b, c)
Number s = (a + b + c) / 2
Math.sqrt(s * (s - a) * (s - b) * (s - c))
}
@Override
String getDisplayInfo() {
"$SHAPE_NAME: Side A = $a; Side B = $b; \
Side C = $c; perimeter = $perimeter; area = $area"
}
@Override
String getShapeName() {
SHAPE_NAME
}
}
package org.groovy_tutorial.shapes.triangle
TriangleSubtype
package org.groovy_tutorial.shapes.triangle
import groovy.transform.SelfType
import org.groovy_tutorial.shapes.Triangle
/**
* A basic example of a targeted trait
*
* @author Duncan Dickinson
*/
@SelfType(Triangle)
trait TriangleSubtype {
/**
* Expects that implementations provide a value for the TRIANGLE_TYPE String
* @return a String representing the type of triangle
*/
String getTriangleType() {
TRIANGLE_TYPE
}
}
TriangleRightAngled
package org.groovy_tutorial.shapes.triangle
import groovy.transform.EqualsAndHashCode
import groovy.transform.ToString
import groovy.util.logging.Log
import org.groovy_tutorial.shapes.ShapeUtil
import org.groovy_tutorial.shapes.Triangle
/**
* A triangle made famous by Pythagoras
*
* @author Duncan Dickinson
*/
@Log
@EqualsAndHashCode(callSuper = true)
@ToString(includeNames = true, includeFields = true, includePackage = true, incl\
udeSuper = true)
final class TriangleRightAngled extends Triangle implements TriangleSubtype {
static final String TRIANGLE_TYPE = 'Right-angled'
/**
* Tell us the "other sides" and the hypotenuse will be determined for you!
* @param a one of the "other sides"
* @param b one of the "other sides"
* @throws IllegalArgumentException if one of the sides <= 0
*/
TriangleRightAngled(Number a, Number b) throws IllegalArgumentException {
super(a, b, calculateHypotenuse(a, b))
}
/**
* Determines the area of this triangle.
* In this implementation we call the static calculateArea(a, b) method
* @return the area
*/
@Override
protected BigDecimal calculateArea() {
calculateArea(a, b)
}
/**
* Determine a right-angled triangle's hypotenuse using Pythagoras' theorem
* @param a
* @param b
* @return the hypotenuse
* @throws IllegalArgumentException if a or b <= 0
*/
static Number calculateHypotenuse(Number a, Number b) throws IllegalArgument\
Exception {
ShapeUtil.checkSidesException(a, b)
Math.sqrt(a**2 + b**2)
}
/**
* Uses 0.5 * a * b
* @param a
* @param b
* @return the area
* @throws IllegalArgumentException if a or b <= 0
*/
static Number calculateArea(Number a, Number b) throws IllegalArgumentExcept\
ion {
log.info "TriangleRightAngled.calculateArea was called with a=$a, b=$b"
ShapeUtil.checkSidesException(a, b)
0.5 * a * b
}
@Override
String getDisplayInfo() {
"$TRIANGLE_TYPE ${super.displayInfo}"
}
}
TriangleIsosceles
package org.groovy_tutorial.shapes.triangle
import groovy.transform.EqualsAndHashCode
import groovy.transform.ToString
import groovy.util.logging.Log
import org.groovy_tutorial.shapes.ShapeUtil
import org.groovy_tutorial.shapes.Triangle
/**
* A triangle with two sides of equal length
*
* @see <a href="https://en.wikipedia.org/wiki/Isosceles_triangle">Wikipedia - I\
sosceles triangle</a>
*
* @author Duncan Dickinson
*/
@Log
@EqualsAndHashCode(callSuper = true)
@ToString(includeNames = true, includeFields = true, includePackage = true, incl\
udeSuper = true)
class TriangleIsosceles extends Triangle implements TriangleSubtype {
protected static String TRIANGLE_TYPE = 'Isosceles'
/**
* Create a triangle that has one base side and two equal sides (legs)
* @param a the base
* @param b the leg(s)
* @throws IllegalArgumentException if one of the sides <= 0
*/
TriangleIsosceles(Number base, Number leg) throws IllegalArgumentException {
super(base, leg, leg)
}
/**
* Determines the area of this triangle.
* In this implementation we call the static calculateArea(a, b) method
* @return
*/
@Override
protected BigDecimal calculateArea() {
calculateArea(a, b)
}
/**
* Calculates the area of an isosceles triangle using a simplified version o\
f Heron's formula
* @param base the base
* @param leg the leg(s)
* @return
* @see <a href="https://en.wikipedia.org/wiki/Isosceles_triangle#Area">Wiki\
pedia article</a>
* @throws IllegalArgumentException if base or leg <= 0
*/
static final BigDecimal calculateArea(Number base, Number leg) throws Illega\
lArgumentException {
log.info "TriangleIsosceles.calculateArea was called with base=$base, b=\
$leg"
ShapeUtil.checkSidesException(base, leg)
def height = Math.sqrt(leg**2 - (base**2 / 4))
base * (height / 2)
}
@Override
String getDisplayInfo() {
"$TRIANGLE_TYPE ${super.displayInfo}"
}
}
TriangleEquilateral
package org.groovy_tutorial.shapes.triangle
import groovy.transform.EqualsAndHashCode
import groovy.transform.ToString
import groovy.util.logging.Log
import org.groovy_tutorial.shapes.ShapeUtil
/**
* A triangle with three equal sides
*
* @see <a href="https://en.wikipedia.org/wiki/Equilateral_triangle">Wikipedia -\
Equilateral triangle</a>
*
* @author Duncan Dickinson
*/
@Log
@EqualsAndHashCode(callSuper = true)
@ToString(includeNames = true, includeFields = true, includePackage = true, incl\
udeSuper = true)
final class TriangleEquilateral extends TriangleIsosceles {
static final String TRIANGLE_TYPE = 'Equilateral'
/**
*
* @param a
* @throws IllegalArgumentException if a <= 0
*/
TriangleEquilateral(Number a) throws IllegalArgumentException {
super(a, a)
}
/**
* Determines the area of this triangle.
* In this implementation we call the static calculateArea(a) method
* @return the area
*/
@Override
protected BigDecimal calculateArea() {
calculateArea(a)
}
/**
* Calculates the area of an equilateral triangle
* @param a the edge (side) length
* @return the area
* @see <a href="https://en.wikipedia.org/wiki/Equilateral_triangle#Derivati\
on_of_area_formula">Wikipedia article</a>
* @throws IllegalArgumentException if a <= 0
*/
static BigDecimal calculateArea(Number a) throws IllegalArgumentException {
log.info "TriangleEquilateral.calculateArea was called with a=$a"
ShapeUtil.checkSidesException(a)
(Math.sqrt(3) / 4) * a**2
}
@Override
String getDisplayInfo() {
"$TRIANGLE_TYPE ${super.displayInfo}"
}
}
package org.groovy_tutorial.shapes.triangle
This package provides the basic command-line script (Main.groovy) for demonstrating the Shapes demo.
Main
package org.groovy_tutorial.shapes.app
import org.groovy_tutorial.shapes.Circle
import org.groovy_tutorial.shapes.Rectangle
import org.groovy_tutorial.shapes.Square
import org.groovy_tutorial.shapes.Triangle
import org.groovy_tutorial.shapes.triangle.TriangleEquilateral
import org.groovy_tutorial.shapes.triangle.TriangleIsosceles
import org.groovy_tutorial.shapes.triangle.TriangleRightAngled
def shapes = [
new Rectangle(10, 2),
new Square(4),
new Circle(8),
new Triangle(5, 8, 10),
new TriangleRightAngled(3, 4),
new TriangleIsosceles(2, 8),
new TriangleEquilateral(6) ]
println """
${'=' * 80}
Welcome to the Shapes demo
${'=' * 80}
"""
shapes.each {
println "${it.displayInfo}\n"
//println " - toString(): ${it.toString()}"
}
Colophon
I wish I had a 19th century engraving on the cover so that I could tell you about a really cool animal. If I did I would use the Pied butcherbird, perhaps accompanied with a picture from one of John Gould’s books. I would then tell you that this small-ish bird has a beautiful song and a really friendly composure. My resident (wild) butcherbirds like to sing on my deck when it’s raining, follow me when I mow and, occasionally, bathe under the sprinkler on hot days.